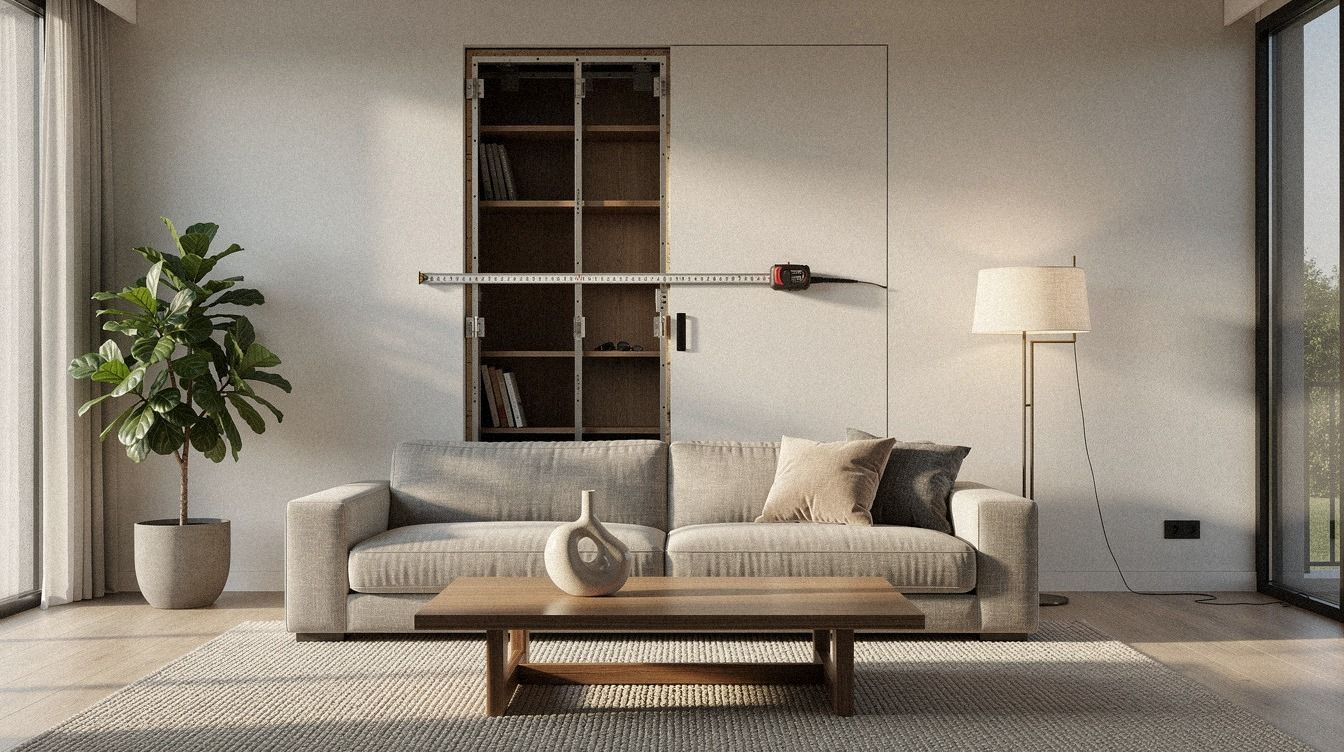
How to build a detail room in a small living room came down to one thing for me: I needed about 35 to 40 inches of honest depth and a wall that could still read as a normal living-room backdrop. I tried pretending the wall was fine. It wasn’t. So I built the hidden room around the sofa line, the sightlines, and one bookcase that could pass at first glance.
Here’s what it looked like before
Before I touched a stud, this wall had that flat, underused look you get when a living room is doing too little with too much square footage. The linen sofa sat about a rug’s width out from the wall, the art felt temporary, and the walkway to the side always looked like leftover space instead of a choice. If you’ve ever read this note on why a 200-square-foot living room gets colder every winter, you know the feeling: the room isn’t wrong, but it never settles.
What bothered me most was that the wall had no job. It wasn’t storage, it wasn’t architecture, and it definitely wasn’t memorable. I didn’t want a gimmick.
I wanted the room to feel older, quieter, and more intentional, the way a built-in bookcase wall does when it has weight and purpose. That’s why I stopped thinking about novelty and started thinking about millwork, paint, and traffic flow.
- I measured the wall with a 35-40 in reality check
- I mapped the door swing behind the sofa
- I framed the opening with 3/4-inch walnut plywood over flush studs
- I chose an IKEA BILLY-width case that could vanish
- Add caster wheels under the case
- I recessed the hinge inside the side panel
- I matched the trim to the living room
- I painted the seams in Sherwin-Williams Evergreen Fog SW 9130
- Test the push latch before drywall
- I hid the release behind an unlacquered brass knob
- I almost painted the back wall Farrow & Ball Hague Blue
- Layer low sconces along the reveal
- I placed a reading chair inside first
- I styled the bookcase to break the gaps
- I closed it until the wall disappeared
1I measured the wall with a 35-40 in reality check
I started with the dull part, because you can’t fake depth once the case is built. With the tape on the wall and a pencil mark at sofa height, I checked how much room I really had between the finished wall and the back line I could steal without wrecking the living-room proportions.
My sofa is in that standard 35-40 in depth range, so I used that as my first reality check. If your seating already feels bulky, you need the hidden room to borrow depth from the wall, not from your walkway.
Then I drew the bookcase outline right on the wall so I could see the width from across the room. That was the moment it clicked for me.
Honestly, that felt huge! Wide enough looked believable. Skinny looked theatrical.
I also kept glancing at this velvet-throw living-room piece because it reminds me how much scale changes warmth. You need your eye to believe the wall first, then the hidden room second.
2I mapped the door swing behind the sofa
Next I taped the door arc on the floor behind the sofa, and this is where most detail room diy plans get clumsy.
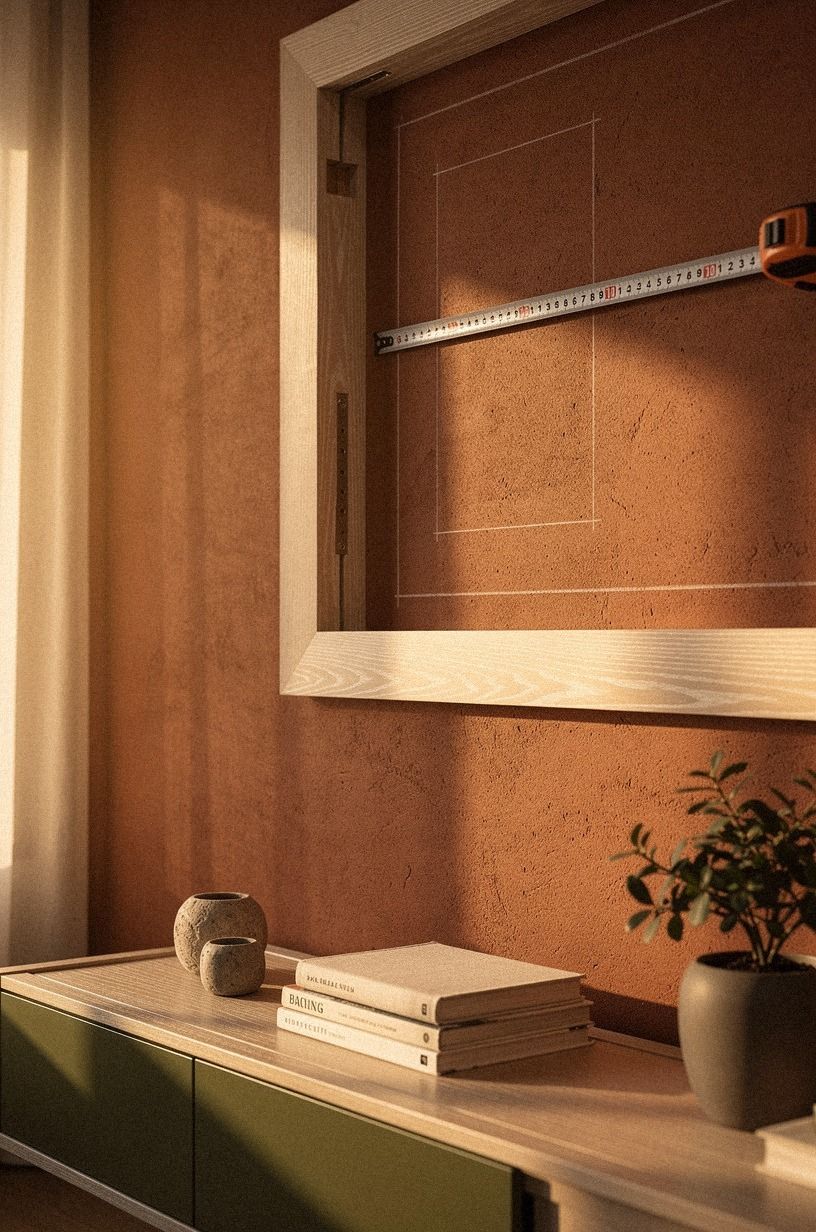
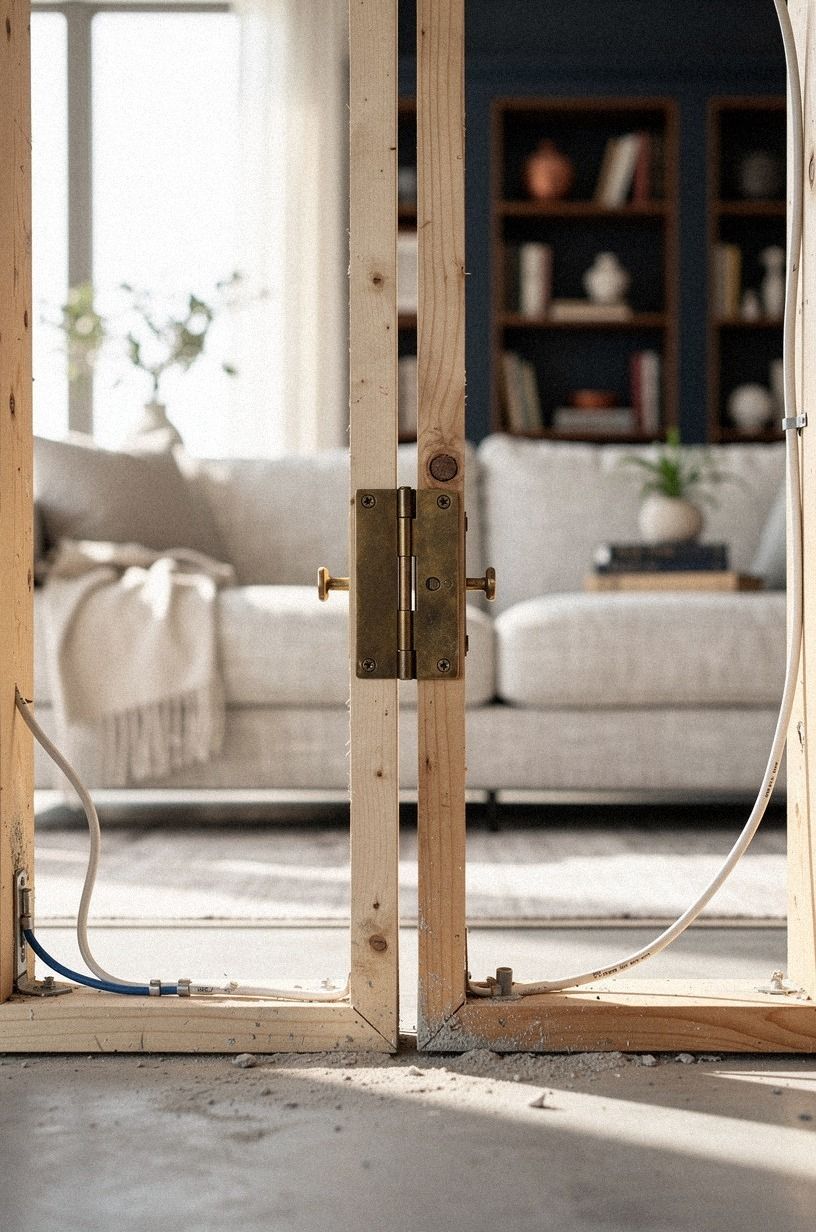
3I framed the opening with 3/4-inch walnut plywood over flush studs
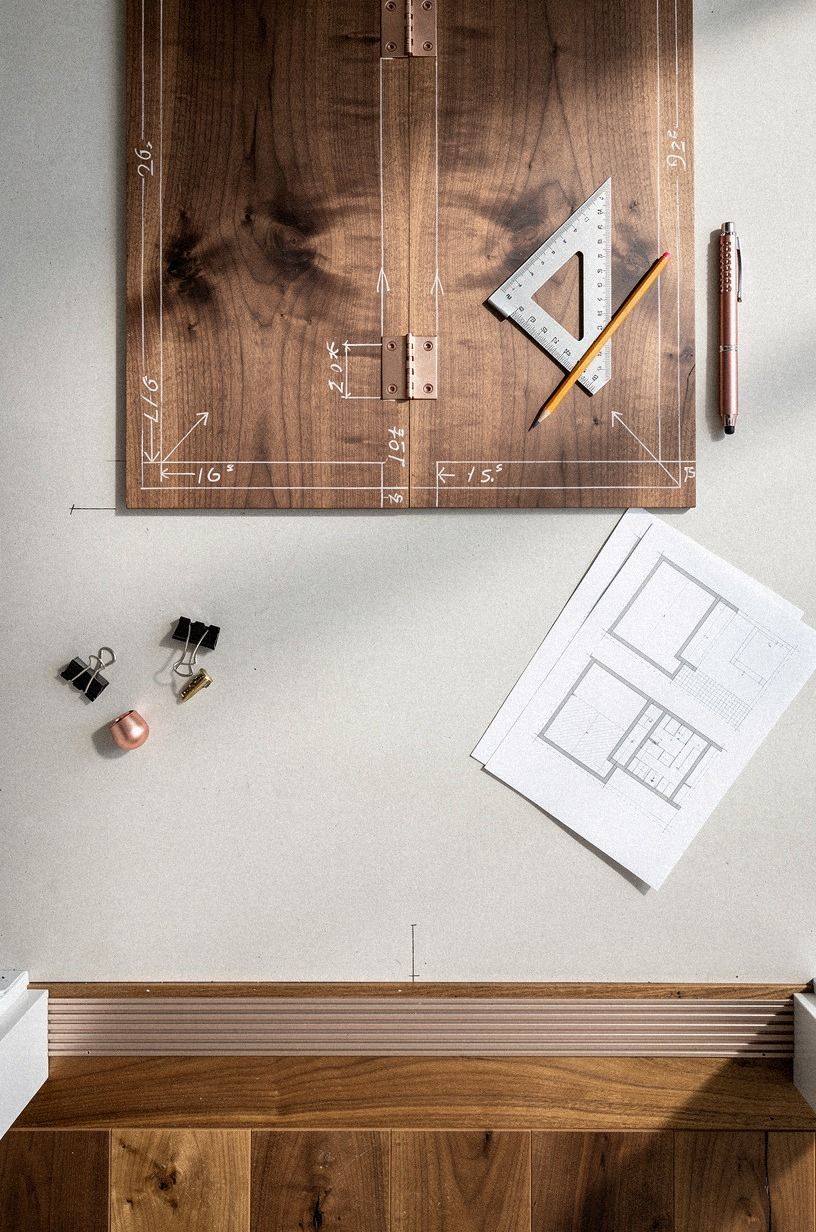
Framing was where the project stopped feeling like fantasy and started feeling expensive in a good way. I laid out the opening with flush studs, hinge blocking, and enough thickness for the case to sit proud only where I wanted trim to hide the transition. I used 3/4-inch walnut plywood for the visible planning mockup and regular framing lumber for the structure, because the face material matters visually and the hidden structure doesn’t need drama.
What mattered was keeping the frame dead flush. Not close.
Flush. If one side kicks out even a little, the reveal line will rat you out forever. I learned that the hard way on an older closet project, and I wasn’t going to repeat it.
And once I saw the overhead layout with the opening centered inside the stud map, the whole idea felt calmer. That’s when I knew the wall had a chance to disappear later.
4I chose an IKEA BILLY-width case that could vanish
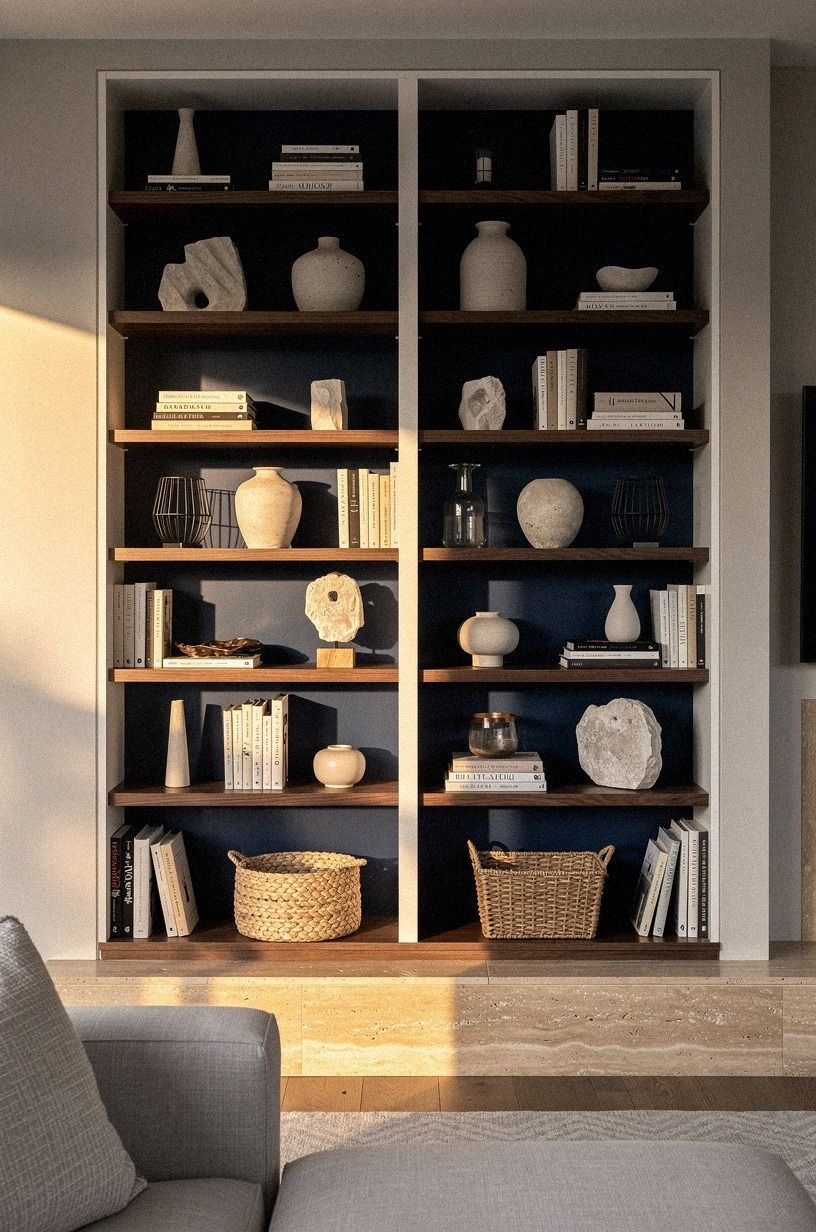
The bookcase choice made or broke the illusion, so I skipped the narrow decorative options and went straight to something that could read like real built-in storage. I kept this living-room warmth piece in mind because scale and softness need to work together, even on a bookcase wall.
For my living room, a wide case with even shelf spacing worked better than a tall skinny one because it matched the horizontal pull of the linen sofa and rug. If you’re figuring out how to make detail room storage believable, think like a cabinetmaker, not a magician.
I kept coming back to the proportions of an IKEA BILLY wall and then upgrading the finish in my head. Symmetry helped, but width helped more.
A bookcase that’s too petite looks apologetic. A bookcase with some authority looks planned.
I also liked that a wide face let me stagger books, bowls, and boxes later so the reveals didn’t read as reveals. You need enough surface to break the seams on purpose.
If you want a deeper reference, my hidden bar behind a bookcase guide walks through the same logic with spirits behind the shelves.
5Add caster wheels under the case
Caster wheels sound like a small hardware note, but they changed the whole build. The case was too heavy to trust on hinges alone, especially once I pictured it full of books, storage boxes, and a couple of weighty ceramic pieces.
I wanted the movement to feel guided, not dragged. So I hid the wheels underneath where they could carry the load without making the front edge look mechanical.
That part matters more than people think.
I also left room for the flooring transition so the wheels wouldn’t announce themselves with a bump every time the case moved. If your floor isn’t perfectly forgiving, test that before you finish anything. Really.
A disguised door that lurches isn’t elegant. It feels homemade in the wrong way.
Once the case rolled in a straight, quiet line, I knew the hidden opening could feel intentional instead of cute.
6I recessed the hinge inside the side panel
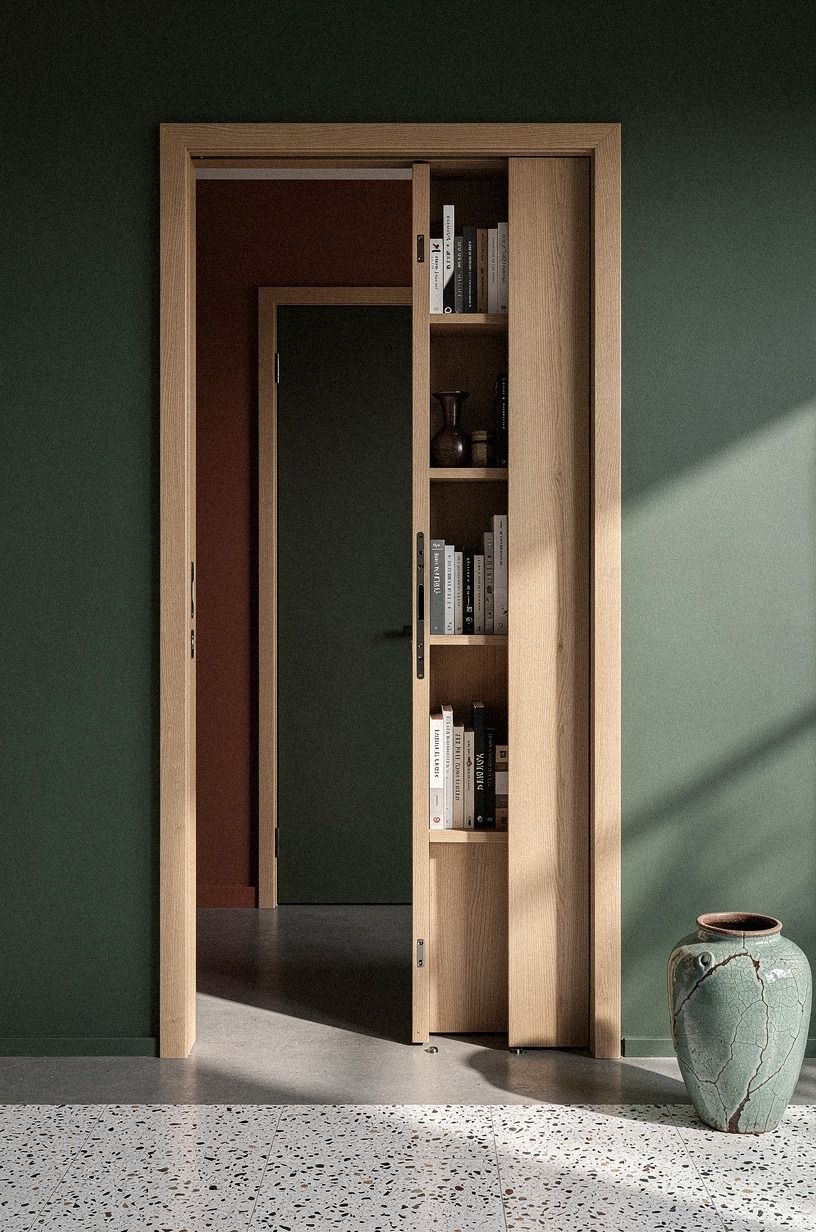
Recessing the hinge inside the side panel was one of those fussy decisions that paid off every single time I looked at the wall. Exposed hardware would’ve pulled the eye straight to the moving part, and that defeats the whole point.
I wanted the hinge to do its job without becoming a detail. So I buried it inside the panel depth and kept the sightline clean from the living-room doorway into the hidden opening.
This is also where I stopped listening to the part of my brain that wanted the easiest path. I had this living-room layout story in mind because room logic beats novelty every time.
Easy would’ve meant surface hardware and quicker installation. Better meant patient routing, cleaner margins, and a side panel thick enough to hold the recess without splintering. If you’re working from detail room plans, that’s the line I’d underline twice.
The invisible parts are what make the visible wall believable. The same goes for built-in cabinetry that conceals a bar.
The engineering hides while the millwork speaks.
7I matched the trim to the living room
Matching the trim profile was less about carpentry and more about social camouflage. If the profile changes, your guests may not know why the wall feels off, but they’ll feel it.
I copied the existing trim lines so the hidden door sat inside the same language as the windows, baseboards, and adjacent wall details. The room already had soft traditional lines, so I didn’t try to force sharp modern casing onto it.
I kept this note on why a 200-square-foot living room gets colder every winter open while I worked because repeating lines and warmer materials do more than people expect.
I also checked the trim from the seat of the sofa, not just standing up. That view tells the truth. While I was testing it, I kept thinking about this living-room layout story because the lesson is the same: a room reads through repeated lines.
Once the trim wrapped the hidden opening, the wall stopped looking like a door project and started looking like millwork. For more on how a hidden door can echo a room’s trim, the small speakeasy room guide shows similar moves scaled down.

8I painted the seams in Sherwin-Williams Evergreen Fog SW 9130
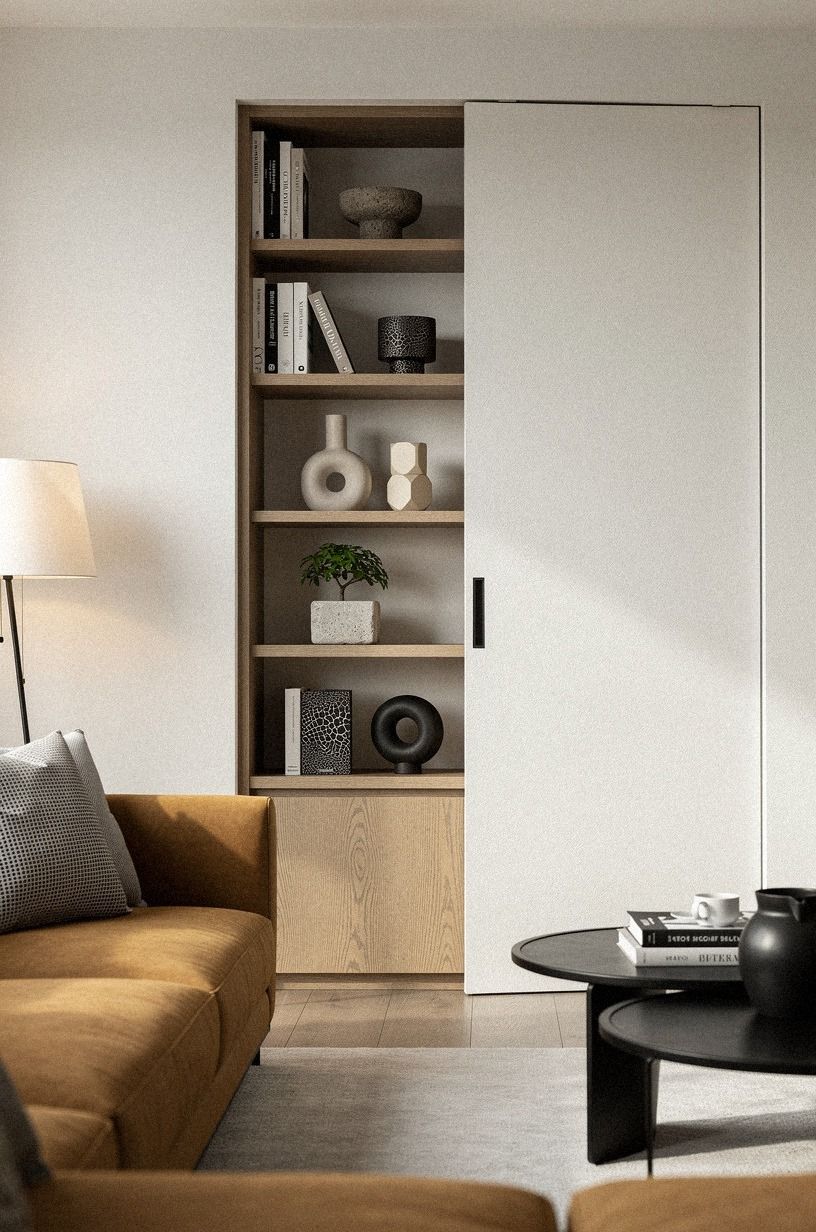
Paint was the cheapest part of the build and the least forgiving. I used the wall color right over the seams so the joints wouldn’t flash white or shadowy when the daylight shifted.
On this wall, Sherwin-Williams Evergreen Fog SW 9130 gave me exactly the softened sage tone I wanted. It was gentle with the linen sofa, warm with oak, and forgiving across the bookcase face. If you use a brighter white, the seams will read sooner.
I’d skip that.
Then I dry-brushed the touchups just enough to kill the line without loading the gap with paint. Too much paint builds a ridge.
Too little leaves a hairline that looks colder than the rest of the wall. And yes, I checked it in morning light and lamplight because hidden edges behave differently after dark.
Nobody tells you this, but the last 5 percent of the illusion usually lives in the paint film. If you want a richer moody version, the dark moody speakeasy decor guide walks through what deeper sage and oxblood can do.
9Test the push latch before drywall
I tested the push latch before drywall because I didn’t trust myself to guess where the pressure would feel right later.
10I hid the release behind an unlacquered brass knob
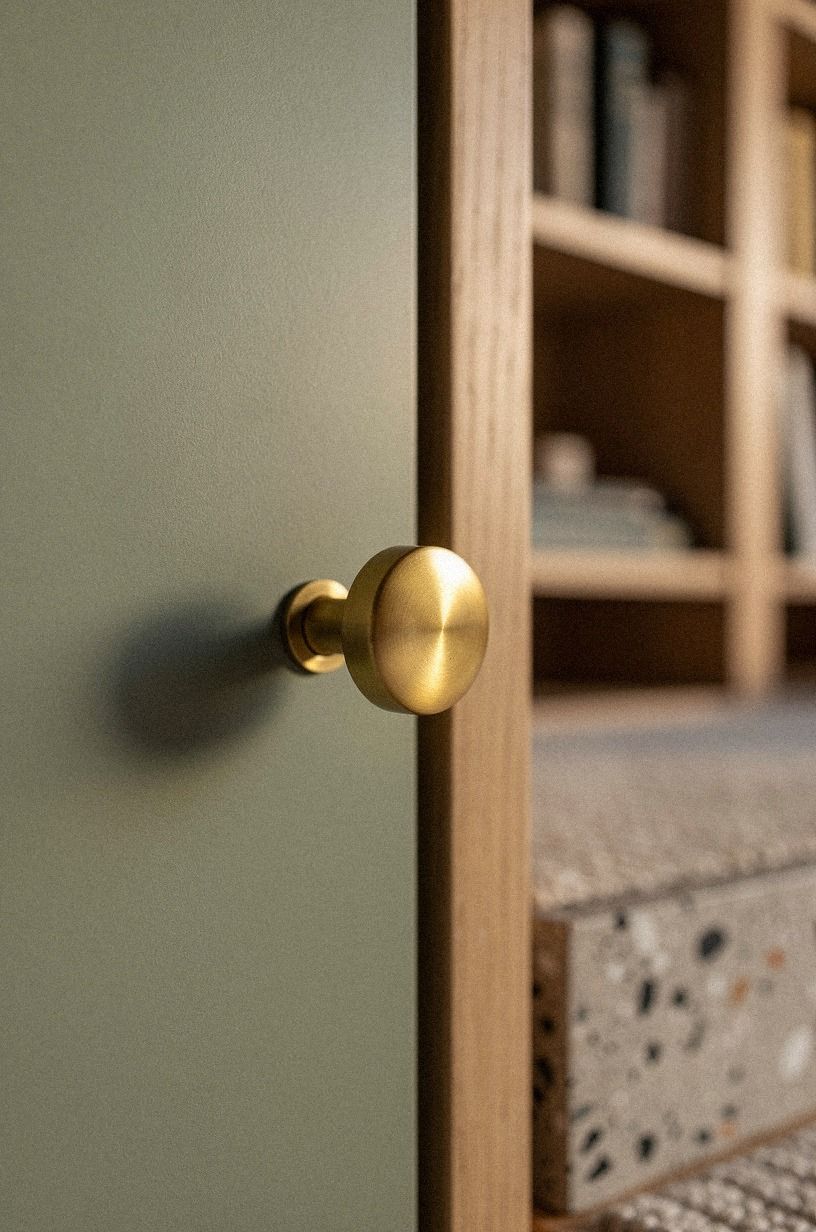
The release point needed a disguise, and a tiny unlacquered brass knob turned out to be the cleanest answer. Not flashy. Not oversized.
Just enough presence to feel plausible on a sage panel while hiding the pressure point behind it. I liked the way the brass warmed up the green and caught a little light without turning into jewelry.
If you’re building ideas for a detail room into a normal family space, restraint wins.
I nearly used a painted wood nub instead, and I’m glad I didn’t. This warmth guide for a chilly living room pushed me toward brass because a small warm note goes further than another painted detail. It disappeared too hard, which made the release feel random rather than integrated.
A small brass note gave the hand somewhere honest to go. And because unlacquered brass develops a soft patina, it already feels a touch older than new hardware fresh out of a box.
That age helps the wall read as furniture, not a prop. For more on the brass-and-age logic, the speakeasy gold brass accent guide is the same material world from a different room.
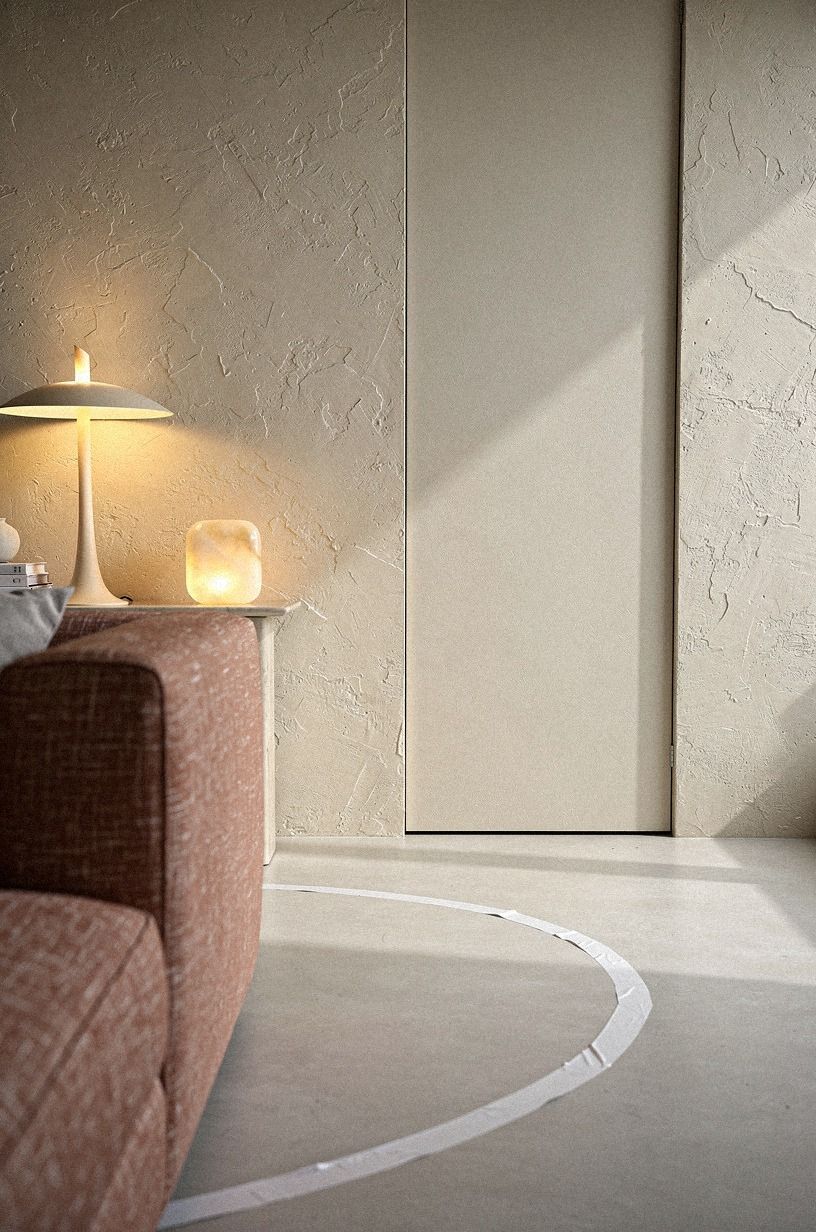
11I almost painted the back wall Farrow & Ball Hague Blue
Inside the room, I went warm on purpose. Built-ins with drawer faces, readable shelf spacing, and wood tones that looked settled instead of glossy.
The threshold opened onto shelves first because I wanted the reveal to feel useful, not empty. A hidden room that opens to blank drywall is a letdown, isn’t it?
I kept the storage low enough to feel approachable and used the same grounded palette that already worked in the living room.
This is where Farrow & Ball Hague Blue No. 30 almost got the job for the back panel, but I stayed lighter because the room was small and I wanted books to read clearly. Warm oak, muted paint, soft lamp glow.
That’s the mix. If your living room already fights winter light, go warmer, not moodier. This cold-living-room article made me even stricter about that.
Depth should feel inviting, not cave-like. If you do want the deeper saturation, green speakeasy decor shows how to make botanical walls sing without swallowing the room.
12Layer low sconces along the reveal
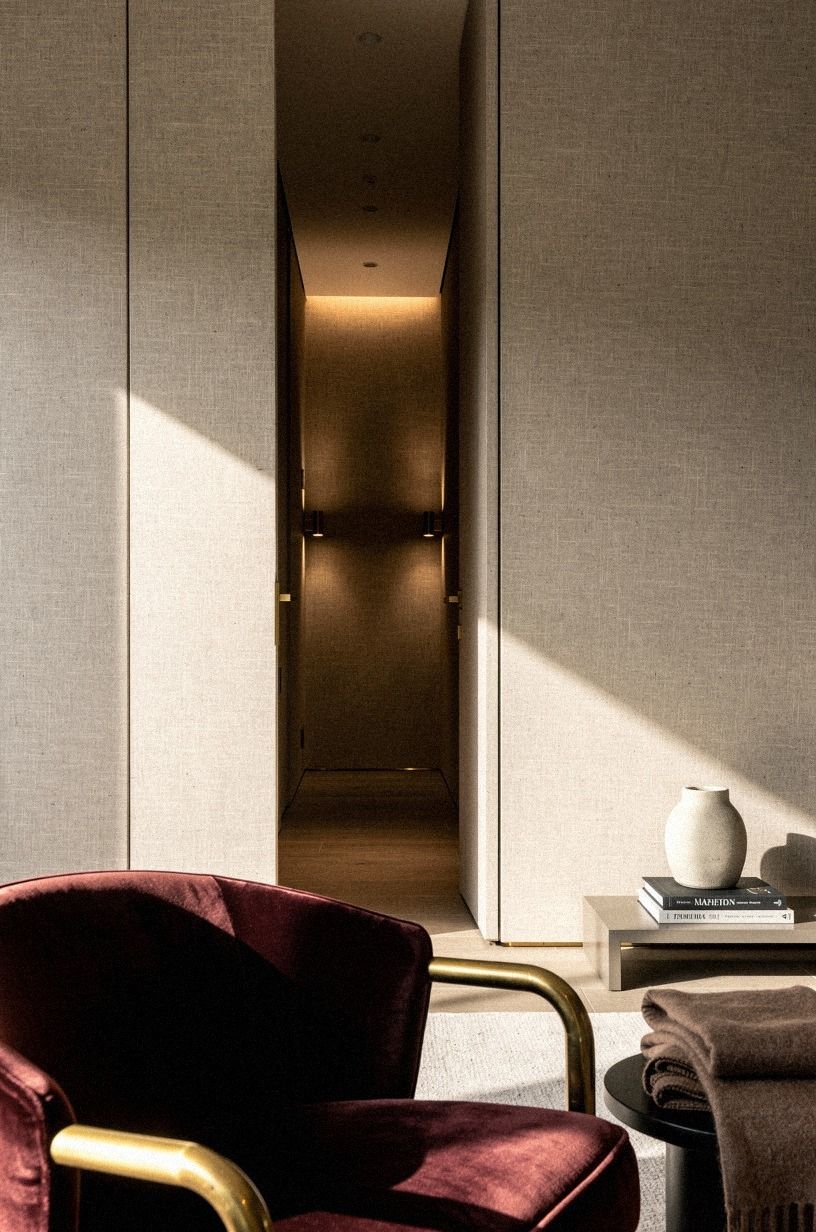
Lighting changed the room more than the moving wall did.
13I placed a reading chair inside first
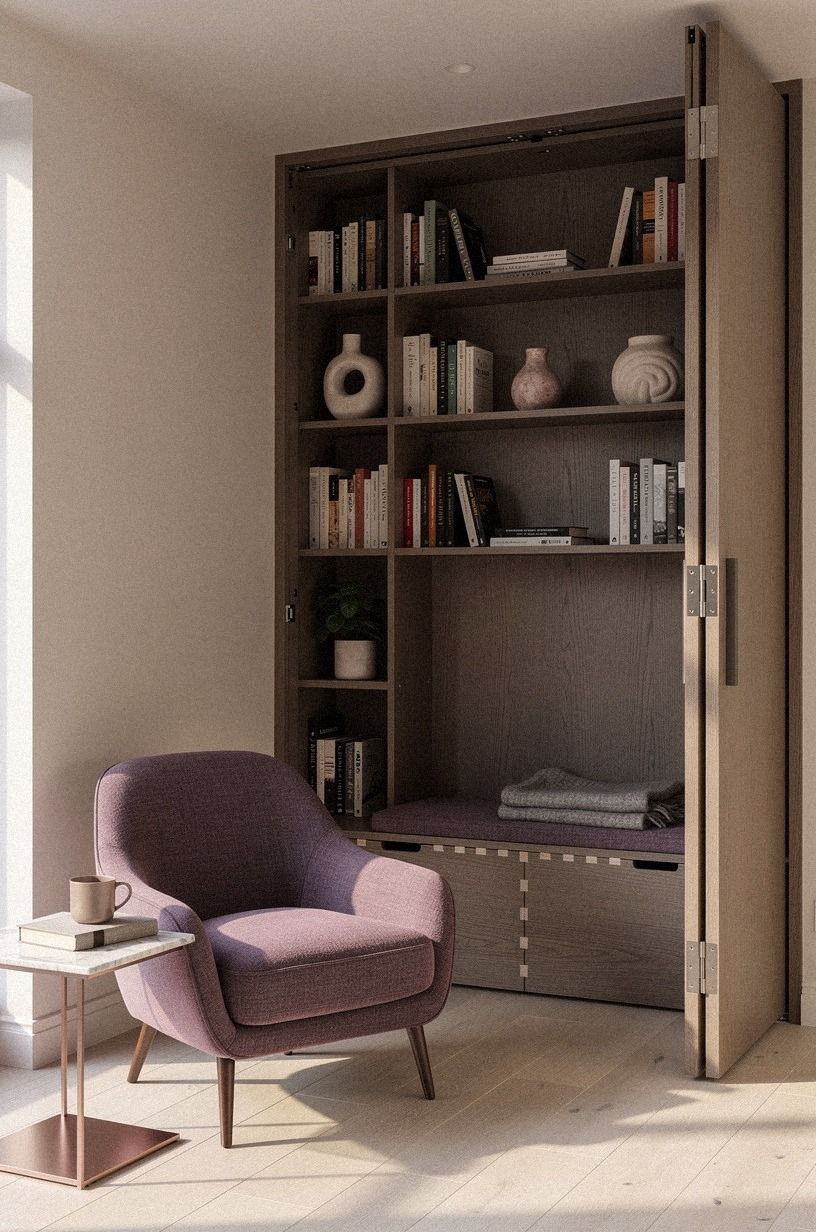
Before I fussed with styling, I moved a reading chair into the room. I kept thinking about this velvet-throw living-room note because the hidden room needed softness first, not perfect props.
That was my test for whether the space had a real life or was only a fun construction story. A reading chair made it immediate.
Suddenly the room wasn’t about the hinge, the latch, or the case. It was about sitting down, setting a book on the arm, and wanting to stay.
I used a compact chair so the room could breathe, the same way you respect circulation around a coffee table that’s 16-18 in high.
And that decision helped outside the room too. Once I could see the chair through the partly open case, the whole project felt warmer and less engineered. A blanket basket.
A lamp. A stack of paperbacks. That’s enough! You don’t need to cram the hidden room with concept.
You need one inviting seat that proves the effort gave you a place, not just a story. For a similar soft-first rule applied to cocktail hideouts, hidden cocktail bar ideas works through the same logic.
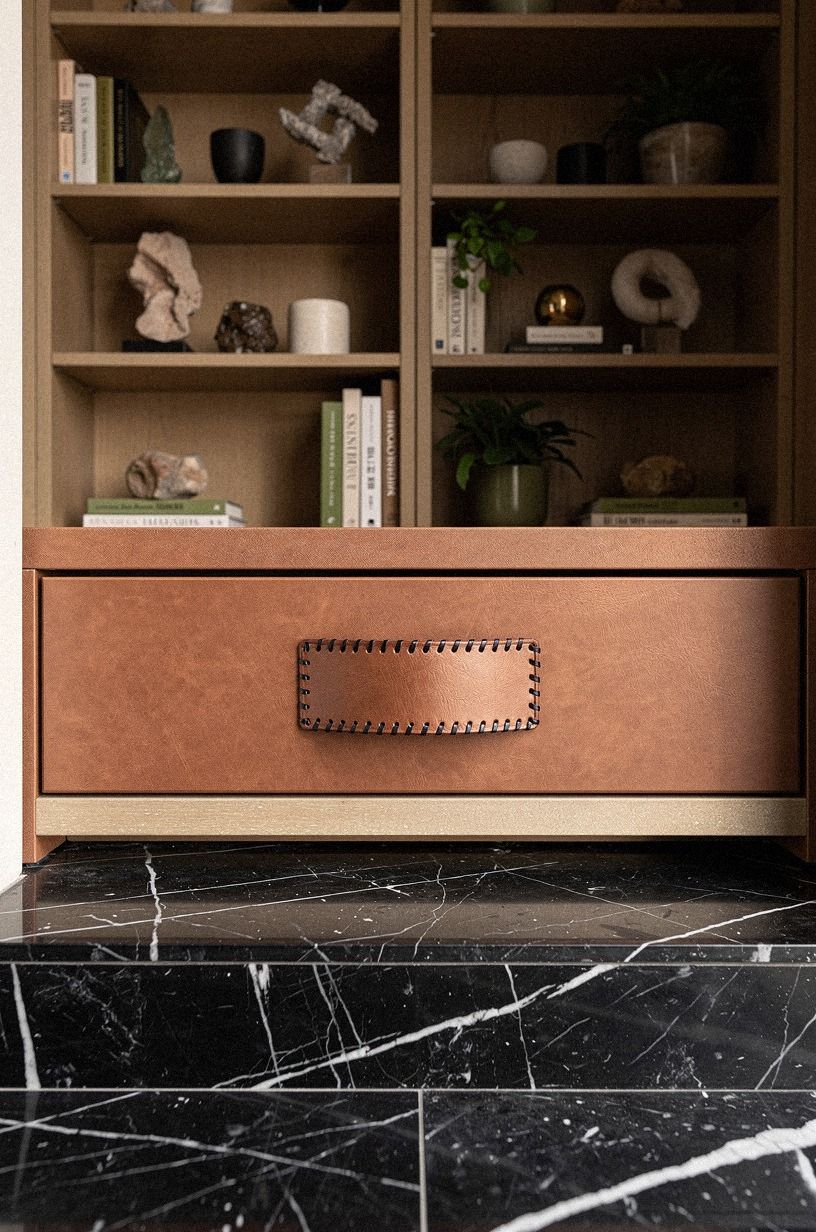
14I styled the bookcase to break the gaps
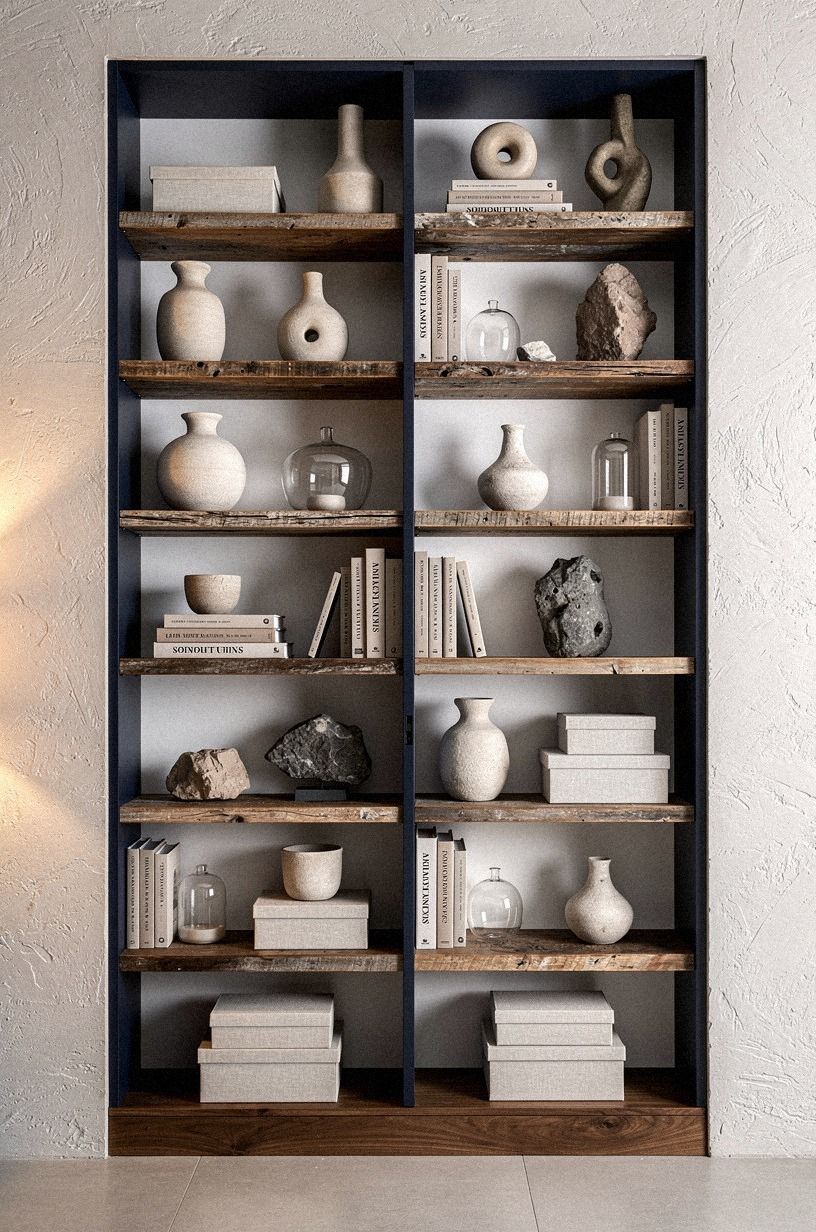
Styling the front shelves was the final camouflage layer, and it mattered more than any one tool on the build list. I staggered books horizontally and vertically, used a few vessels with rounded shoulders, and left deliberate open patches so the shelf rhythm looked normal instead of stuffed.
If everything is symmetrical, the seams pop. If everything is chaotic, the moving panel looks suspicious.
You want that middle ground where the eye relaxes.
I also used pieces with believable living-room scale. A shallow bowl, a framed photo, a fabric box, a little stack of hardcovers.
Not twenty tiny objects. This living-room warmth article helped me remember that negative space is part of comfort. And yes, I restyled the shelves three times. The first version was too perfect.
The second was too sparse. The third finally broke the gaps.
If you want to layer in vintage character, the vintage speakeasy decor guide shows how aged objects help a wall feel settled.
15I closed it until the wall disappeared
Closing the panel for the last time was weirdly emotional.
How much it cost
I kept this build mentally in the same budgeting language I use for any living-room makeover: what belongs in the room already, what has to move, and what absolutely needs quality. My hidden room project leaned on existing seating, rug placement, and wall color logic, so it stayed closer to a smart room upgrade than a full custom renovation. If you already own a solid sofa, a decent rug, and lighting you like, you’re ahead.
The hidden-room part behaves most like millwork, so your costs climb fast if you outsource every detail. I saved money by keeping the living-room shell stable and focusing on the wall, the bookcase, the finish work, and the lighting. This cold-living-room piece is worth a read if you’re pairing the build with a broader comfort update.
If you’re balancing this with a bigger room refresh, the usual numbers still matter: an 8×10 or 9×12 rug anchors the seating, a coffee table should run about 2/3 the sofa length, and a performance-fabric sofa typically lands between $1,200 and $4,000. You don’t need all of that new.
You need the hidden wall to feel native to what you already have. For the custom-millwork side, the speakeasy home bar design guide is the closest pricing reference I’ve found for similar concealed-room builds.
The Millwork First Rule over novelty
Here’s the part that changed my approach: once I stopped trying to make the room feel clever, it started feeling expensive. A hidden room isn’t impressive because it swings open.
It’s impressive when the wall looks calm while it’s closed and useful while it’s open. That’s why I chose bookcase proportions, warm paint, and trim repetition over anything flashy.
If you’re tempted to oversell the reveal, don’t. The better move is to support the living room first.
I learned more from this layout story about rearranging a living room than from any movie scene. When sightlines work, the hidden part feels inevitable.
For the philosophy applied to a louder room, luxury speakeasy decor shows the same millwork-first logic at a higher budget tier.
Why did the Disappearing-Wall Rule work?
My biggest mistake early on was treating the hidden room like the star and the living room like the setup. That got me nowhere.
The wall kept looking self-conscious, and every decision screamed for attention. Once I flipped the order, the project started making sense.
The living room came first. The hidden room had to earn its place by supporting the room’s scale, circulation, and mood.
That’s the Disappearing-Wall Rule I kept coming back to.
You can feel this rule in small things. The bookcase had to match the line of the sofa instead of floating above it like a separate prop.
The trim had to echo what was already in the house. The lighting inside the hidden room had to stay low enough that it didn’t advertise itself from across the space.
And the shelf styling had to be normal enough that your eye didn’t start counting gaps. Those choices aren’t glamorous, but they’re the difference between a novelty wall and a room that feels settled.
I also think people spend too much energy trying to make the hidden room dramatic. I did at first.
I imagined dark paint, a louder hardware moment, maybe a bolder reveal. But every time I tested those moves, the living room lost some of its ease.
The better answer was warmer and quieter: Sherwin-Williams Evergreen Fog SW 9130 on the outer wall, wood tones that leaned honey instead of gray, and brass that would age softly instead of gleam. It felt richer because it wasn’t trying so hard.
If you want to see the dramatic-leaning version of this same wall logic, the gothic speakeasy decor guide shows how a hidden door can lean moody without losing the living room.
And yes, there’s a practical side. When the closed wall looks natural, you don’t have to explain it. You don’t protect it.
You just live with it. Guests walk in, sit down, and read the room as a comfortable living room first. Then, later, they realize a panel moves. That’s a much better reveal.
It lands every time! It feels earned. More important, it means the build improved the room even on days when nobody opens the door at all.
What People Always Want to Know
What is the best How to Build a Detail Room (Step-by-Step Guide) for a small living room?
The best version is a bookcase wall that borrows depth from the wall, not your walkway. A wide case feels believable.
I’d start with an IKEA BILLY-style width, low warm lighting, and a chair inside so the space reads useful on day one. For a deeper dive on choosing the right width, this hidden bookcase door guide is a useful sister read.
Where can I buy How to Build a Detail Room (Step-by-Step Guide) pieces on a budget?
Start with IKEA, Target Threshold, and Wayfair for the visible pieces, then hunt Facebook Marketplace for a solid wood case you can refinish. Warm paint.
Brass hardware. Fabric boxes.
This living-room warmth piece makes the same case. That’s the budget mix that keeps the wall from looking flimsy.
How much does a How to Build a Detail Room (Step-by-Step Guide) makeover cost?
In most living rooms, expect something in the budget to mid-range bands depending on whether you reuse seating and rugs. Paint and styling are the cheap wins.
Custom millwork, better lighting, and a new performance-fabric sofa are what push the number upward. If you want a full cost-of-materials comparison, the built-in cabinetry that conceals a bar guide breaks down similar line items.
Can I create a How to Build a Detail Room (Step-by-Step Guide) on a budget?
Yes, and you can do more than people think. Reuse the sofa and rug first.
Paint the wall, upgrade the hardware, and restyle the bookcase with books, bowls, and storage boxes you already own. That’s where the illusion starts.
For a tight-space version of the same logic, hidden mini bar ideas for small spaces applies the same principle scaled down.
Is a How to Build a Detail Room (Step-by-Step Guide) worth it in a small space?
Yes, especially in a small living room where every wall has to work harder. A hidden room turns dead depth into usable depth.
Keep the front legs of your seating on an 8×10 or 9×12 rug so the room still reads open. The under-stairs hidden bar guide is a useful reference for what dead depth can become when you commit to it.
Is How to Build a Detail Room (Step-by-Step Guide) a good idea for a rental?
Usually no for the framed version, but yes for the visual idea if you stay reversible. Use a freestanding bookcase, removable paint-safe styling, and plug-in sconces.
Skip structural framing. Keep the drama in the layout and finish choices instead.
The One-Move Rule
If I had to pick one, I’d start with the bookcase width. A narrow case gives the whole idea away because the wall reads decorative instead of structural.
Get that scale right first. Everything else has a chance.