
Built-In & In-Wall Hidden Bar Ideas [Cabinetry That Conceals] saved my kitchen, and the short answer is yes, this kind of upgrade is worth it even in a small space. I did mine after months of staring at bottles on the counter, a tray that never looked tidy, and one pantry wall that felt wasted. Then I tucked the whole thing into cabinetry, and the room finally exhaled.
- Carve the bar into a pantry wall
- Match the doors to the kitchen cabinets
- Hide bottles behind reeded glass panels
Here’s what it looked like before
Before I hid anything, my kitchen had that low-grade clutter that never looks dramatic in a photo but wears you down in real life. A few nice bottles, mismatched glassware, two bar tools in a ceramic crock, and one dark tray shoved beside the toaster.
You know that feeling when your counter is technically usable but never looks finished? That was my daily view.
The wall itself was the bigger issue. Standard-height counters at 36 in were doing their job, but the eye kept landing above them on a blank, awkward run between storage zones.
I had upper cabinets in one direction, pantry storage in the other, and no proper stop in the middle. It looked undecided.
I kept thinking about the kind of concealed opening you see in that limestone-cliff hidden bar story, where the reveal matters as much as the contents. I didn’t want more stuff on display. I wanted a wall that looked calm when it was closed and rich when it opened.
- Carve the bar into a pantry wall
- Match the doors to the kitchen cabinets
- Hide bottles behind reeded glass panels
- Frame the niche with thin brass trim
- Add pocket doors beside the range
- Line the back wall with walnut slats
- Build a coffee-to-cocktail cabinet stack
- Tuck a wine fridge under the counter
- Install stone shelves inside the reveal
- Paint the hidden interior in oxblood gloss
- Run LED strips behind every bottle row
- Hang stemware under the upper cabinet
- Disguise the pull with cabinet edge grooves
- Slide a backsplash panel over the bar
- Set a tray shelf at elbow height
- Add mirrored tile behind the bottles
- Style the closed wall with one sconce
- Leave the final reveal slightly lit
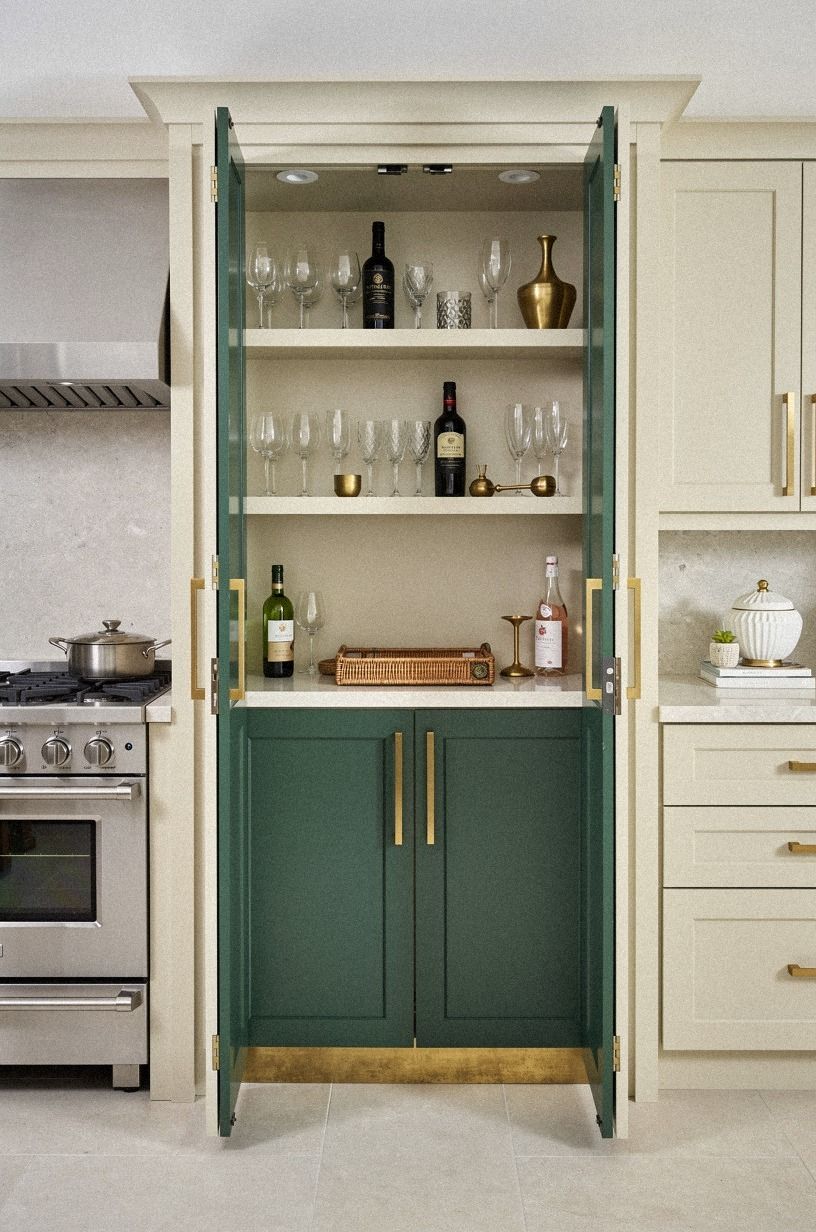
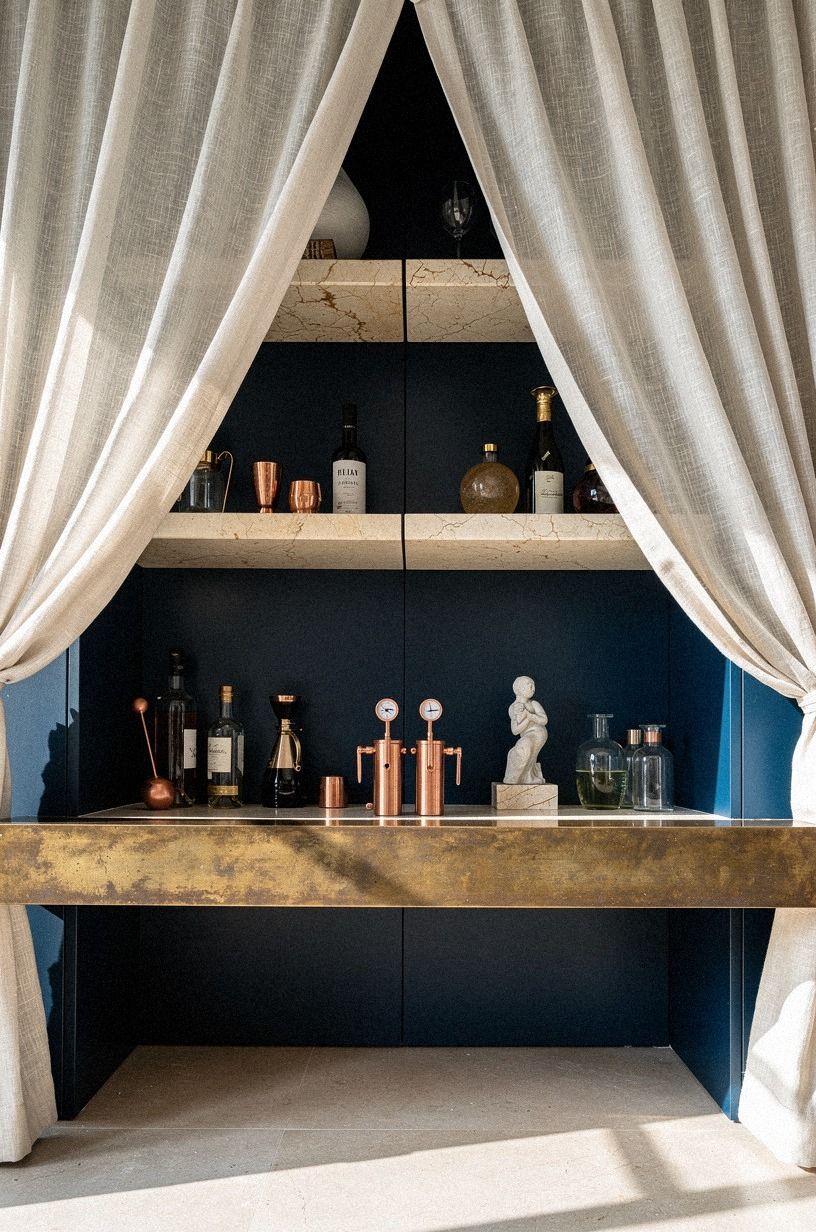
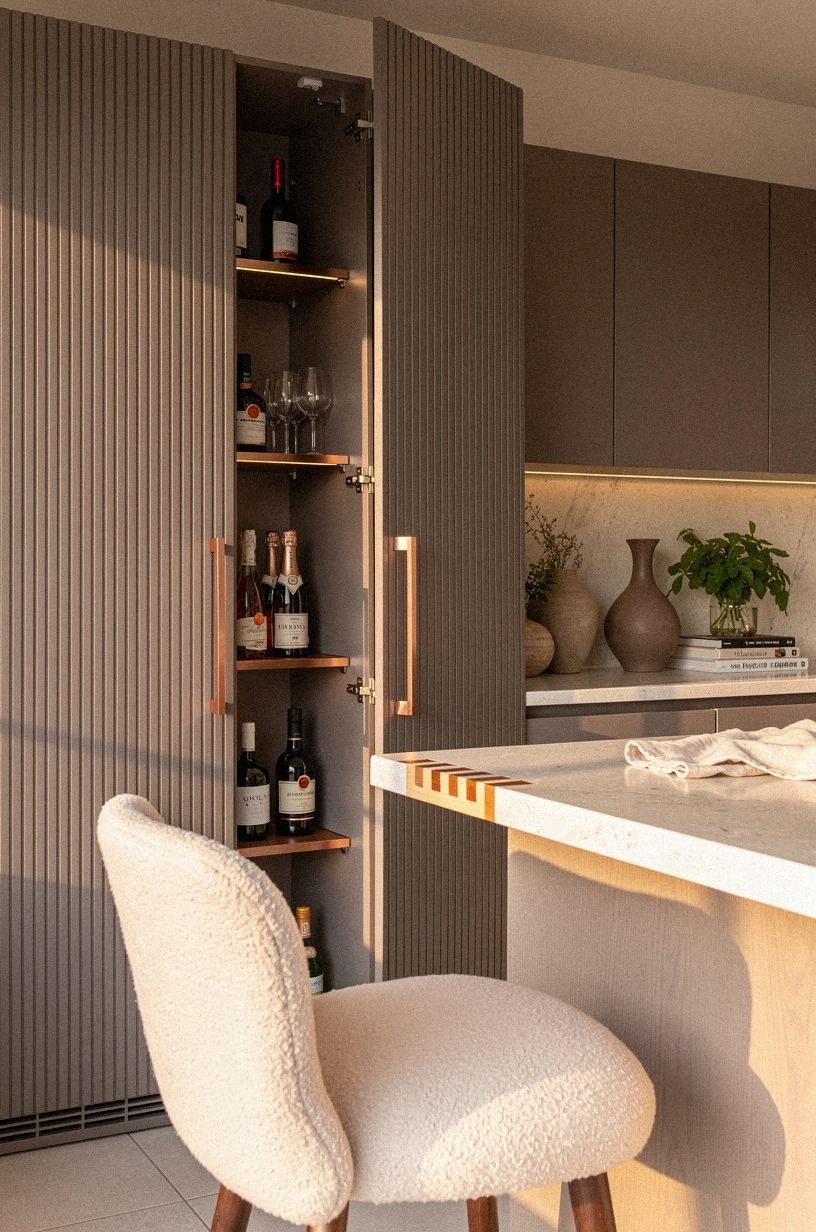
1Carve the bar into a pantry wall
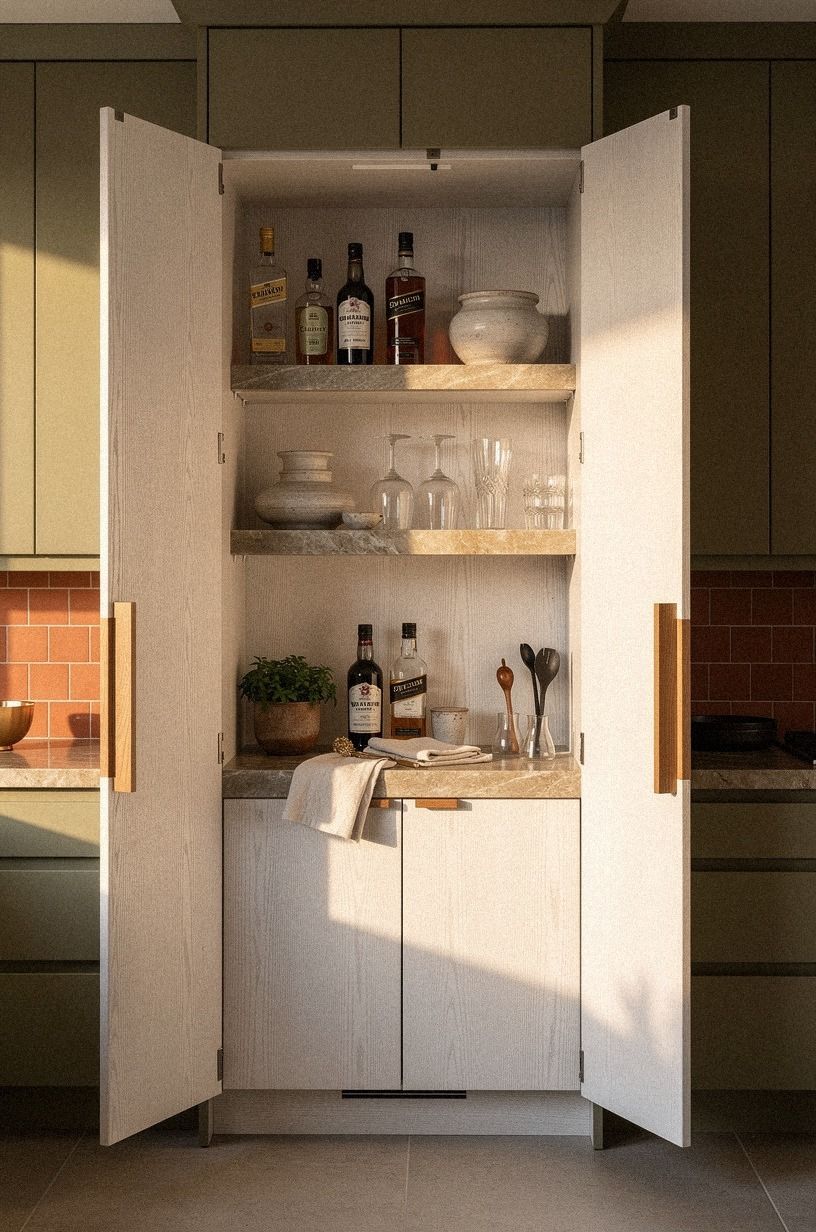
This was the move that changed everything for me. Instead of fighting for a new footprint, I carved the bar into the pantry wall that already had enough depth for shelving, and that made the hidden bar in wall idea feel intentional instead of bolted on. If you have a pantry run near your prep zone, you’ll feel the win right away because you aren’t crossing the kitchen for a glass or bottle.
I used white oak tones as the warm note inside the opening and kept the reveal symmetrical so your eye reads it as architecture, not furniture. Stone shelves matter here because they don’t visually sag the way thin painted boards can. I also left enough depth for bottles to sit comfortably without pushing the doors proud.
If your wall can handle built-ins, study proportions the way people do in this built-in bookshelf look from IKEA. That built-in feeling comes from alignment, not from adding more trim.
2Match the doors to the kitchen cabinets
Once I decided the bar should disappear, I knew the doors had to read as part of the kitchen and not a novelty panel. So I painted them to match the surrounding cabinet fronts, and that one choice made the hidden bar cabinet built ins idea believable. When one clay-painted door swings open, the reveal feels like a private layer of the room instead of a little stunt.
I kept the outer finish close to Benjamin Moore White Dove OC-17 nearby and used a muddier clay tone only where the cabinetry could support it. If your kitchen already has Shaker fronts, copy the rail widths and hinge reveals exactly.
But don’t get cute with a contrasting face frame here. You want the closed wall to lie to you a little, in the best way!
I learned that if the outer doors try too hard to be special, you lose the clean effect before anyone even touches the handle.
3Hide bottles behind reeded glass panels
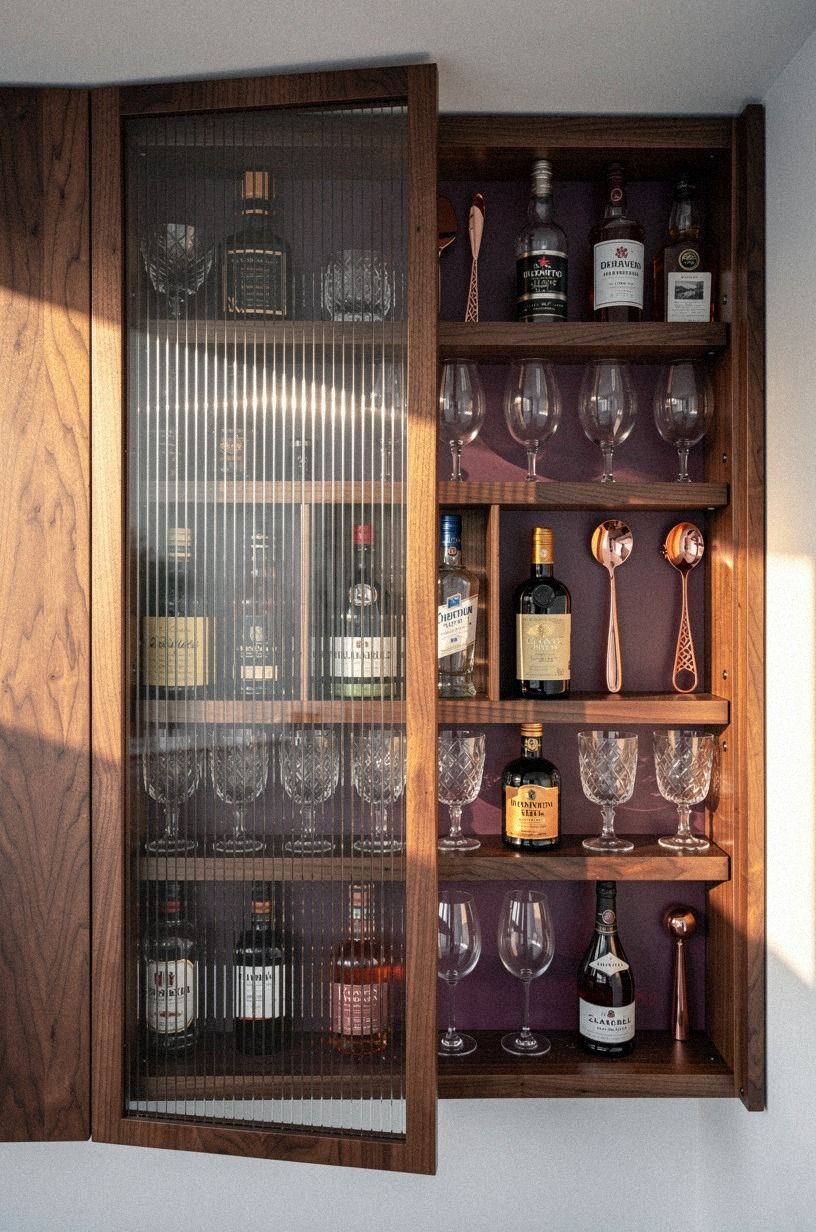
Reeded glass gave me the privacy of concealment without making the upper section feel dead. You can still read the glow, the bottle shapes, and the movement of light, but your eye doesn’t get dragged into label clutter. If you like a hidden bar that still hints at itself, this is a very good middle path.
I prefer reeded glass over clear glass in small kitchens because clear panels turn every bottle into a tiny decision you have to maintain. With ribbed texture, you get softness and forgiveness. Rose-gold hardware can work if the rest of your metals stay quiet, but I’d keep the trays in walnut so the whole composition doesn’t drift sweet.
And if you’re already collecting concealed-room references, this hidden bar feature inside old stone walls shows the same principle on a bigger, moodier scale.
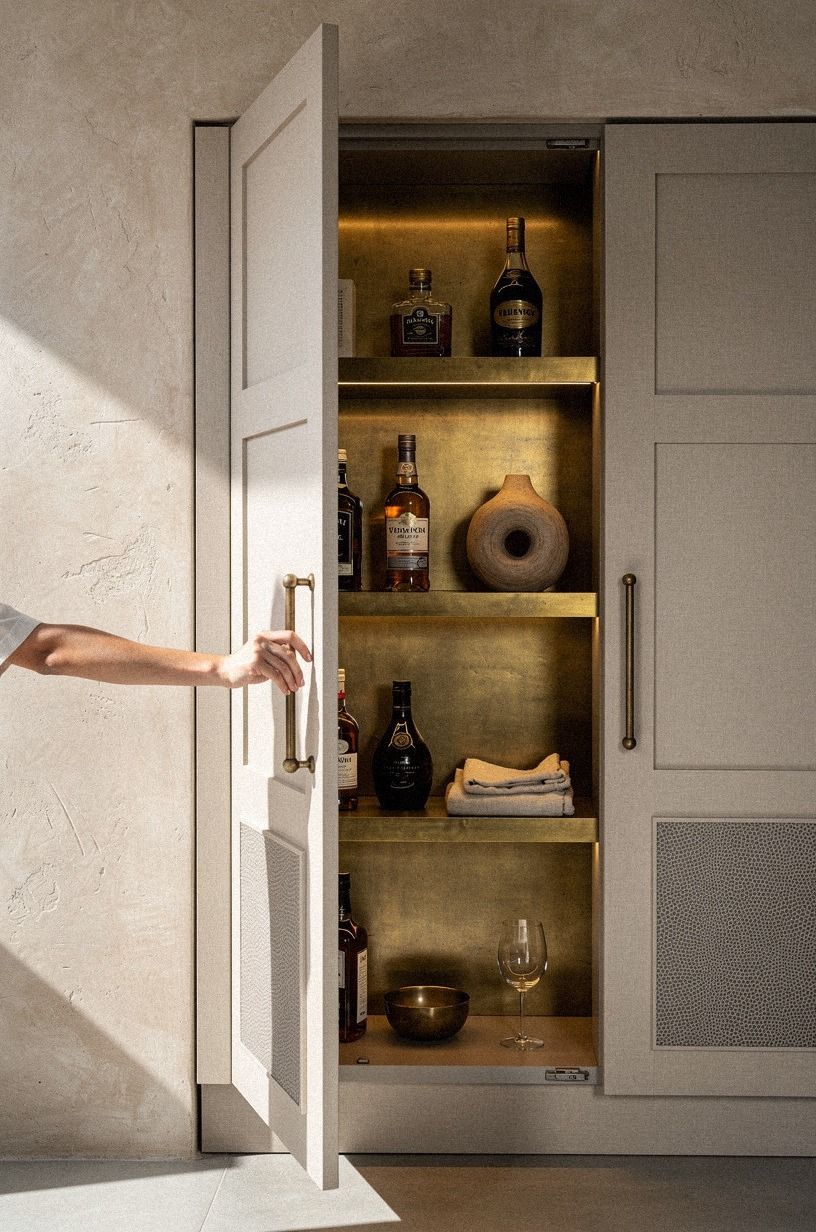
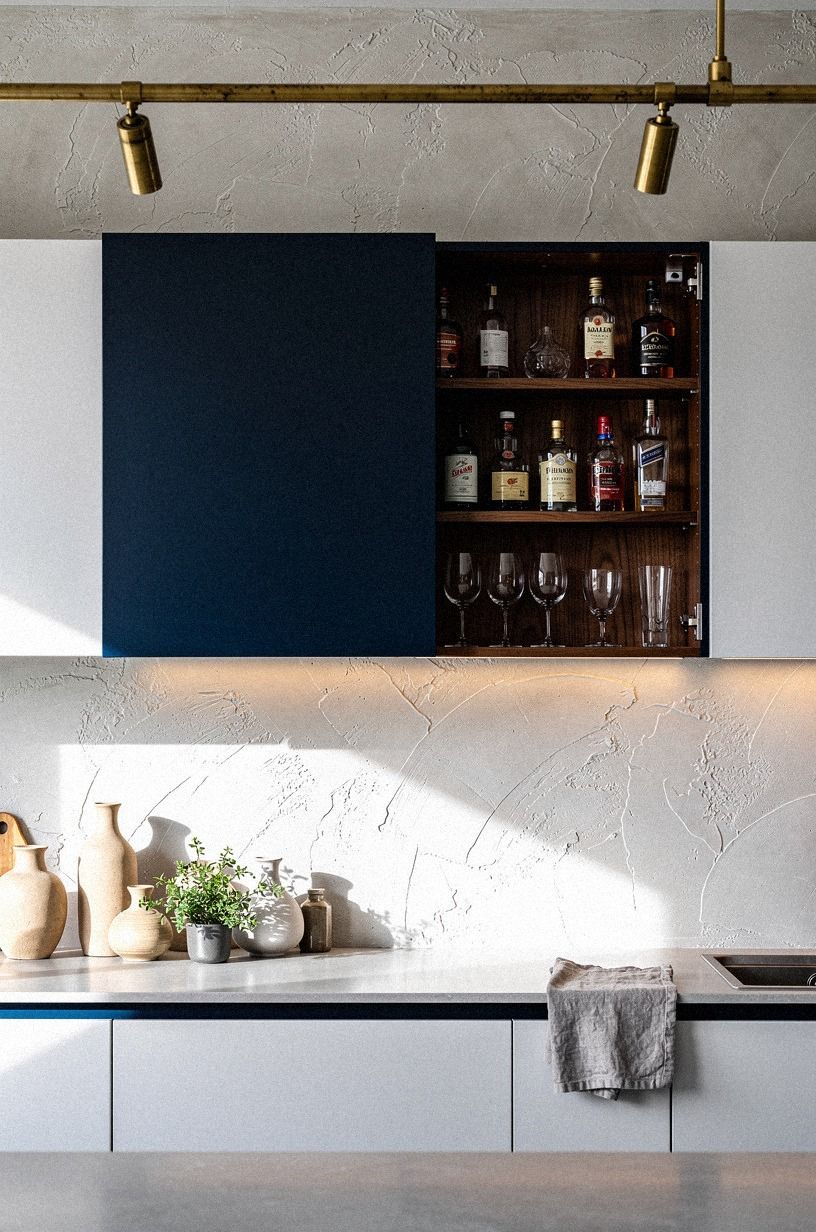
4Frame the niche with thin brass trim
Thin trim is where the modern built in bar starts to feel tailored. I didn’t want a chunky surround because the bottles, tile, and shelves already had enough presence. A slim line of brass around the opening gave the bar a finished edge and let the navy doors feel sharper when they opened.
Use unlacquered brass if you want the frame to mellow over time, especially against white tile and walnut shelving. You don’t need much width.
In fact, you want restraint. The bar should catch the light, not shout for it.
I also think brass works better here than black metal because it makes the hidden opening feel collected rather than industrial. If your kitchen already leans warm, the patina will make the reveal look better six months in than it did on day one.
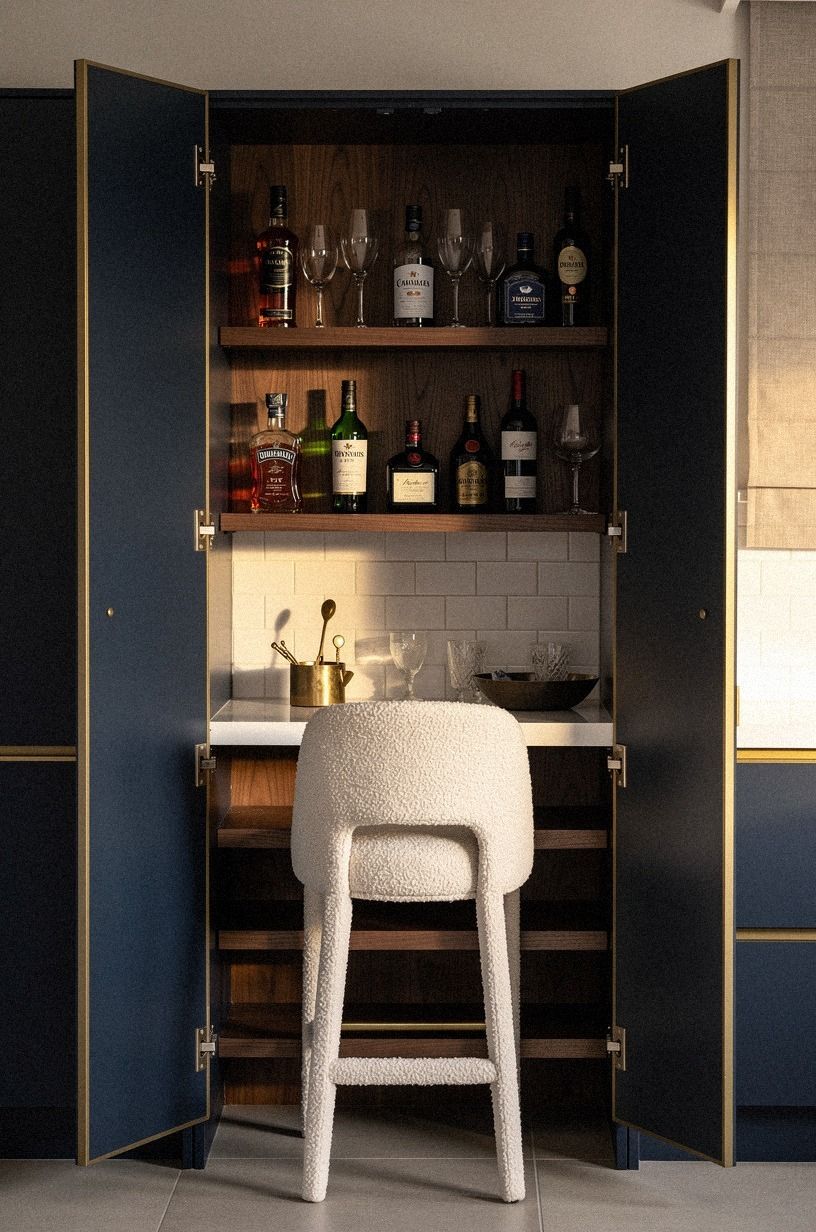
5Add pocket doors beside the range
Putting a concealed bar beside the range sounded risky to me at first, but the pocket-door version solved the two real problems at once: visual clutter and swing space. When the doors slide away, you can mix or pour without blocking a walkway. When they’re closed, the wall goes back to being useful and quiet.
I like this move most when your clearance around the working zone is already tight, especially if you need to preserve 42-48 in around an island path. Brass pulls with a little age on them look better than anything glossy here, and emerald cabinetry beside cream surfaces keeps the pocket opening from disappearing into flat beige.
But don’t place a bar beside the range unless you can keep the finishes wipeable. Grease is real, and you’ll resent a fussy finish fast.
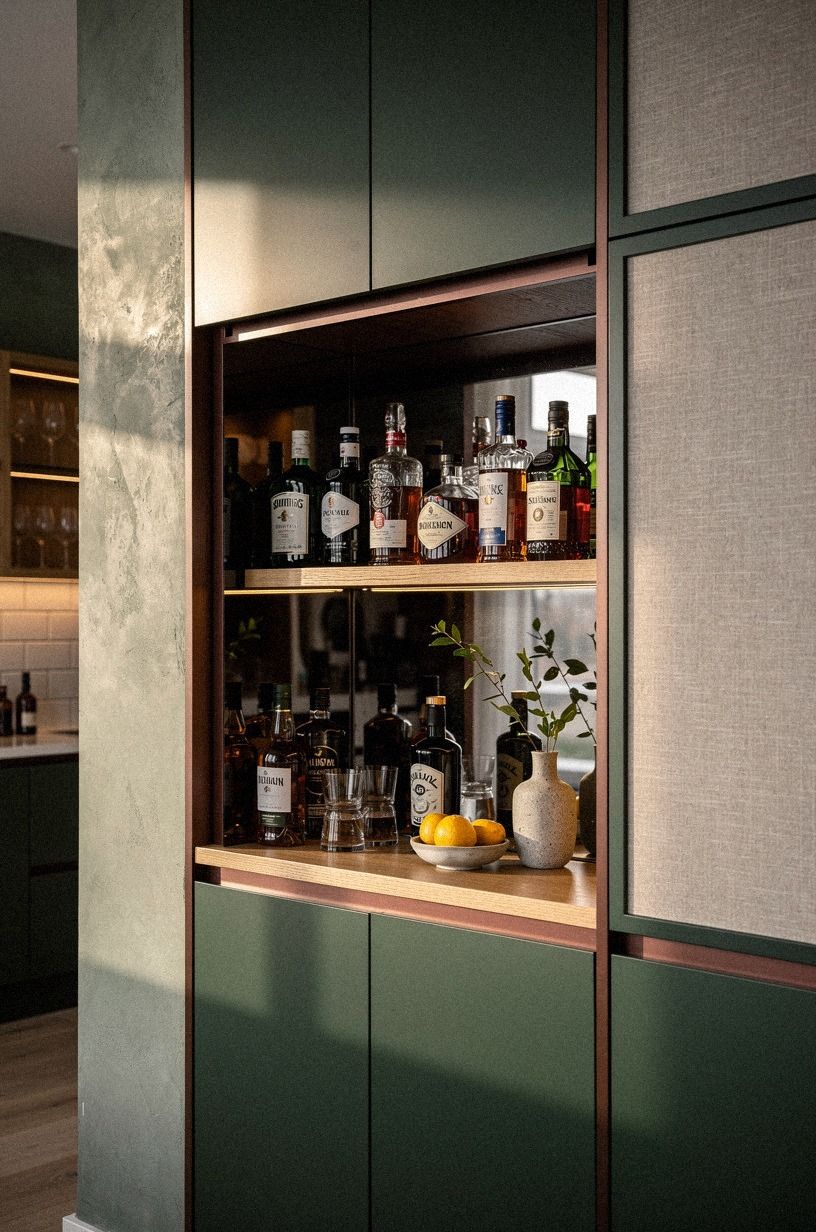
6Line the back wall with walnut slats

Walnut slats gave my bar depth without adding more objects, and that matters when the whole point is controlled richness. Through a doorway, the cabinet looked warm and dimensional even before you noticed the bottles. If you want your built in wall units to read expensive when the doors open, texture on the back wall is one of the fastest routes there.
And I used the slats like a backdrop, not as the star. Walnut slats behind glass and stone let rust accents, olive notes, and clear bottles sit forward without getting lost.
Yes, I tested a painted back first. It looked flat.
If you’re worried the wood will feel too dark, pair it with a lighter stone shelf or a pale counter edge so your eye has a place to rest. That was what kept mine grounded instead of heavy.
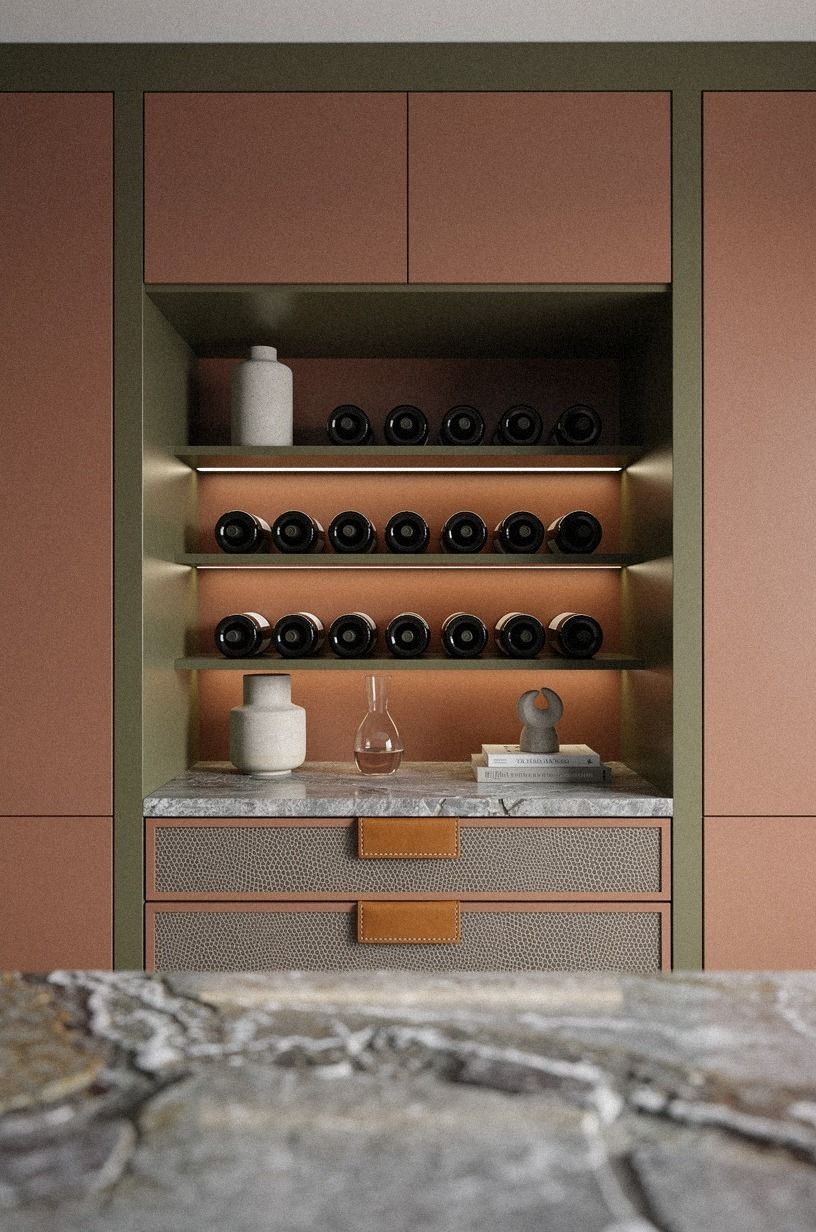
7Build a coffee-to-cocktail cabinet stack
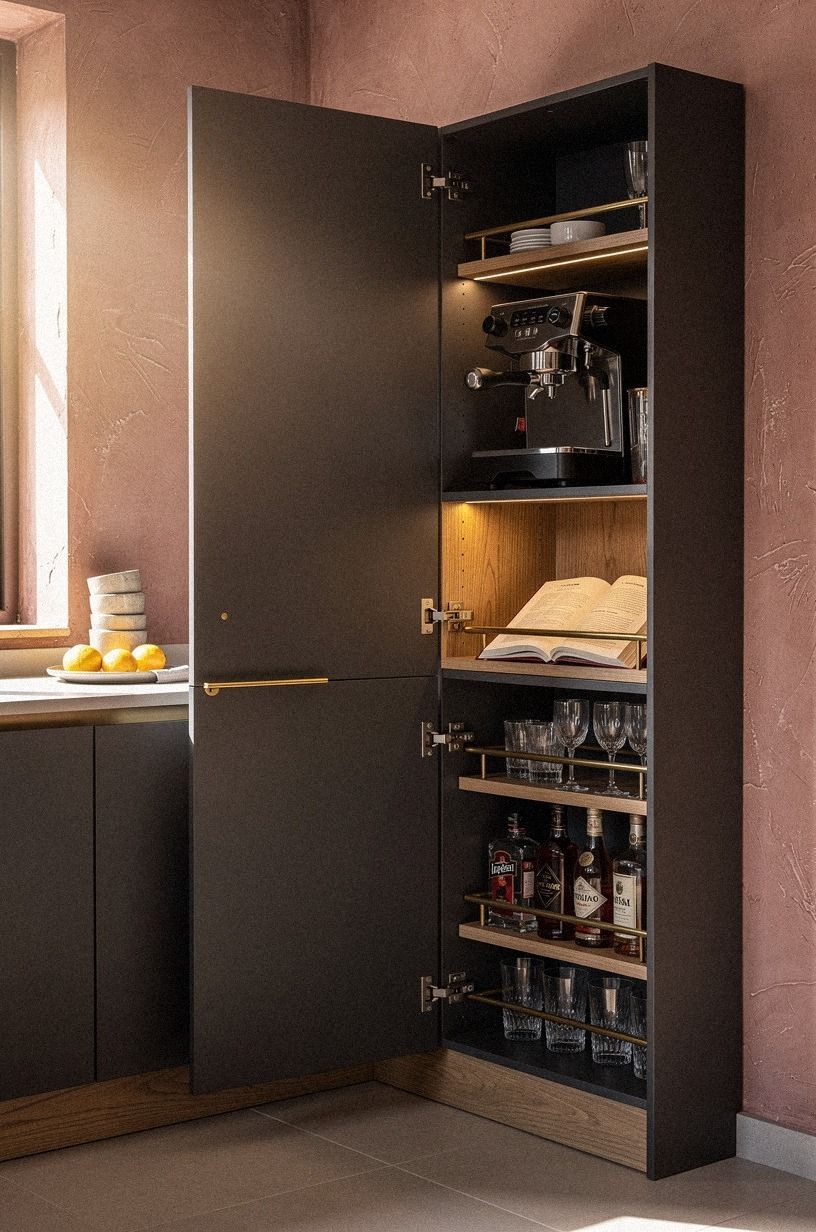
This is the version I recommend when you need the cabinet to work all day, not just at 7 pm. I stacked morning above evening, with the espresso machine up top and the bottles below, and suddenly one kitchen corner earned its footprint. If you live in a real house with real routines, this setup keeps the bar from feeling precious.
The tall charcoal cabinet looked cleaner once the functions were vertical instead of spread sideways. I like IKEA planning logic for this kind of stacking because modular thinking keeps you honest about height, reach, and storage.
You can even borrow proportions from that IKEA built-in wall idea if you’re sketching around one awkward corner. My one warning: don’t put your nicest glassware too high.
If you need a step stool for the coupe glasses, you’ll stop using them.
8Tuck a wine fridge under the counter
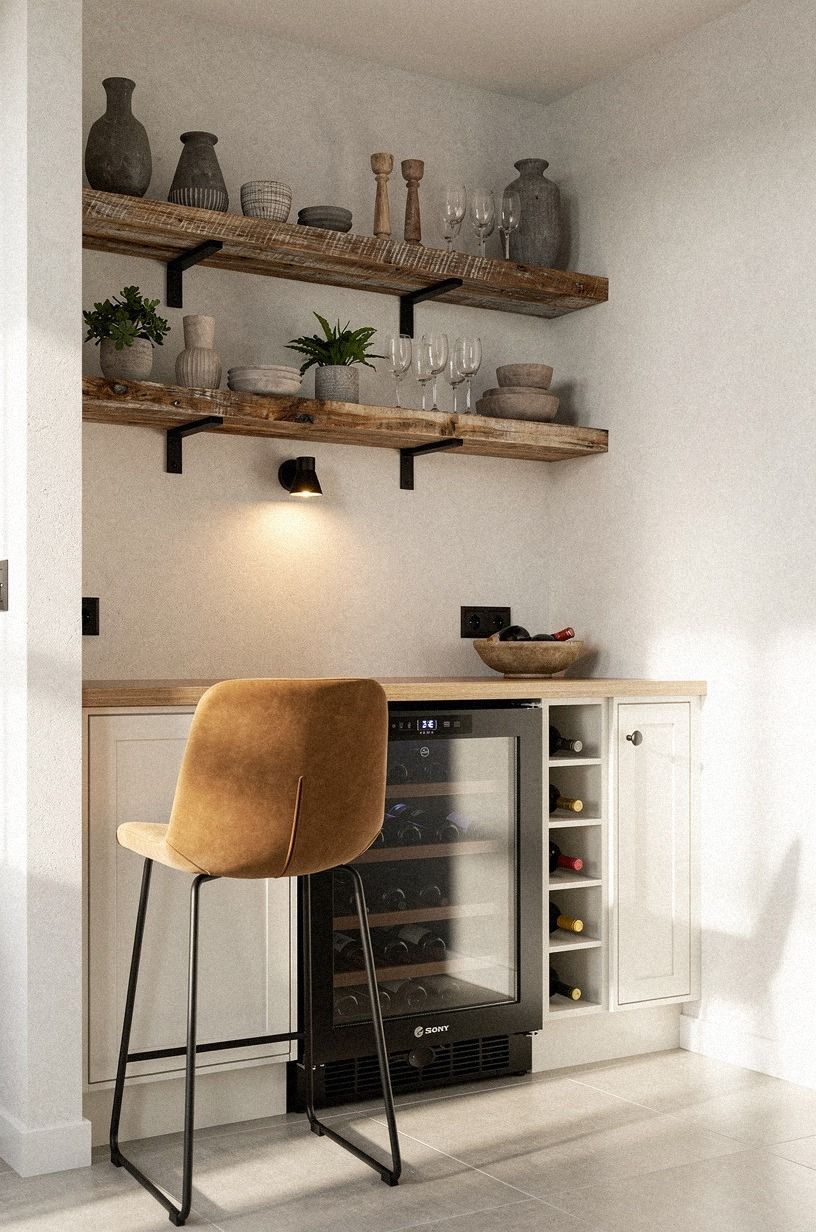
An under-counter wine fridge made the whole bar feel less decorative and more usable. I used to keep white wine wedged between yogurt and leftovers, which worked, but only in the strictest technical sense. Once the fridge moved under the bar counter, the upper shelves were free for glassware, mixers, and the little things that make hosting easier on you.
This works best when the surrounding cabinetry stays light, because the dark fridge door can anchor the whole lower half. I like reclaimed wood tones and black accents around it, especially with camel stools nearby, because the contrast keeps the appliance from looking dropped in.
But let the venting requirements lead. If the appliance needs breathing room, give it the room. A hidden bar that overheats its own fridge is not the kind of clever you want.
9Install stone shelves inside the reveal
Stone shelves changed the mood faster than paint did. The reveal instantly felt architectural, and the bottles looked settled instead of parked. If your bar niche has enough depth, a stone shelf gives you a solid line that reads clean even from a low angle across the floor.
I love this with midnight-blue doors because the cool frame makes the shelf material look richer, especially if you choose quartz or a soft honed stone in a pale cream. Typical quartz countertop pricing runs about $60-$120 per sq ft, so this isn’t the cheapest line item, but a small bar niche uses less square footage than a full kitchen. That makes it one of the few places where a better surface can be worth it.
I wouldn’t fake a thick stone front with a clumsy edge build-up. You can spot that shortcut across the room.
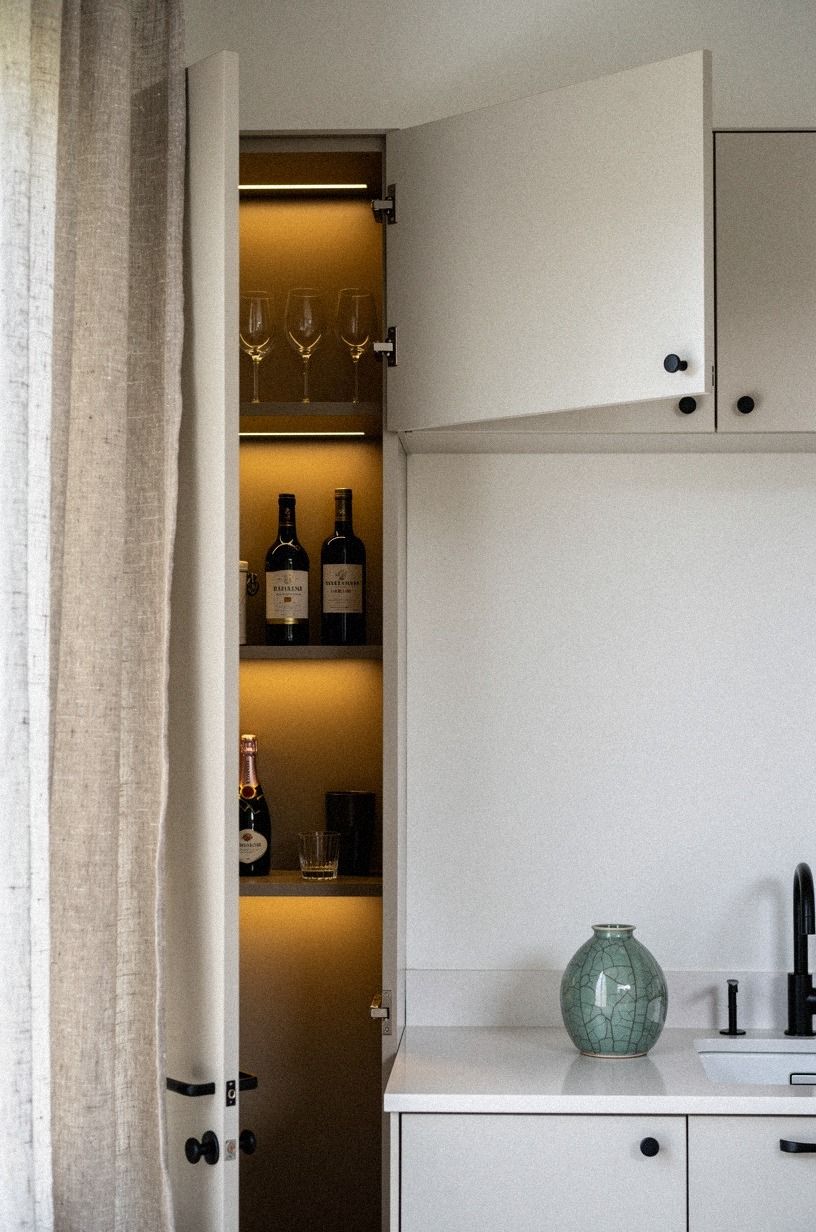
10Paint the hidden interior in oxblood gloss
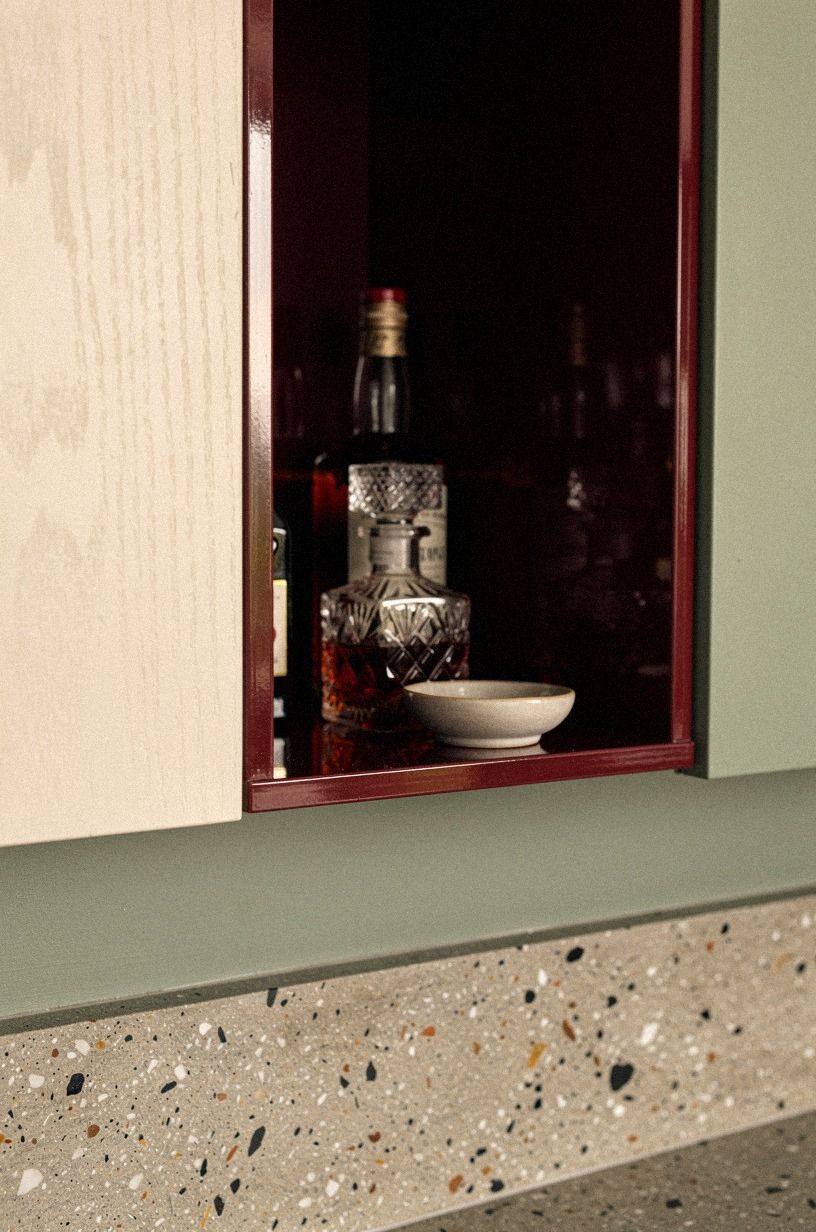
This was my boldest call, and I’m still glad I made it. The cabinet exterior stayed quiet, but the hidden interior turned deep and reflective, almost like a little lacquered room inside the wall. When the doors opened, the bottles caught the gloss and the whole niche looked more intentional than any tray on a counter ever could.
If your outer kitchen is soft, like cream cabinetry with a Sherwin-Williams Evergreen Fog SW 9130 moment nearby, oxblood reads dramatic without looking random. The gloss is important.
Matte would have died in there. But only use a dark interior if you can balance it with lighter shelving, glass, or stone. Otherwise the bottles vanish.
I tried a flatter red sample first, and it looked muddy by late afternoon. Gloss fixed that in one coat.
11Run LED strips behind every bottle row
Lighting is where the hidden bar stops being storage and starts feeling deliberate. I ran warm LED strips behind each bottle row so the back glow did the mood work for me, and suddenly the cabinet looked alive even when I wasn’t mixing anything. If your bar disappears into terracotta doors by day, lighting is what gives it identity at night.
But keep the light warm and low, never blue. I like the effect best when it washes over shagreen texture, stone, or glass instead of blasting forward into the room.
Yes, every bottle row matters. One strip at the top only lights the necks and leaves the whole lower half dead.
If you’re already collecting moody concealed-bar ideas, this fortress hidden bar piece gets the same quiet drama right. Small light.
Big payoff!
12Hang stemware under the upper cabinet
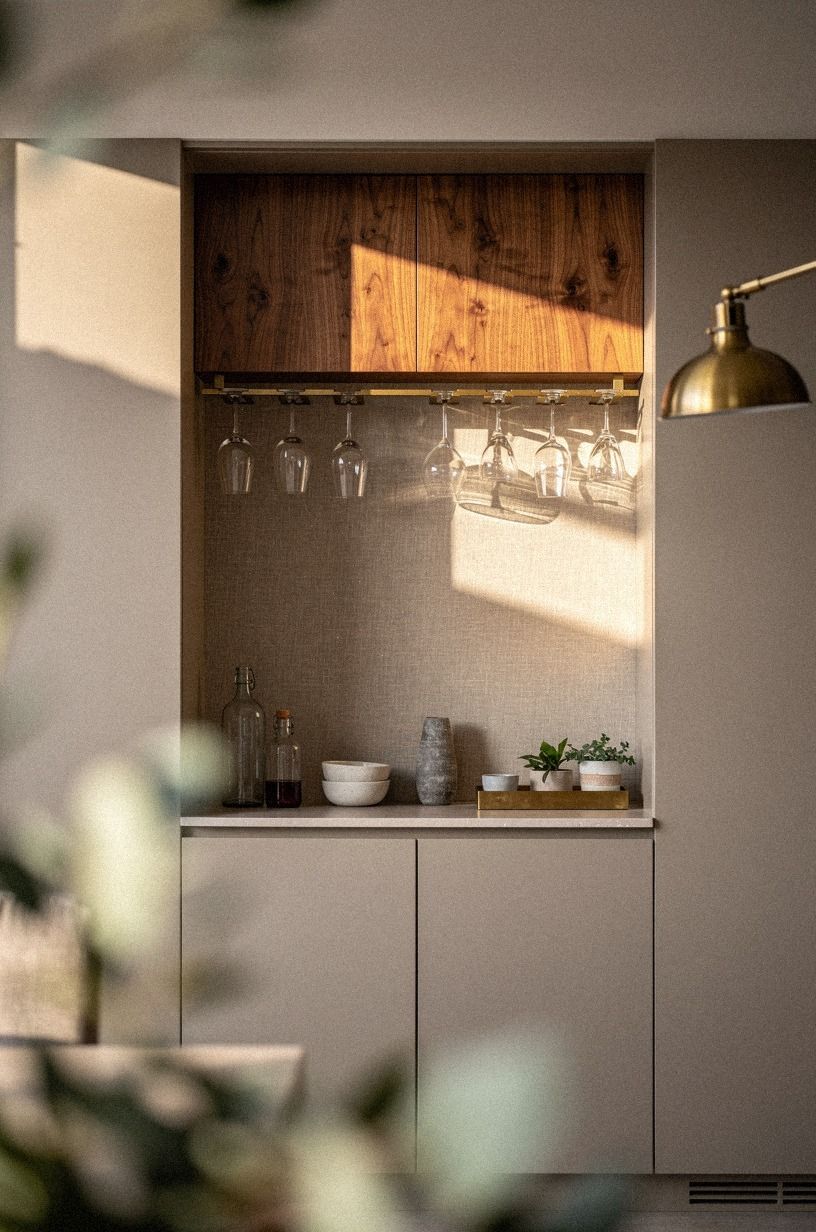
Under-cabinet stemware storage gave me back shelf space without making the bar feel stuffed. The glasses became part of the composition, but they stayed tucked high enough that the counter still felt open. If you have a pass-through view into the kitchen, this move lets the bar read layered without looking busy.
I like hanging rails most when the cabinet above is deep enough to hide the hardware line from normal eye level. Stemware racks in brass or bronze disappear nicely under warm cabinetry, especially when soft foliage or another room edge frames the view.
But measure your tallest glass first. You need enough drop so the bowls clear the counter and enough width so you aren’t clinking rims every time you grab one.
That’s the sort of tiny annoyance that can ruin a good setup.
13Disguise the pull with cabinet edge grooves
The groove pull was one of those details nobody notices until they do, and then they can’t stop touching it. I skipped a visible knob because I wanted the plum-grey face to read as one clean plane. When the door cracked open, the reveal felt cleaner, more custom, and far less kitchen-showroom.
This is especially good if your cabinetry is already carrying visual weight through color. Grooved cabinet edges give you function without a metal interruption, and they help a hidden bar cabinet built ins wall stay believable from a wide diagonal view. I would not pair this detail with fussy crown trim, though.
One subtle move is enough. If everything is special, nothing lands. That turned out to be one of the bigger lessons in this whole makeover.
14Slide a backsplash panel over the bar
A sliding panel is for people who want the bar there but don’t want it visible all the time.
15Set a tray shelf at elbow height
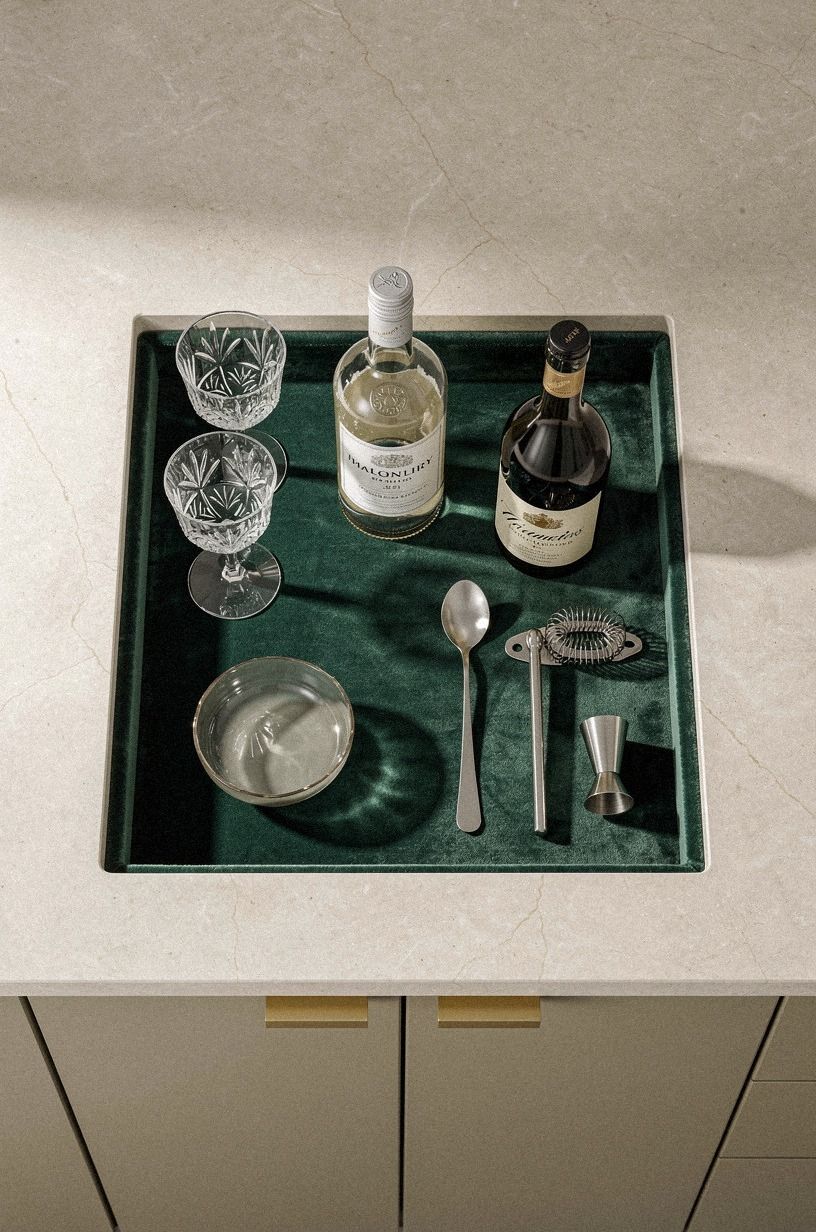
An elbow-height tray shelf sounds minor, but in use it was one of the smartest things I added. The little landing spot gave me somewhere to set a shaker, a bottle, or two glasses without taking over the full counter. If you entertain even casually, that extra ledge keeps your hands from doing a frantic dance.
I placed mine where my arm naturally paused, not where the cabinet drawing first suggested, and that changed everything. Overhead, the geometry looked neat, but the comfort was the real win.
A small emerald tray shelf against cream stone and warm hardware can feel jewel-like without becoming cute. And if your bar opening is narrow, this shelf helps break the vertical stack so the whole interior doesn’t read as one tall box.
16Add mirrored tile behind the bottles
Mirrored tile is the move I almost talked myself out of, mostly because I didn’t want the bar to feel too flashy.
17Style the closed wall with one sconce
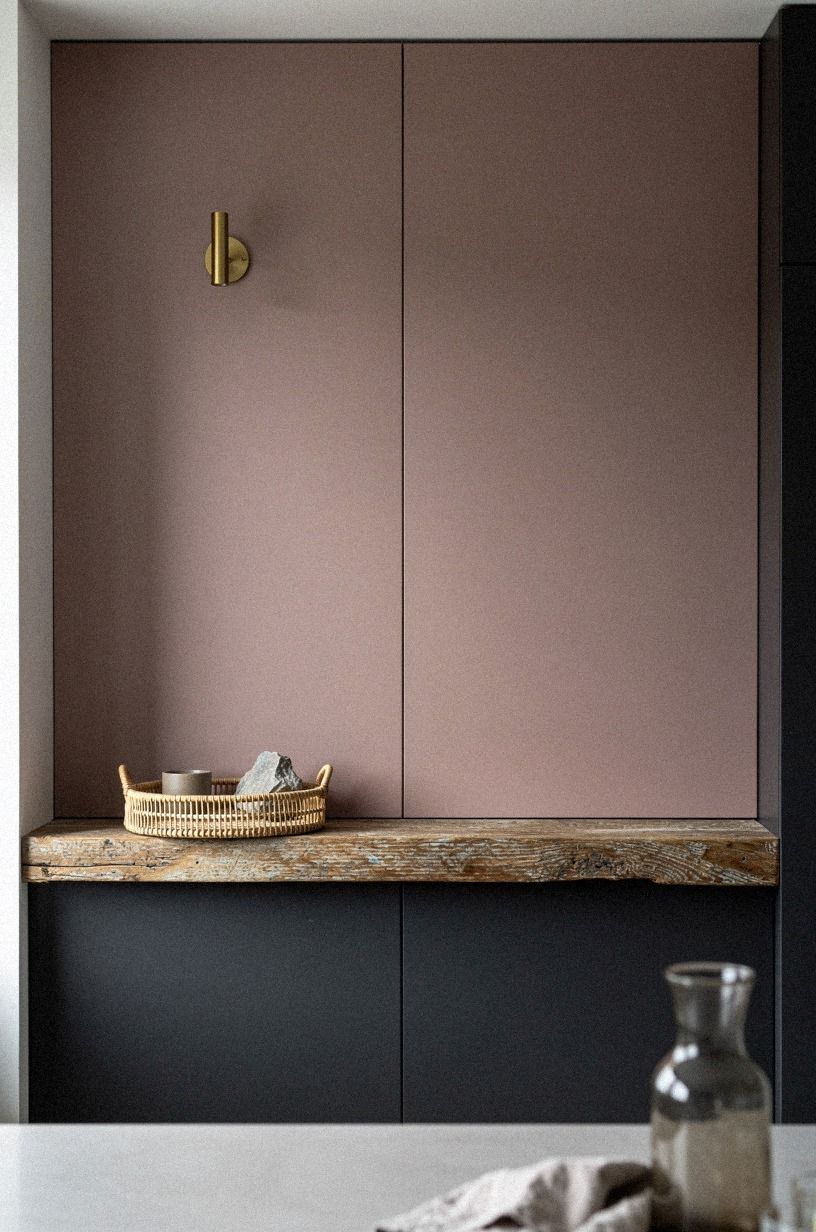
This was the part that made the hidden bar feel grown up. Once the doors were shut, I styled the wall like a finished elevation, not a storage cover. One brass sconce, centered with intention, gave the dusty-rose and charcoal panels a reason to exist when the bar was off-duty.
The hidden wall should still contribute to the kitchen, and lighting is what lets it do that. I like one brass sconce better than art here because the bar already delivers enough visual interest when it opens.
But keep the wiring plan simple. If the wall is doing concealment, don’t clutter it with extra objects just to prove you can style.
You need one clear note, not five competing ones. That’s the whole clean-room payoff.
18Leave the final reveal slightly lit
The best part of the project wasn’t the first big reveal. It was the quieter habit that came after.
I started leaving one cabinet slightly ajar at night with the warm light still on, and the kitchen looked softer from the hallway than it ever had when everything sat out in the open. That last little glow is what made the room feel lived in, not staged.
And if your cabinetry is warm white with camel leather nearby, a cracked-open door gives you just enough asymmetry to keep the wall from feeling stiff. I would not leave it wide open. Just a little.
That is why I call this the final reveal and not the permanent display. You want a hint, not a showroom.
Once I saw that low light through the doorway, I knew the makeover had done what I wanted.
How much it cost
I kept my project firmly in the cosmetic tier, because I wasn’t replacing the full kitchen and I didn’t need to. The win came from using one existing wall better, then spending on finish choices that looked rich in a small footprint. If you’re planning your own modern built in bar, these typical US numbers are the most honest starting point.
I treated the hidden bar like a focused cosmetic upgrade inside a bigger kitchen envelope. That meant painted cabinetry, selective hardware, better lighting, and nicer shelf materials, not a full demolition. For material planning, these numbers helped too:
The Two-Wood Rule
My best styling rule was simple: two wood tones, no more. One was the cabinet-adjacent oak tone that kept the kitchen grounded. The other was the darker walnut note inside the bar.
If I added a third wood, the whole wall started looking busy and you could feel the cabinet line lose discipline.
This rule matters because hidden bars work by contrast you can control. You want enough variation for depth, not so much that your eye gets noisy. I learned that from built-in references like this IKEA wall illusion, where repetition and restraint do the heavy lifting.
Why does the One-Door Pause work so well?
Because a hidden bar should not perform like theater every single time you use it. One open door, one lit niche, one controlled view.
That is enough. When both doors are flung wide all day, the bar stops feeling tucked away and starts feeling like more open shelving you have to maintain.
I started leaving just one side active when friends came over, and it looked calmer from every angle. You still get the reveal, but your kitchen keeps some composure. Small choice, huge difference.
Closed wall over open shelf
If I had to choose between open bottle shelving and a concealed cabinet wall, I would pick the closed wall every time. Open shelves can look charming for about ten minutes. Then labels fade, dust lands, and you start editing the display for the room instead of using the room for yourself.
A closed wall gives you visual quiet first and atmosphere on demand. For me, that’s the luxury. Not more things to show, just better control over when you see them.
Why hiding the bar changed the whole kitchen for me
I did not expect this project to change my behavior as much as it changed the room, but it did. Before, the bar stuff lived in that annoying category of objects I used often and disliked looking at every day.
Bottles on the counter always wanted a perfect tray. Glassware wanted dusting. The little accessories wanted to multiply.
And because they were visible, they felt like they needed styling all the time. That kind of maintenance gets old fast.
Once the bar moved into cabinetry, the kitchen got quieter in a way I could feel in my body. I know that sounds dramatic, but if you’ve ever cooked in a room that never looks finished, you know the feeling.
The closed doors gave the wall a clear job. The open version gave me a richer little moment at night. I wasn’t solving clutter with bins or labels.
I was solving it with architecture.
The other thing I learned is that concealment makes you edit better. When every inch of the bar isn’t on display, you stop buying filler.
You keep the bottles you like. You keep the glasses you reach for. You stop trying to make the setup impress people from across the room.
That’s where the room started feeling more expensive to me, not because I spent wildly, but because the choices got tighter.
Would I do anything differently? Just one thing.
I would plan the lighting earlier. I got so focused on shelves, door fronts, and finish color that I treated the LEDs like a last pass, when they should have been there from day one.
The light is what makes the reveal feel intentional after dark. Without it, a hidden bar can look smart.
With it, the bar feels memorable. That is the line I’d respect if you do this in your own kitchen.
A Few Things Worth Answering
What is the best Built-In & In-Wall Hidden Bar Ideas [Cabinetry That Conceals] for a small kitchen?
A narrow pantry-wall version is the best place to start because it gives you real storage without stealing floor space. If you need a template for the built-in look, borrow the proportions from IKEA planning and keep the shelves shallow enough that the doors still close cleanly.
Where can I buy Built-In & In-Wall Hidden Bar Ideas [Cabinetry That Conceals] pieces on a budget?
Start with IKEA, Target Threshold, and Wayfair for trays, glassware, and simple cabinet hardware. Then check Facebook Marketplace for older bar tools, mirrors, and stools. I also like using that IKEA built-in wall reference when I need a low-cost built-in look.
How much does a Built-In & In-Wall Hidden Bar Ideas [Cabinetry That Conceals] makeover cost?
For a cosmetic version, expect about $300-$1,500 for the average US refresh. That’s the range where paint, hardware, lighting, and a peel-and-stick backsplash can carry a lot of visual change. If you move into cabinet replacement or appliances, the number climbs fast.
Can I create a Built-In & In-Wall Hidden Bar Ideas [Cabinetry That Conceals] on a budget?
Yes, and the cheapest wins are often the clearest ones. Paint first, light second, hardware third.
Existing wall depth. A better tray. Warm LEDs.
If you already have a pantry run, you may not need new square footage at all.
Is a Built-In & In-Wall Hidden Bar Ideas [Cabinetry That Conceals] worth it in a small space?
Yes, because small kitchens benefit most from visual quiet and better task zoning. Keeping the bar behind doors lets your counter work harder for daily life. I also think the smaller footprint helps you stay disciplined about what earns a place inside.
Is Built-In & In-Wall Hidden Bar Ideas [Cabinetry That Conceals] a good idea for a rental?
Yes, if you keep the intervention light. Removable upgrades can still fake the effect.
Peel-and-stick backsplash. A freestanding cabinet with matching paint. Battery lighting.
If drilling isn’t allowed, use the same concealed styling logic inside an existing cupboard and save the trim work for later.
Where I’d Start First
If I had to pick one, I’d start with matching the outer doors to the kitchen cabinets. When the closed wall looks calm, every finish inside it works harder.
Pin this idea for later and start with the disguise, not the bottles. It pays off every night!