
I‘ve walked into a hundred homes and the under-stairs space is always the same: a sad slope holding a vacuum cleaner and a coat rack. Then someone clever hides a bar in it, and the whole entryway changes energy. A hidden bar under the stairs isn’t a luxury thing; it’s a storage move that surprises people when they find it. The dead triangle behind the treads becomes a real bar, and your guests discover it when you open a panel, not when you point at it.
Don’t overthink: Build the Two-Wood Rule Into the Whole Nook.
These are 17 under-stairs hidden bar ideas that turn that awkward wedge into the most memorable corner of your house. Some cost almost nothing (a curtain rod and a thrifted tray).
Some cost real money (a custom speakeasy door). All of them work because the space is already there, waiting, and you’ve just been ignoring it.
Less than dinner out for the budget version!
- Anchor the Layout With a Slim Console and Two Stools
- Build the Two-Wood Rule Into the Whole Nook
- Hang a Curtain Instead of a Door
- Frame the Slope With a Single Picture Light
- Float a Single Open Shelf for the Bottles You Actually Drink
- Try the Three-Source Light Stack
- Paint the Back Wall One Shade Darker Than You Think
- Hide the Bar Behind a Framed Mirror
- Should You Use a Pegboard Inside the Door for Glassware?
- Layer Two Rugs to Define the Bar Zone
- Should You Add a Single Velvet Stool as the Power Move?
- Build a Library Bar Behind a Sliding Bookcase
- Run a Brass Rail Along the Underside of the Stairs
- Skip the Mini Fridge, Use an Ice Bucket Instead
- Use a Pair of Antique Doors as the Concealment
- Paint the Ceiling Slope a Different Sheen
- Style the Counter Like a Still Life, Not a Store
1Anchor the Layout With a Slim Console and Two Stools
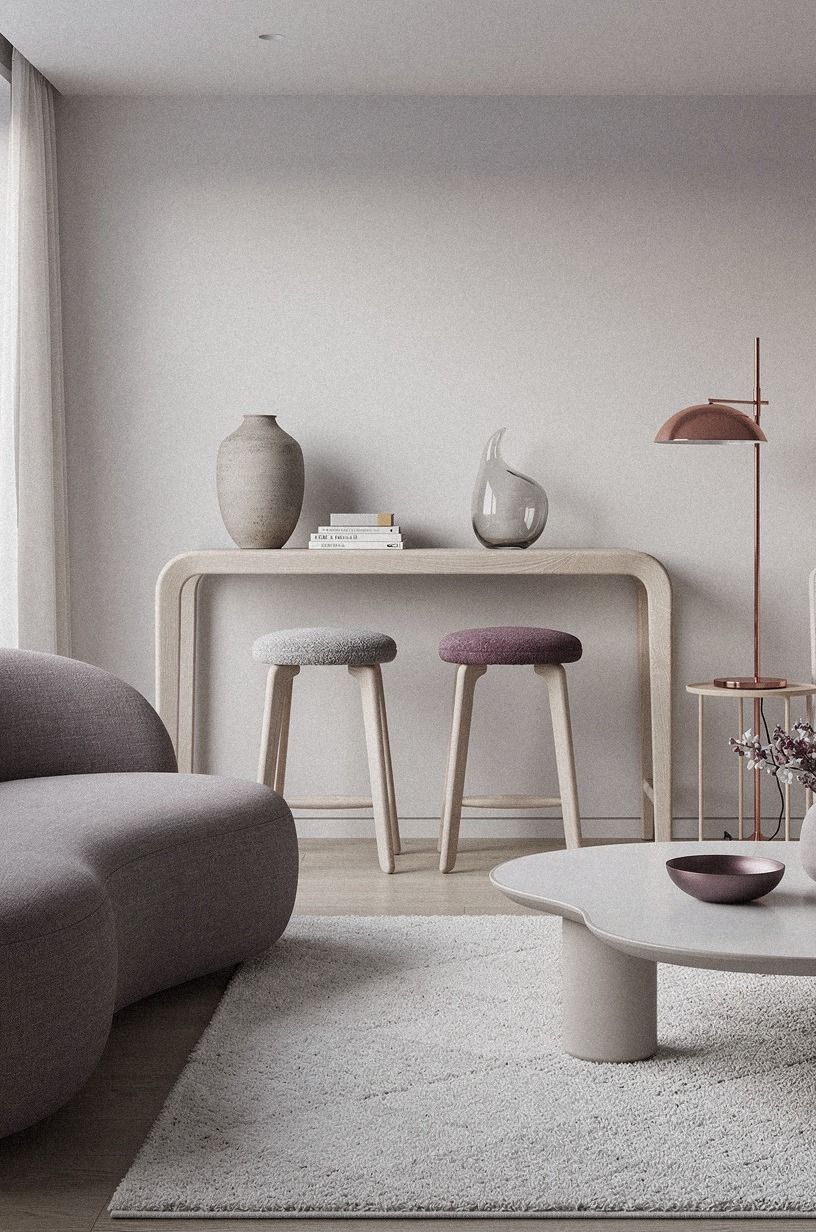
Skip the full bar counter. A 30-inch console table (the slim IKEA HEMNES works) pushed flush against the back wall gives you a real prep surface without eating the whole wedge. Two backless stools tuck under the slope where the ceiling dips, and your guests can actually sit without hunching.
Keep the table 32 to 36 inches tall so it lines up with the stair rail above it; that visual rhythm is what makes it feel intentional, not improvised. And if your wedge is shallow, drop the table to 30 inches and pull the stools a few inches forward, you’ll get the same sit-down feel without scraping knees on the slope.
I’d skip a glass top here. It shows every fingerprint, and a bar gets touched constantly. A solid white oak or walnut top will hide the wear and look better at year five than day one.
For the full layout math on small wedges, our cabana corner ideas post runs the same numbers against a similar footprint.
2Build the Two-Wood Rule Into the Whole Nook
The Two-Wood Rule means you pick one wood for the warm surfaces (counter, shelving, ceiling slats) and one wood for the structure (treads, rail, banister). They should contrast, not match.
Try cerused white oak on the new shelving against the original dark walnut treads you’ve already got. That one decision does more work than any paint color, and it costs you about $250 in plywood and a Saturday.
But don’t go to a third wood. That’s where most under-stairs builds fall apart.
Two woods feels intentional; three woods feels like a furniture store. For more on laying two-tone woods across a small space, see our hidden bar cabinet ideas for the wood-pairing principles in action.
3Hang a Curtain Instead of a Door
The cheapest move in this whole listicle: a floor-length velvet curtain in a deep tone (forest green, oxblood, ink blue) on a ceiling-mounted rod. Pull it closed and the bar vanishes.
Pull it open and you’ve got a reveal moment that’s better than any custom door. A linen curtain works too, but velvet absorbs sound, and a bar under the stairs sits right next to your main living space, so the dampening matters.
If you want to push it further, the same curtain idea goes behind a bookcase bar reveal, just with hardware instead of fabric.
I’d skip grommet tops here. They look like a dorm room. Pinch pleat or rod pocket, full stop.
You’ll spend $80 to $150 and ten minutes to hang it.
4Frame the Slope With a Single Picture Light
The angle of the stair underside is what makes the bar feel like a cave. A slim picture light mounted on the back wall, 6 to 8 inches above the counter, throws a pool of warm light that hugs the wedge and stops right at the rug’s edge.
That’s the move that says “this is a bar,” not “this is where we keep the mop.” Warm bulbs only (2700K or lower); anything blue will kill the mood instantly. And if you’re renting and can’t wire a fixture, a battery-operated picture light from Amazon Basics does about 80% of the same job for $35 and zero holes.
If you’re wiring the whole nook, mount a second light low on the sloped ceiling to bounce off the floor. You’ll get rid of every shadow in the wedge and your guests will look ten years younger.
Worth it. And the rest of the room matters too: if your stairwell overhead is blasting cool white, your wedge is fighting the hallway, and you’ll feel it even if you can’t name it.
5Float a Single Open Shelf for the Bottles You Actually Drink
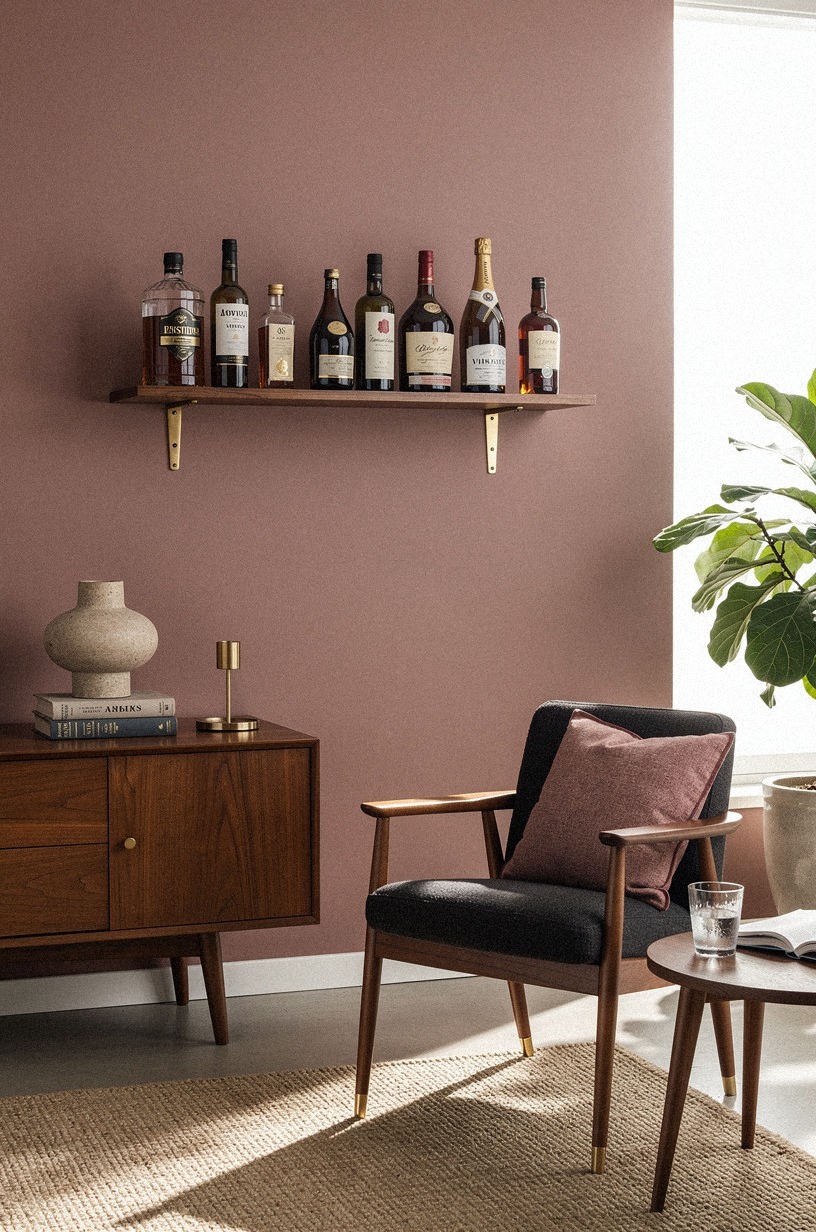
Resist the urge to build a wall of cubbies.
6Try the Three-Source Light Stack

The Three-Source Light Stack is the lighting rule I use in every small nook: one overhead source (a small flush mount or recessed), one task source at counter height (the picture light from section 4), one accent at floor level (a tiny uplight or an LED strip tucked behind the toe-kick). Three layers, three switches, all dimmable. You’ll never have a single moment where the bar feels either washed out or cave-dark, and your guests will notice the difference even if they can’t name it.
And the thing that ruins most stacks is dimmer compatibility: every dimmer needs to be the same type (ELV or 0-10V), or one of them will buzz audibly when you turn it down past 30%.
But don’t put the accent on the same wall as the task. Bouncing it off the opposite wall doubles the glow without adding a fixture, and you’ll spend less than $40 on a smart bulb and a plug-in strip.
7Paint the Back Wall One Shade Darker Than You Think
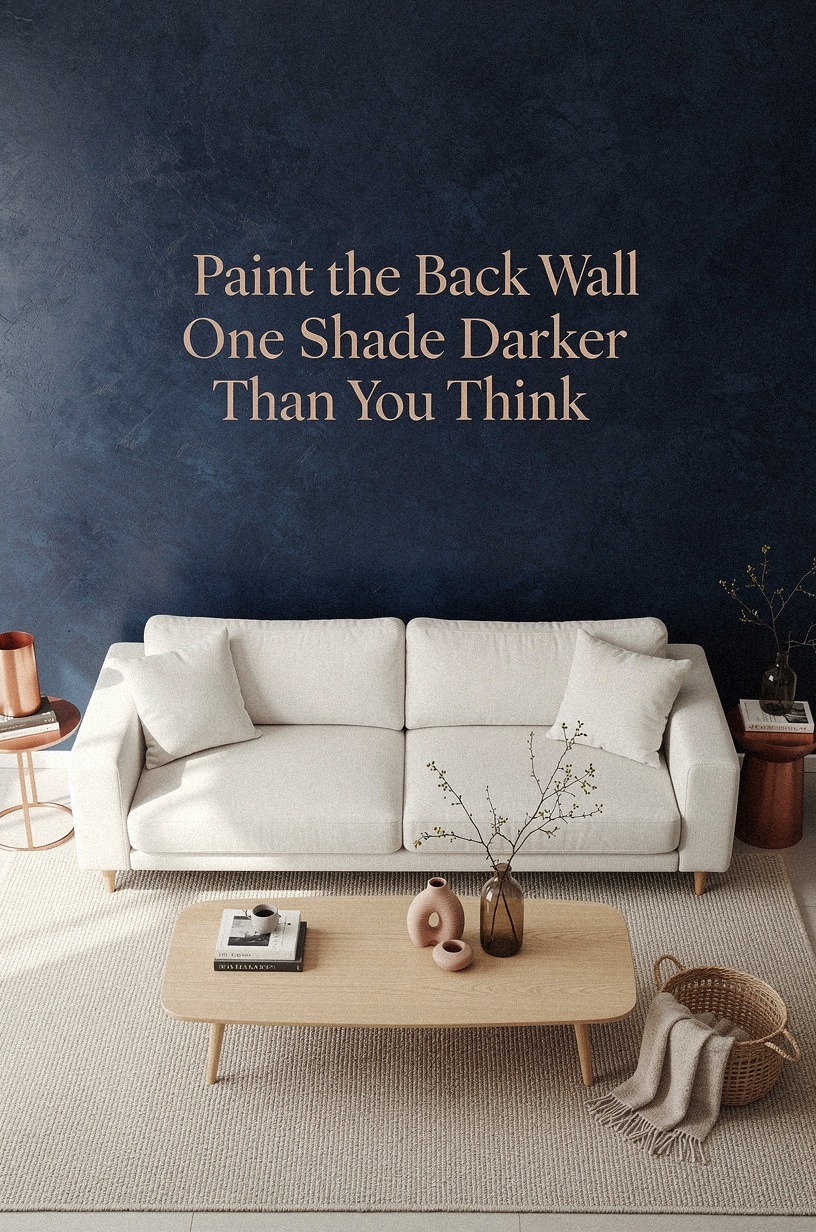
People pick the safe color and then wonder why the bar feels flat. Go one full shade darker than whatever the rest of the room is.
If the stairwell is Farrow & Ball Ammonite (a warm off-white), paint the bar back wall in Farrow & Ball Hague Blue at low sheen. If the stairwell is a clean white, go Sherwin-Williams Urbane Bronze on the back wall only.
That single darker plane makes the bottles glow like a display case.
I’d skip pure black. It swallows everything in a low-ceiling wedge and reads as a hole in the wall rather than a feature. A deep, slightly warm dark is what you want.
If you’re going this route, our cabana corner ideas post walks through the same color-deepening rule in a nook of similar size.
8Hide the Bar Behind a Framed Mirror
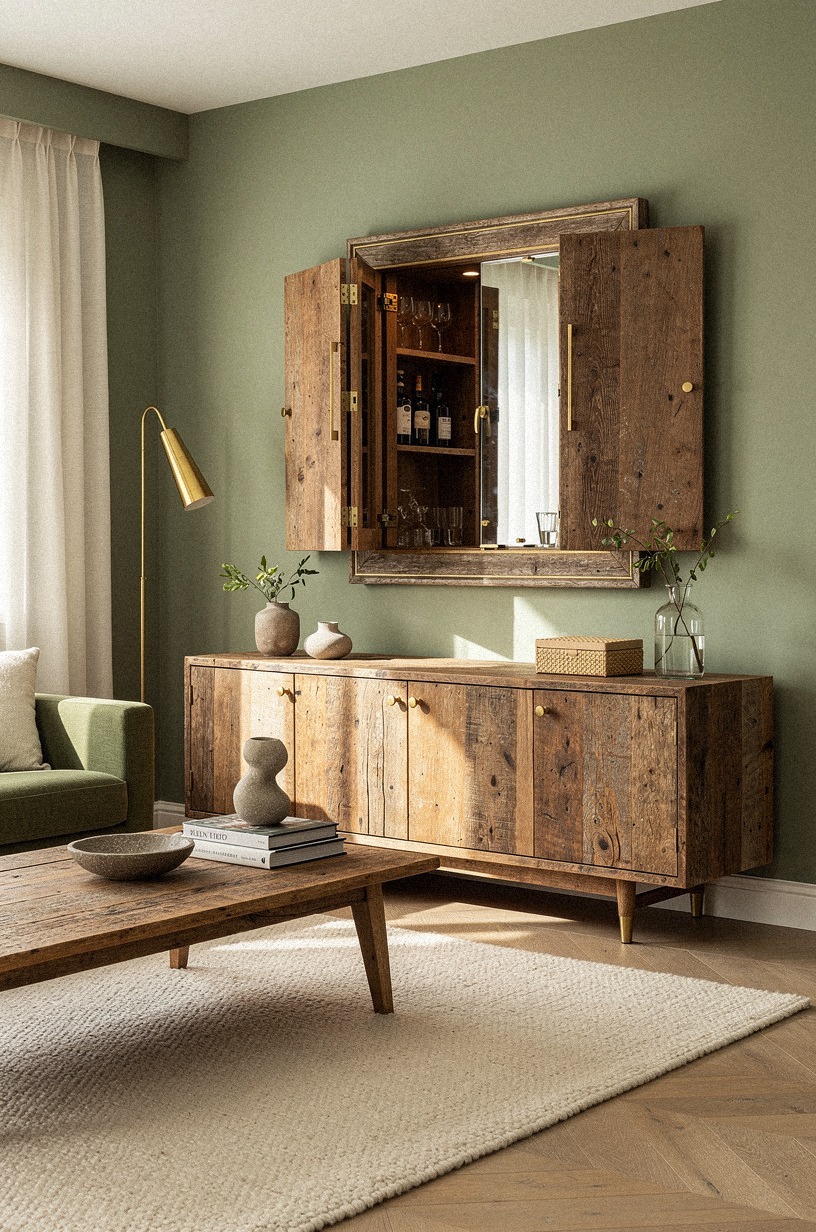
Mount a large framed mirror (at least 24 by 36 inches) on a full-height hinge, painted the same color as the surrounding stair wall. Closed, it’s just a mirror that bounces light down the hallway.
Open, and you’ve got a doorway to the bar. It’s the same move a speakeasy uses, and it costs about $120 in mirror, hinge hardware, and paint. Your guests will not see it coming.
For the heavier version of this reveal, see our hidden speakeasy door entrance ideas.
If your wall is plaster, use a French cleat instead of trying to anchor into the lath. The mirror will be heavy once framed, and you don’t want a 30-pound mirror falling on someone’s foot the first time they swing it open.

9Should You Use a Pegboard Inside the Door for Glassware?

A painted pegboard (matte black or oxblood) mounted on the inside of the hidden door holds up to 12 pieces of stemware, all hanging, all visible. It looks like a working bar the moment the door opens, and it frees your floating shelf for bottles.
The pegboard is one of those upgrades that costs $25 and looks like a $500 design decision, and it’s why you’ll see it in half the design accounts you follow. Yes, really!
I’d skip clear plastic hooks. They look cheap and they snap in about a year. Go brass or matte black hooks; they cost a few dollars more and they last forever.
10Layer Two Rugs to Define the Bar Zone
The under-stairs wedge is small, but a low-pile wool runner (about 2 by 5 feet) laid over a slightly larger natural fiber rug (jute or sisal) creates a clear “this is the bar area” zone without any wall.
11Should You Add a Single Velvet Stool as the Power Move?
You don’t need a full seating area. One sage velvet stool with a brass footrest, tucked under the slope at the deepest point, gives one person a place to sit while you pour.
It’s the visual anchor that tells the room this is a bar, not a closet. The stool becomes the most photographed object in the nook, and you’ll be surprised how often guests want to sit exactly there.
Total MVP for this room.
I’d skip anything with a back. The slope won’t allow comfortable back support anyway, and a backless stool slides under the counter and disappears when you’re not using it. That’s the point.
12Build a Library Bar Behind a Sliding Bookcase
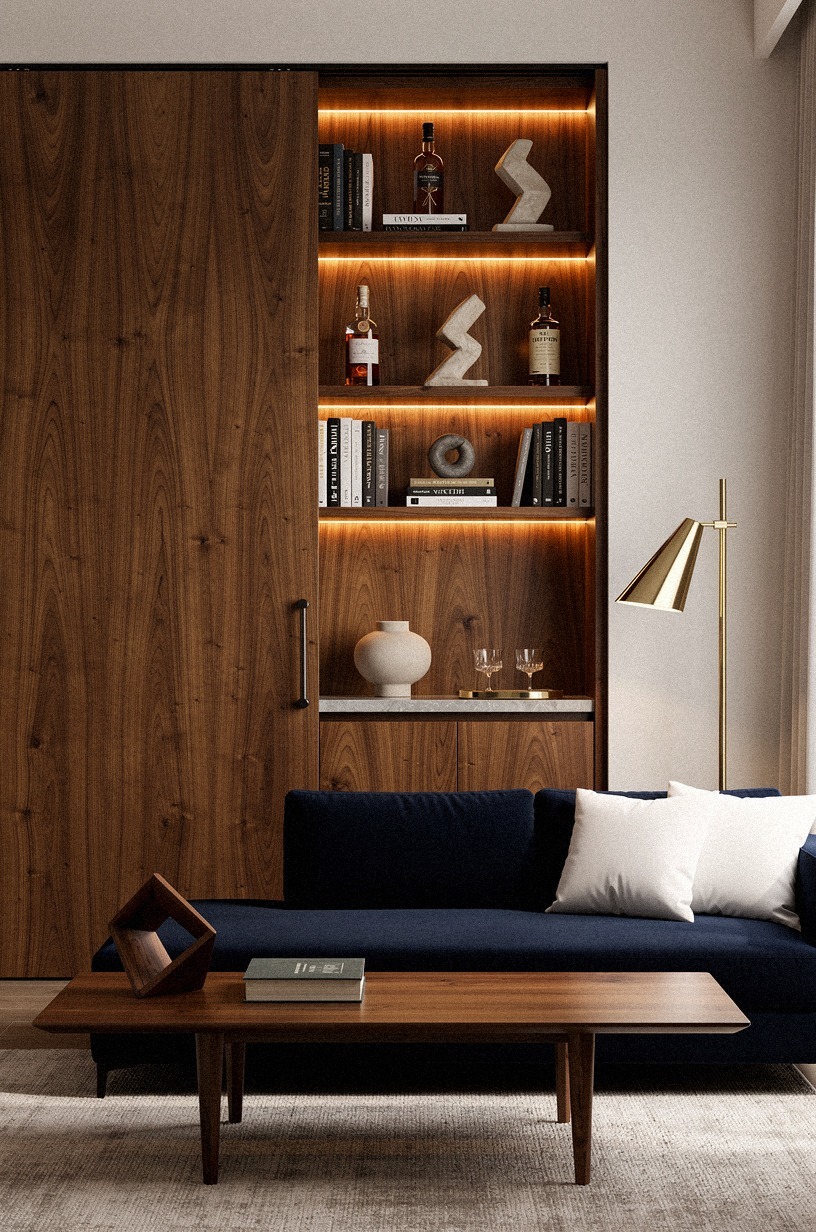
This is the move if you’ve got the budget and the patience. A floor-to-ceiling bookcase on barn door hardware slides sideways to reveal the bar inside.
The front looks like a real library; the back is a fully stocked bar. The reveal takes two seconds and it’s the most dramatic thing on this list. Budget about $1,200 to $2,500 if you DIY the frame and buy the hardware from a real door supplier, not a home goods store.
And the part people forget: bookcase weights swing hard when the door is open, so mount the track into the stair stringer, not the drywall; the door will weigh 80+ pounds loaded.
But measure twice. The bookcase has to clear the stair rail when it’s fully open, and most people forget that until install day.
A 2-inch gap is the difference between a working reveal and a stuck door. If you want a smaller-scale version of the same idea, our hidden bar behind a bookcase post walks through the hardware in detail.
13Run a Brass Rail Along the Underside of the Stairs
A thin brass rod (about 3/4 inch thick) screwed into the stair risers, running the full length of the slope, holds hanging plants, glassware, or even pendant lights over the bar. It’s one of those things that does nothing functional and everything visually.
The brass catches whatever warm light you’ve got and turns the underside of the stairs into an actual design feature instead of a forgotten ceiling. About $60 in rod, brackets, and anchors.
And if you’re worried about the rod looking like a curtain rod, run it at an angle (downhill with the slope) instead of straight horizontal; the eye reads it as architectural rather than decorative.
I’d skip the cheapest brass. It tarnishes unevenly and starts to look like costume jewelry in six months. Unlacquered brass is the move.
It develops a patina that gets better with age, and you’ll never polish it. If you’re layering brass with other warm metals across the room, our cabana corner ideas post runs through the same metal-mixing rules.
14Skip the Mini Fridge, Use an Ice Bucket Instead
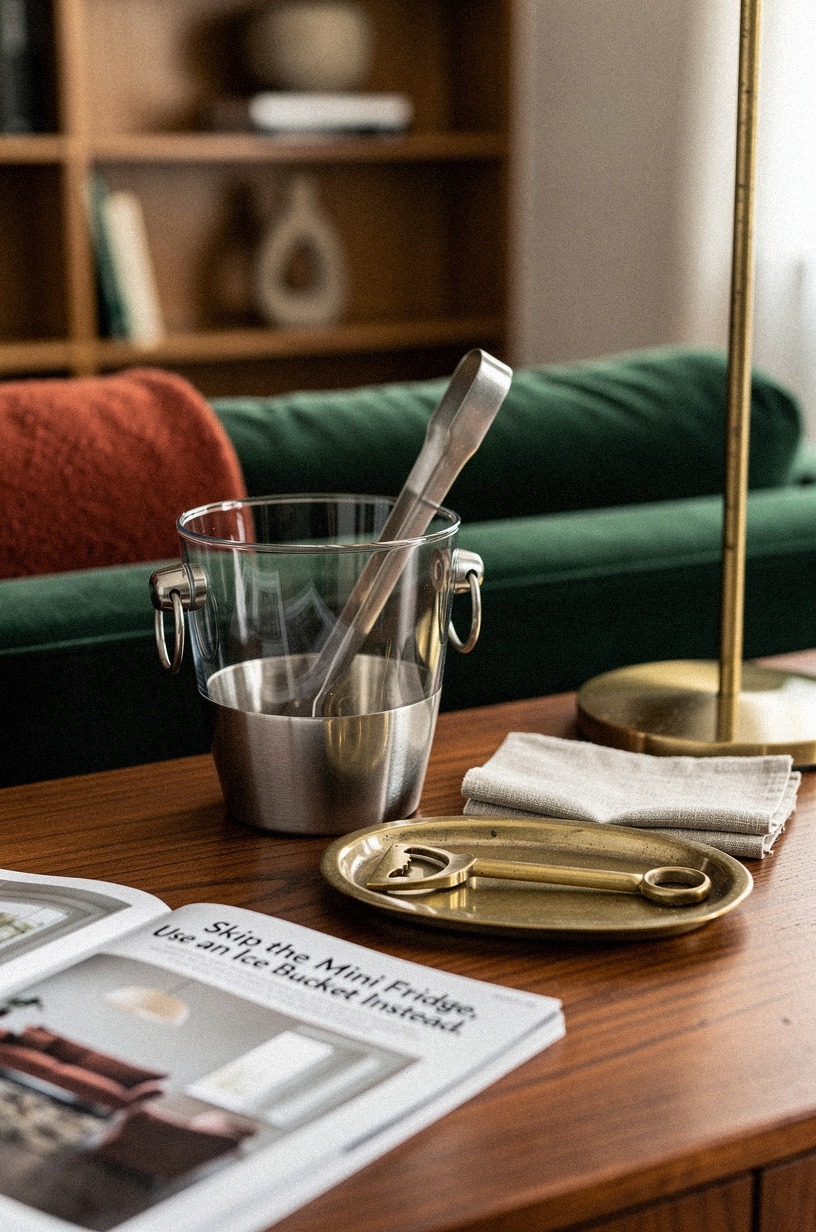
Everyone wants a mini fridge under the bar. Resist.
A vintage-style metal ice bucket with a brass tong does the same job for $40 and looks 100 times better. The bucket becomes part of the styling, not an appliance. If you need cold storage, hide a slim under-counter fridge behind a panel further down the slope, but the working bar surface stays free of plastic.
The bucket also forces you to edit: when ice runs low, you stop pouring, which is its own kind of hospitality. Worth it.
15Use a Pair of Antique Doors as the Concealment
Hit a salvage yard for a pair of old paneled doors (even mismatched is fine).
16Paint the Ceiling Slope a Different Sheen
The slope is what makes this nook feel cave-like. Fight it with high-gloss paint on the ceiling slope only.
A satin or eggshell on the walls, gloss on the slope, and the ceiling will bounce light back down onto your bottles and glassware. It costs about $30 more in paint than you’d spend on flat everything, and the visual upgrade is enormous. A flat ceiling absorbs; a gloss ceiling doubles your lighting budget.
And the difference shows up in photos first, where the slope reflects your bottles and reads as a designed moment instead of a forgotten surface.
But don’t go full mirror finish. A satin gloss is the sweet spot. Anything higher shows every imperfection in the plaster, and you’ll spend your weekends filling nail holes instead of pouring drinks.
17Style the Counter Like a Still Life, Not a Store
This is the move most people get wrong. The counter should hold three things: a tray, two bottles, one plant or floral.
That’s it. Not your full liquor collection, not your mixer graveyard, not your collection of novelty glasses. A still-life counter reads as intentional. A cluttered counter reads as dorm room.
Edit ruthlessly. You’ll thank yourself every time you walk past.
If you want a working counter you can actually build, our hidden bar cabinet ideas post shows the cabinet-back version of the same rule. Less than a full liquor shelf, every time!
I’d skip anything ceramic. It chips when a bottle drops and it makes the whole vignette feel fragile. Go brass, walnut, or stone for the tray, and let the bottles be the only glass on the surface.
What a Hidden Under-Stairs Bar Actually Costs in 2026
Here’s what most people spend, in real US ranges, from a DIY budget build all the way up to a full custom job. The numbers below come from real homeowner projects and contractor quotes we’ve tracked over the last year.
You can land in the Budget tier for a Saturday and about $400 if you already own a drill and a level. The Mid tier is where most people end up because the materials are real but the labor is still yours.
The High tier is the kind of project where you’re hiring a finish carpenter for two weeks and you stop watching the bill. Pick the tier that matches how often you’ll actually open the bar, not the tier that photographs best on Instagram.
Why This Works: The Psychology of a Reveal
There’s a reason hidden bars feel like the best part of a home, and it isn’t really about the liquor. It’s the reveal.
Humans remember moments of discovery more than moments of presentation. A bar behind a curtain, behind a mirror, behind a sliding bookcase, gives your guests a small moment of “wait, what?” every time they come over. That moment is the whole product.
You’re not selling alcohol; you’re selling a tiny theatrical beat that happens in your own house.
The other thing most people miss: the under-stairs wedge is acoustically dead. The slope soaks up sound, which means a conversation at the bar feels private even if it’s ten feet from the living room.
Designers have known this for a hundred years; the best hotel bars use the same approach with curved ceilings. You’re getting hotel-bar acoustics for the price of a curtain rod.
The design cycle in 2026 is moving away from open everything. Open kitchens, open floor plans, open shelving on every wall.
The hidden bar is the counter-move: a small, intentional reveal in a house that gives everything else away. You’ll notice more of them in design magazines this year, and you’ll notice that the homes that have one feel calmer than the homes that don’t.
The wedge stays calm, the rest of the house breathes, and your guests leave remembering the moment they saw it.
If you’re a renter, you can still pull this off. A tension-rod curtain, a freestanding shelf, a console on furniture pads, and a rug.
Nothing touches the wall. You take it all with you when you move, and your security deposit stays intact.
A Few Things Worth Answering
What is the best under-stairs hidden bar idea for a small living room?
A velvet curtain on a ceiling-mounted rod, with a slim console behind it and one floating shelf for bottles. It’s reversible (renter-friendly), costs under $300, and the reveal is genuinely good.
If you’ve got a bit more budget, the hinged mirror in section 8 is the next step up and feels twice as custom as it actually is. For the closet-sized cousin of this build, our closet-to-speakeasy-bar post walks through the exact same idea in a different footprint.
Where can I buy under-stairs hidden bar pieces on a budget?
IKEA for the console (HEMNES) and the floating shelf brackets, Target for the velvet stool and the picture light, Wayfair for the slim rug and the brass rail. For secondhand, hit Facebook Marketplace and Habitat for Humanity ReStores for the antique doors in section 15 and the salvage console. You’ll cut your budget in half if you’re willing to refinish one piece yourself.
How much does an under-stairs hidden bar makeover cost?
Realistically, between $300 and $1,200 for a DIY weekend version, $2,500 to $8,000 if you’re hiring a handyman for a day and buying mid-tier materials, and $12,000 to $40,000+ for a full custom build with a carpenter and millwork. Most homeowners land in the middle tier. Don’t trust any quote that comes in below $300 unless you’re painting and that’s it.
Can I create an under-stairs hidden bar on a budget?
Yes, and the floor for “good enough” is genuinely low. Three moves, total cost under $200: a velvet curtain on a tension rod, a single floating shelf with brackets from the hardware store, and a brass tray holding your two favorite bottles.
That’s it. Everything else on this list is an upgrade, not a requirement.
The reveal works because of the curtain, not the cabinetry.
Is an under-stairs hidden bar worth it in a small space?
Yes, more than almost any other upgrade. A small space actually helps because the wedge is intimate and acoustically dead.
If you’re under 1,000 square feet, the under-stairs nook is probably the only spot in your house where a bar feels right-sized. The move is restraint: one stool, one shelf, three objects on the counter.
If you want to push past one focal point, our IKEA slider-box storage post covers how to make every inch of the wedge earn its rent.
Is an under-stairs hidden bar a good idea for a rental?
It’s actually one of the best projects for a rental because the whole thing can be reversible. Skip anything that drills into the stair structure.
Use a tension-rod curtain, a freestanding shelf that sits on the floor, and a console on rubber furniture pads. You take it all when you move, the walls stay perfect, and your landlord never knows.
If I Had to Pick One, I’d Start With the Curtain
Pick the velvet curtain first, don’t overthink the color. The whole wedge reads as a bar the moment you hang it. Pin our hidden bar cabinet ideas for when you’re ready to commit to millwork.