
Speakeasy Wall Art Ideas (Vintage Prints, Newspaper & Neon) pulled my living room together for about $300 to $1,200 if you’re keeping the big furniture and changing the walls. I started this makeover after realizing my Article Sven tan leather sofa looked good on paper and oddly flat in real life, because the wall behind it said nothing. The Farrow & Ball rep at the paint counter saw me staring at swatches for ten minutes and just handed me a Hague Blue sample. So I stopped shopping for more stuff, changed the art story first, and the room finally felt finished. It wasn’t a budget thing, it was a sequencing thing.
Here’s what it looked like before
Before I touched the walls, the room had that frustrating in-between look you probably know too well. The bones were solid, the sofa depth sat right in the sweet 35 to 40 in range, and the oak coffee table was the right 16 to 18 in height, all sitting on an 8 x 10 Loloi wool rug that did most of the work, but the eye had nowhere to land. I had warm wood, a decent rug, and one lonely lamp trying to do all the work.
What made it feel off was not clutter. It was vagueness.
The wall over the console was blank, the corner by the bookcase looked like a waiting room, and every little object I added just floated there. I painted one panel in Farrow & Ball Hague Blue No.30 to test the mood, then added a Benjamin Moore White Dove OC-17 sample on the opposite wall for the warm half, and that deeper backdrop showed me the real problem fast: the room needed a point of view, not another throw.
- Start with one framed Prohibition newspaper clipping
- Hang smoky jazz prints beside the sofa
- Build a gallery from faux speakeasy menus
- Sepia mugshots in brass portrait frames, the West Elm way
- Lean oversized cocktail blueprints on the mantel
- Cluster vintage bottle labels above the bar cart
- Mount a black fan print over velvet seating
- Mix Art Deco posters with tarnished mirrors
- Pin a newspaper collage inside walnut molding
- What do gold record sleeves do over dark wallpaper?
- Add a hidden-door sign near the bookcase
- Layer telegram prints around the floor lamp
- Spotlight one moody club photograph at night
- Finish with a brass plaque by the entry
1Start with one framed Prohibition newspaper clipping
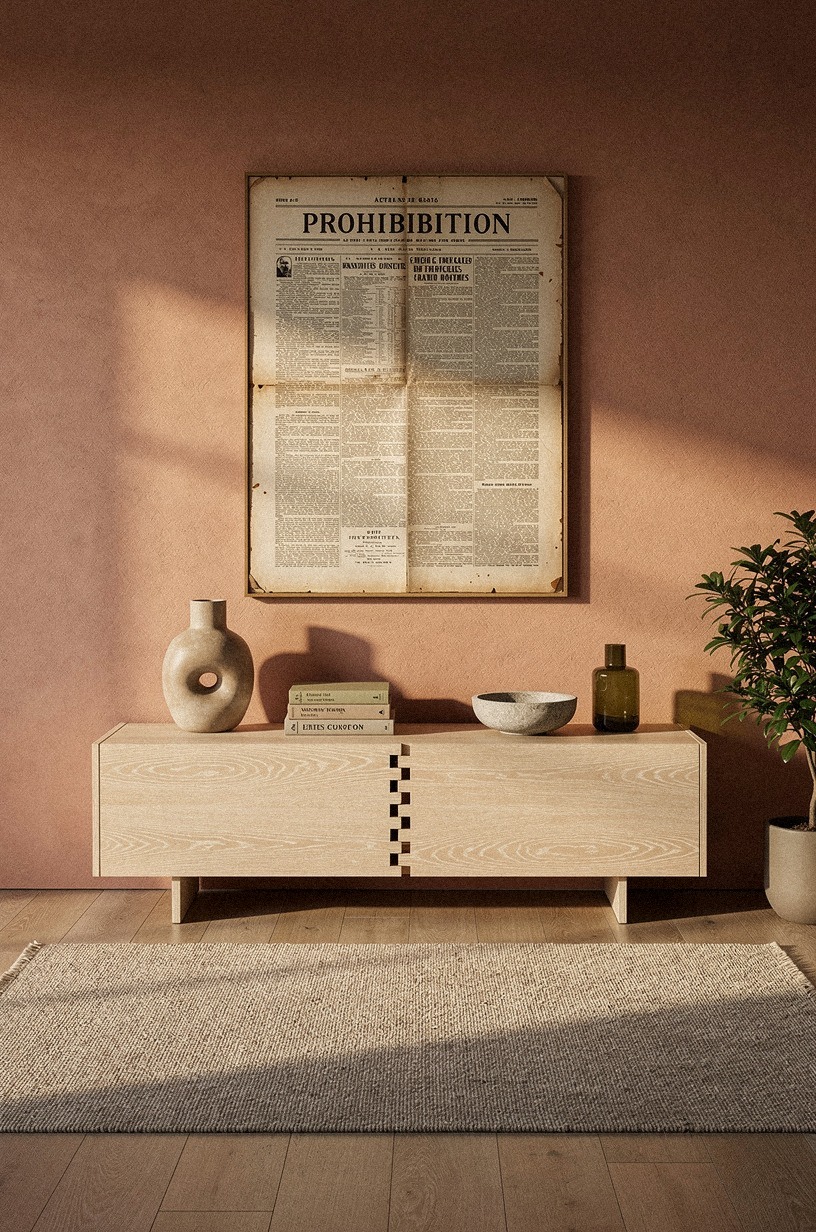
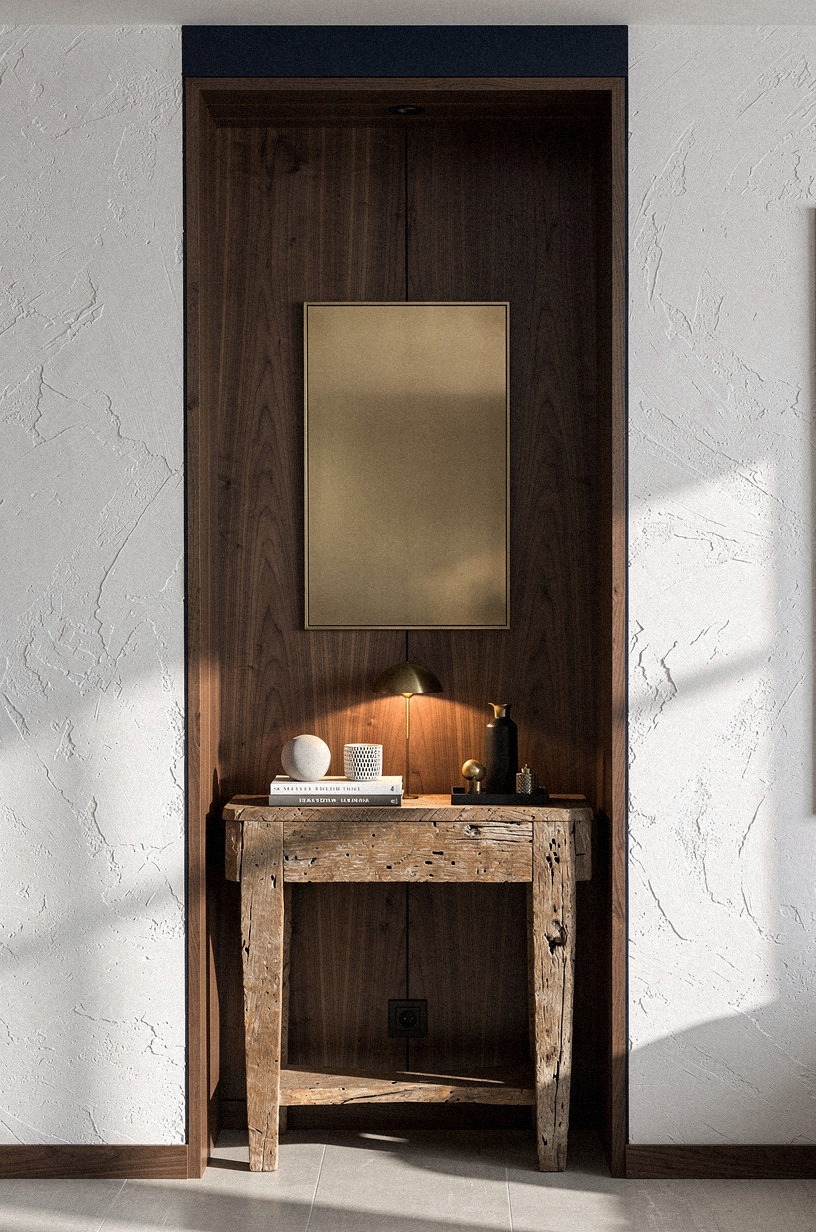
I started with one framed Prohibition newspaper clipping because I needed a hard center, not a busy collage right away. If you’re trying this in your own living room, give yourself one anchor first and let the rest build outward from it. A single piece centered above a cerused white oak console with an exposed dovetail joint looks deliberate, and that pale grain keeps the vintage paper from reading dusty.
Mine was a wordless print built to mimic old column blocks, and that blankness helped more than real text would have. You do not need the wall yelling at you. I used a 16 x 20 frame in aged black, left about 6 to 8 in above the console, and kept the styling tight: one smoked glass vase, one stack of books, one small unlacquered brass bowl, and a single Farrow & Ball Bone No.15 candle for a warm pool at night.
If you want more old-world references before you buy anything, this guide to vintage speakeasy decor ideas for old world charm gets the mood right without turning theme-y.
2Hang smoky jazz prints beside the sofa
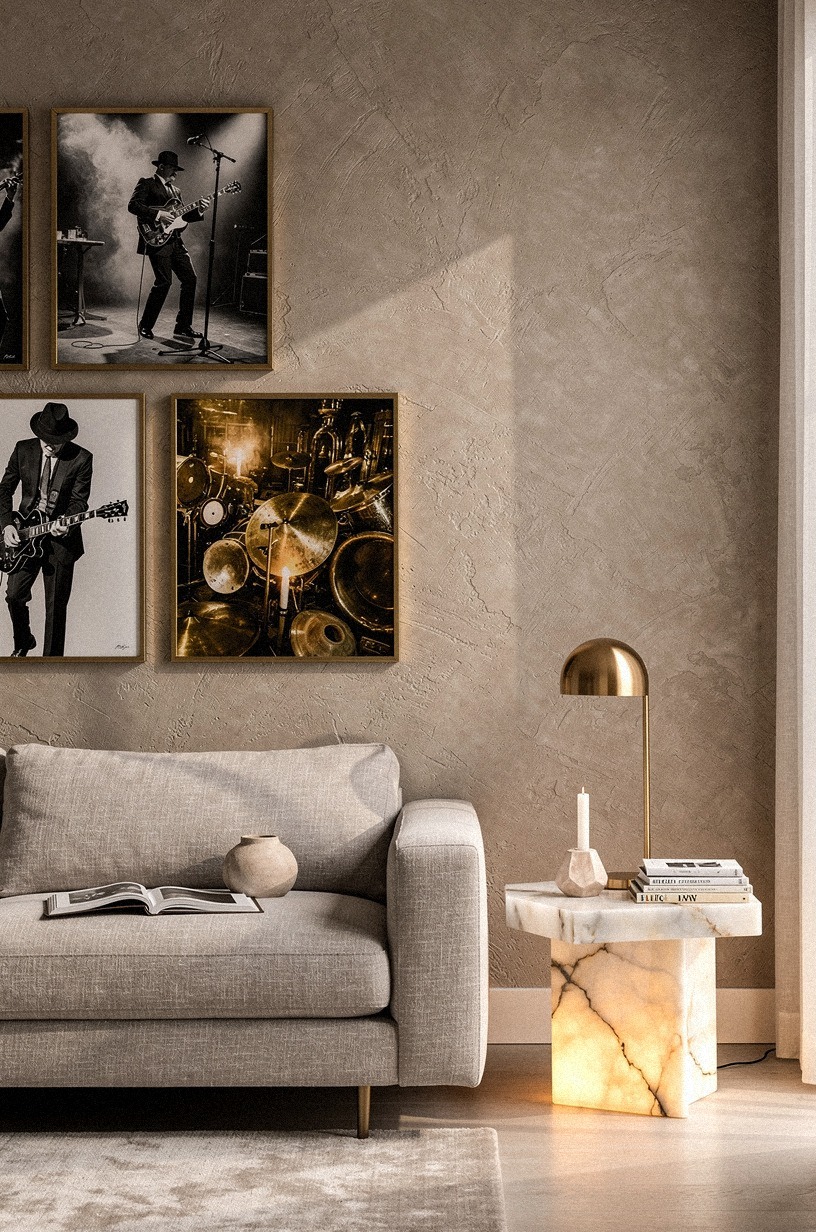
Once the console wall had a center, the Article Sven sofa wall still felt too polite. I hung smoky jazz prints beside the sofa so the seating zone finally had some rhythm, and you could feel the room loosen up the second those charcoal silhouettes went up. It felt looser right away!
If your sofa is long, you’d keep the art group to roughly two thirds of that width, the same proportion rule you use with a coffee table.
I skipped glossy black frames and went for thin brass-toned ones because the soft metal picked up the lamp glow at night. That mattered more than I expected.
A deep seat like the Article Sven tan leather can handle moodier art, and a slim CB2 Fluted Travertine side table nearby repeats the warm stone note, especially if you are layering a plum pillow and a tobacco throw nearby. And if you are torn between strict vintage and something cleaner, the balance in these modern speakeasy decor ideas with updated vintage vibes is a better model than copying a bar set.
3Build a gallery from faux speakeasy menus
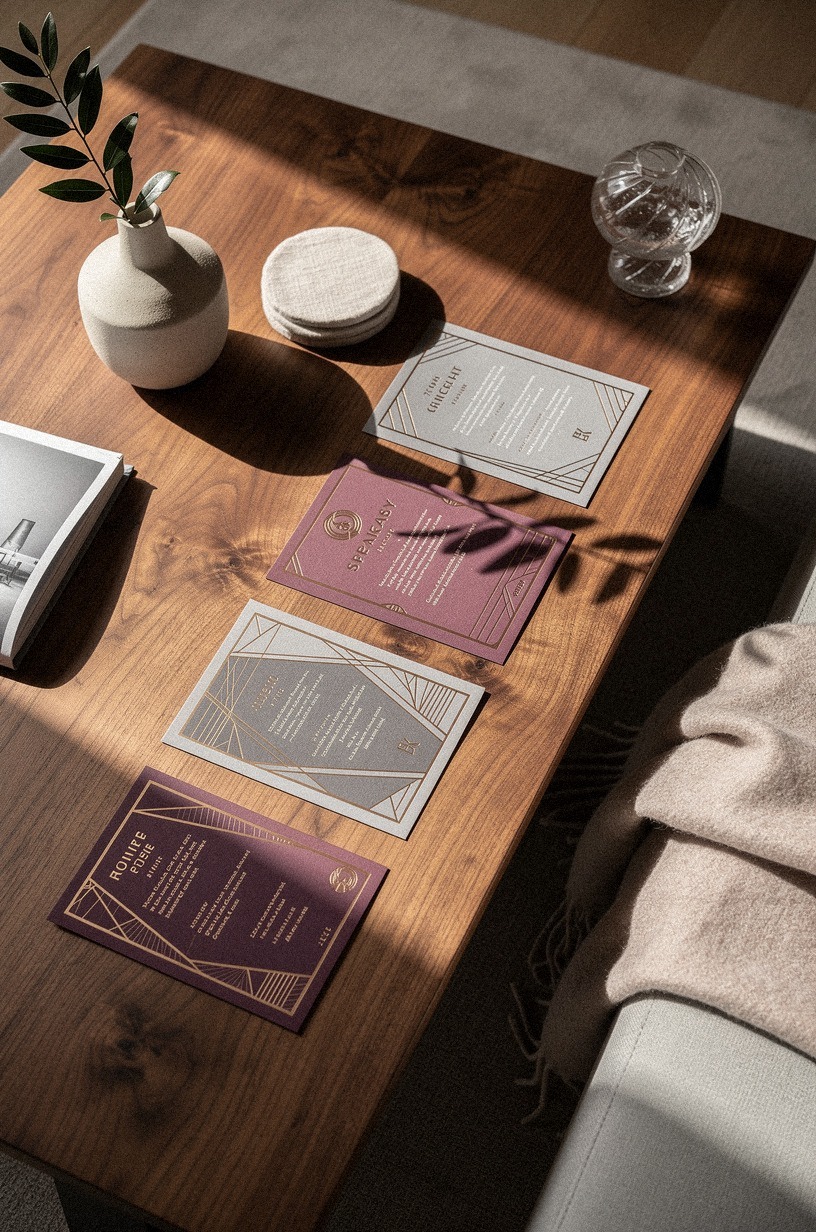
This is where the room stopped looking accidental. I spread faux speakeasy menus across the book-matched walnut coffee table first, then a 9 x 12 Loloi Layla rug anchored the whole layout, shuffled them around like cards, and built the gallery on the floor before anything hit the wall. If you’re nervous about gallery layouts, do that step.
You will save yourself at least three extra nail holes.
The pieces worked because they looked like Art Deco menu cards without readable words, which kept the effect graphic instead of kitschy. I mixed five small IKEA LOMVIKEN frames in warm black, and kept the spacing close at about 2 in so the group read as one move.
But do not make every frame identical. I did that in another room once, and it felt like hotel corridor art.
A little mismatch gives you life. For more framing confidence, I like the spacing lessons in 12 plate wall decor displays that feel like pure art, even though the medium is different.
4Sepia mugshots in brass portrait frames, the West Elm way
Sepia mugshot-style art sounds risky, I know, but in brass portrait frames it landed as character, not gimmick.
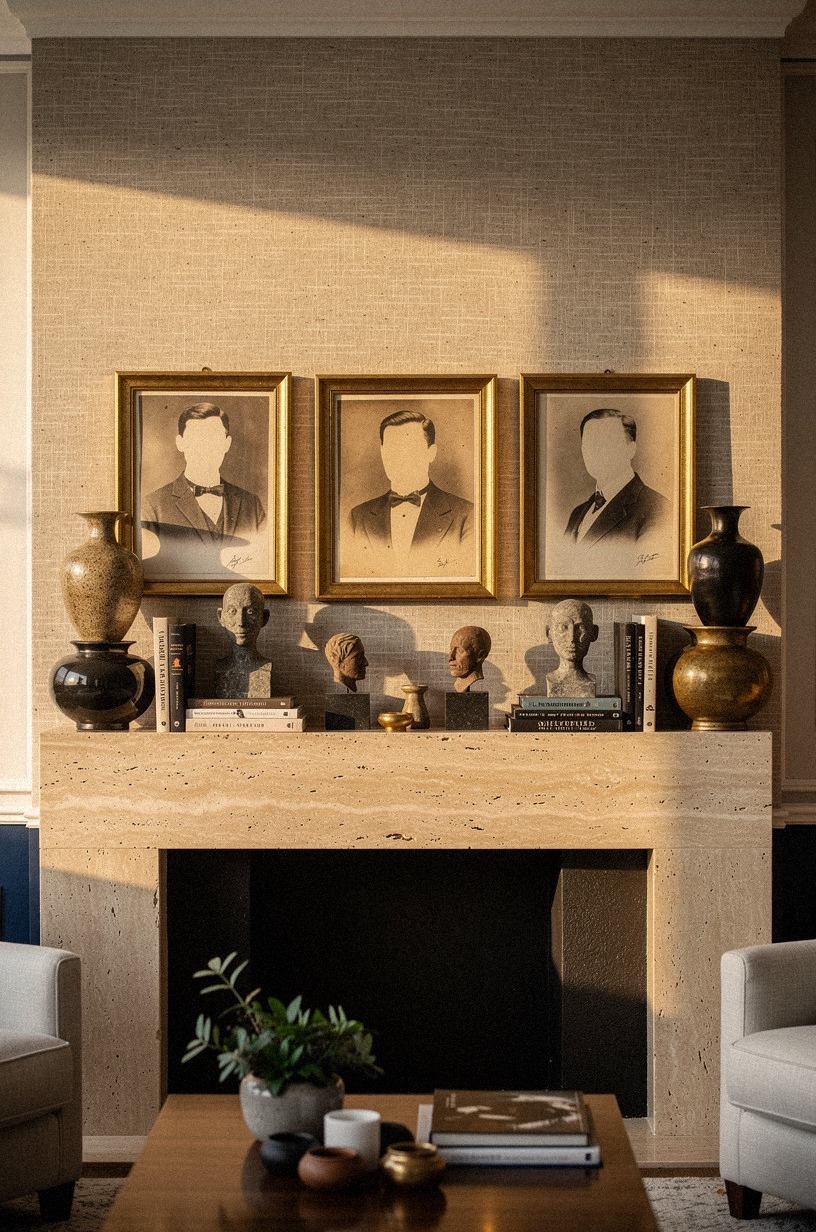
5Lean oversized cocktail blueprints on the mantel

Leaning oversized cerused white oak cocktail blueprints on the mantel gave me the easiest win of the whole project. No measuring spiral.
No perfect commitment. You’ve got the kind of piece that earns its place without being a science project. Just one large cream-and-muted-gold line drawing resting against the wall so the mantel stopped looking stiff.
If you’re unsure where to start, this is friendly because you can move it around until the proportions click.
My mantel depth isn’t huge, so I kept the art oversized but slim and layered one smaller West Elm frame partly in front. That overlap made the setup feel collected.
And honestly, blueprints beat quote art every single time! The room already had enough objects talking. I also found that a darker wall behind the mantel, specifically Sherwin-Williams Evergreen Fog SW 9130 on the side paneling, helped the cream paper glow instead of disappear, and a slim Rejuvenation picture light over the largest drawing kept the cream warm past 10pm.
If you’re working the whole entertaining zone, these speakeasy kitchen coffee bar ideas for a vintage twist echo the same relaxed layering.

6Cluster vintage bottle labels above the bar cart
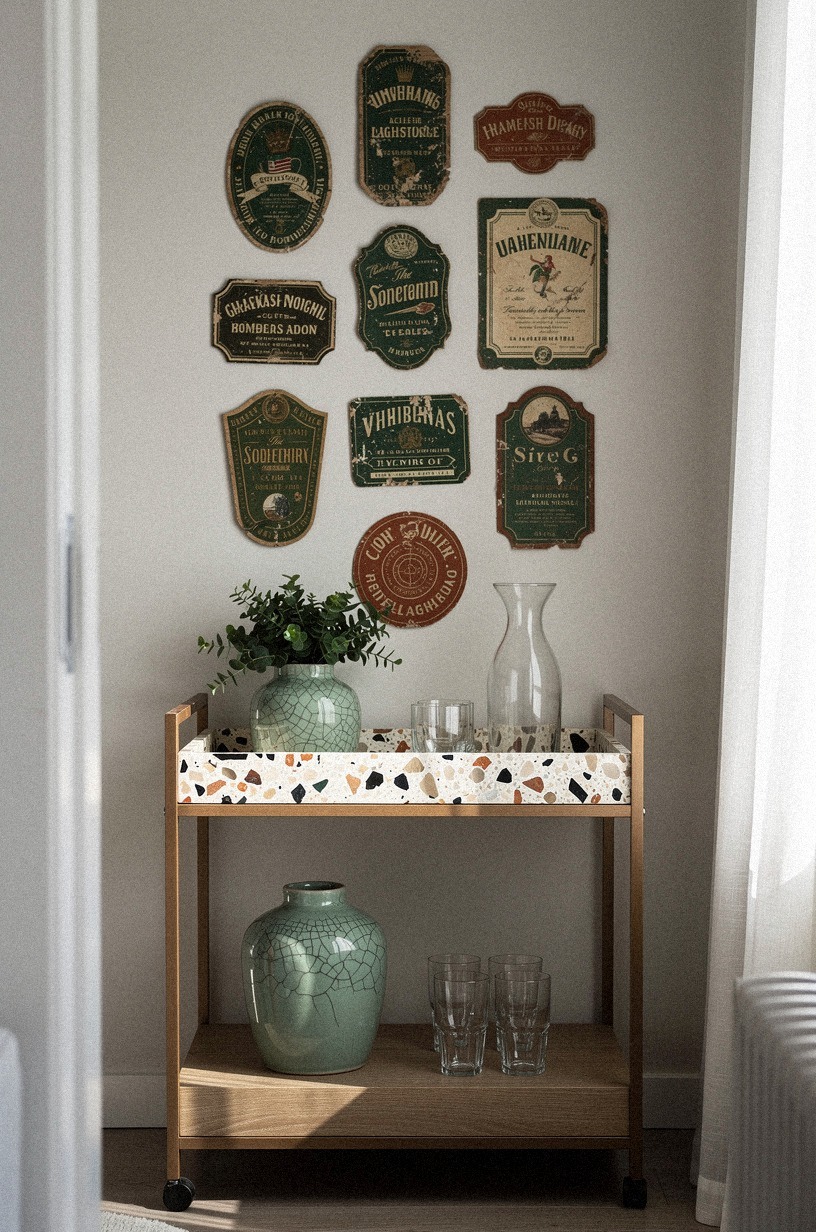
Above the CB2 bar cart, I wanted the wall to feel a little busier and a little looser. A cluster of vintage bottle label art did that fast because the shapes were irregular, the forest green and rust tones repeated the room palette, and the whole arrangement felt like it had grown over time. If you have a narrow cart, you need that visual spread above it or the area reads top-light and underfurnished.
I pinned the outer edges of the composition to an invisible rectangle so it didn’t drift. That part matters.
You can be casual inside the shape, but the perimeter should still feel controlled. My cart is about 30 in wide, the art cluster spans closer to 40, and a slim IKEA RAGRUND bamboo tray on the lower shelf repeated the warm green.
I wouldn’t go fully symmetrical here. Bottle label art wants some swing, and you’ll feel the difference the second you stand back. The Target Threshold wood frames I used came in a 4-pack, which made the cluster feel like a set without forcing it.
And if your bar cart shares space with a kitchen corner, the crossover styling in speakeasy kitchen coffee bar ideas for a vintage twist helps you keep it from looking cut off.
7Mount a black fan print over velvet seating
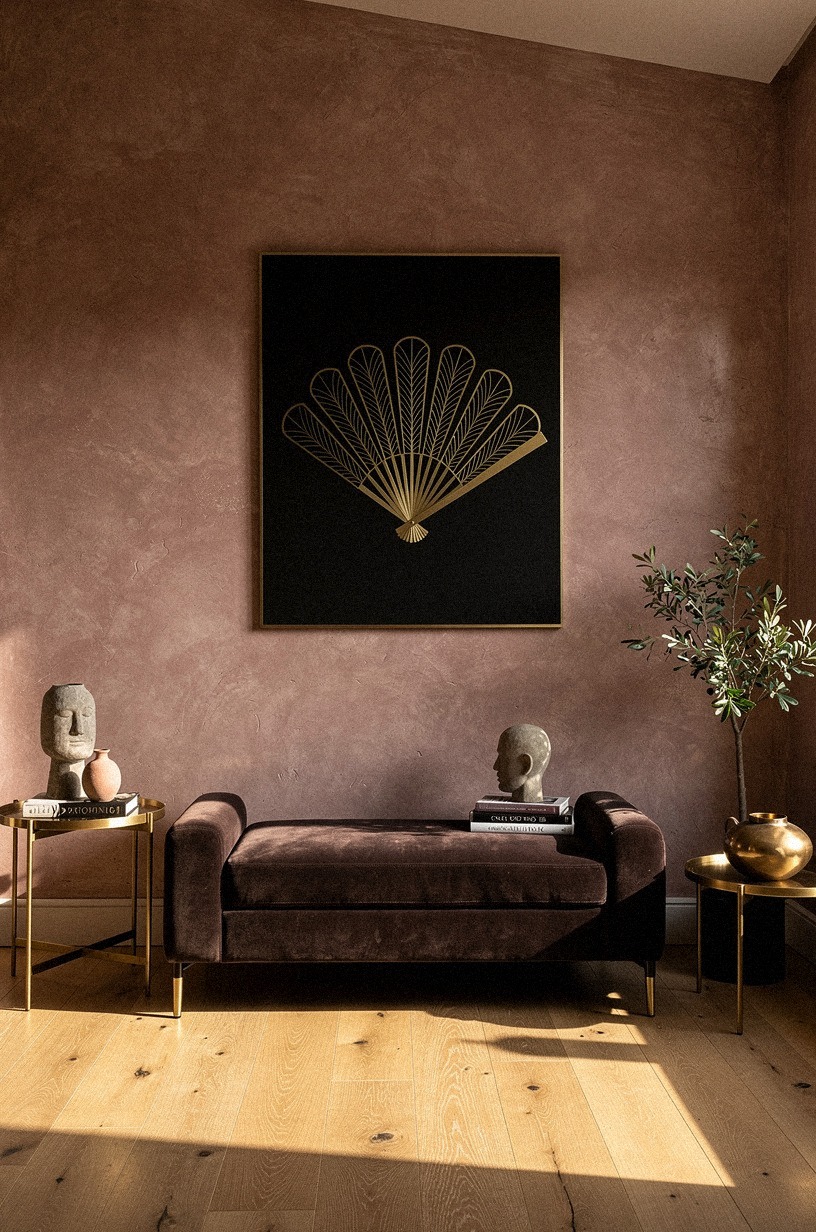
The black fan print over velvet seating was my The Fan-Motif Anchor, the move that made the room feel unmistakably speakeasy without one fake password sign in sight. If you’re working with a tufted bench, a slipper chair, or a small velvet loveseat, you want one bold motif above it that reads clearly from the doorway. This one did.
I paired the print with mohair velvet in a deep olive seat, the Article Sven chair holding the line, and let the contrast stay sharp: black, brass, walnut, cream. Nothing sugary. The fan shape also echoed the curve of the West Elm lamp shade across the room, which is the kind of repeat your eye notices even when you don’t name it.
But I’d skip a multicolor Deco print here. It starts fighting the upholstery, and once you fight your own sofa, you’ve lost the room.
One strong silhouette is enough, and you can pull more shape language from speakeasy wall decor signage ideas passwords maps more if you are filling adjacent walls.
8Mix Art Deco posters with tarnished mirrors
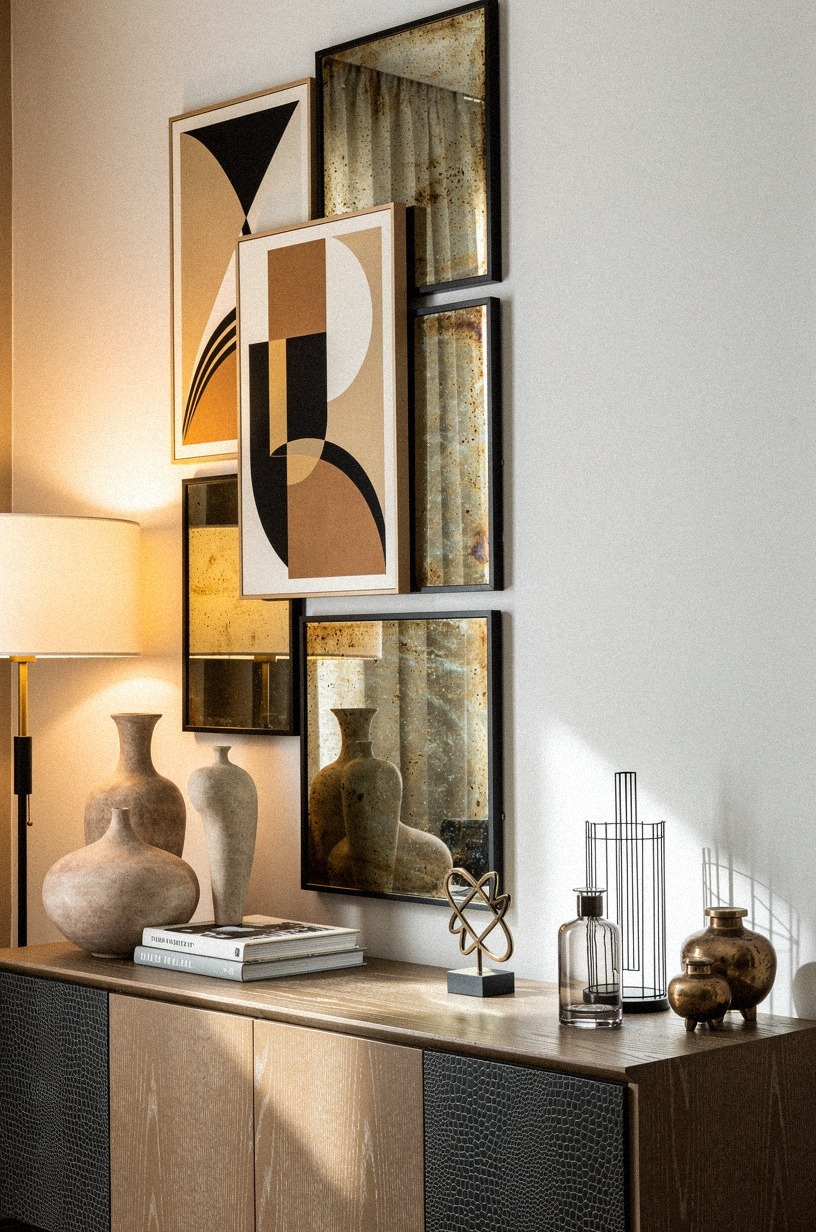
This was my The Smoke-and-Glass Rule, and it saved me from making the room too flat with RH-style aged bronze. I mixed Art Deco posters with tarnished mirrors because paper alone can go dry, especially on a longer wall. A smoky aged-glass panel beside a geometric poster throws back light in a softer way than a clear mirror, and you get depth without breaking the mood.
If you’re trying this, keep the mirrors smaller than the posters so they read as texture, not vanity. Mine sat in dark bronze frames, slightly offset, with the poster edges doing most of the talking, and a slim Article Sven chair nearby kept the leather tone repeating. The smoky glass I chose was a West Elm Antonina panel, which I mounted about 1.5 in off the wall for a slight shadow gap.
You also want the reflection to catch something pretty, a lamp pool, a drape fold, a stack of books, not the TV. Article Sven next to the panel made sure the leather caught a soft repeat.
Ask me how I learned that. For more ideas on old-world shine without overdoing glamour, I kept circling back to vintage speakeasy decor ideas for old world charm while planning this wall.
9Pin a newspaper collage inside walnut molding
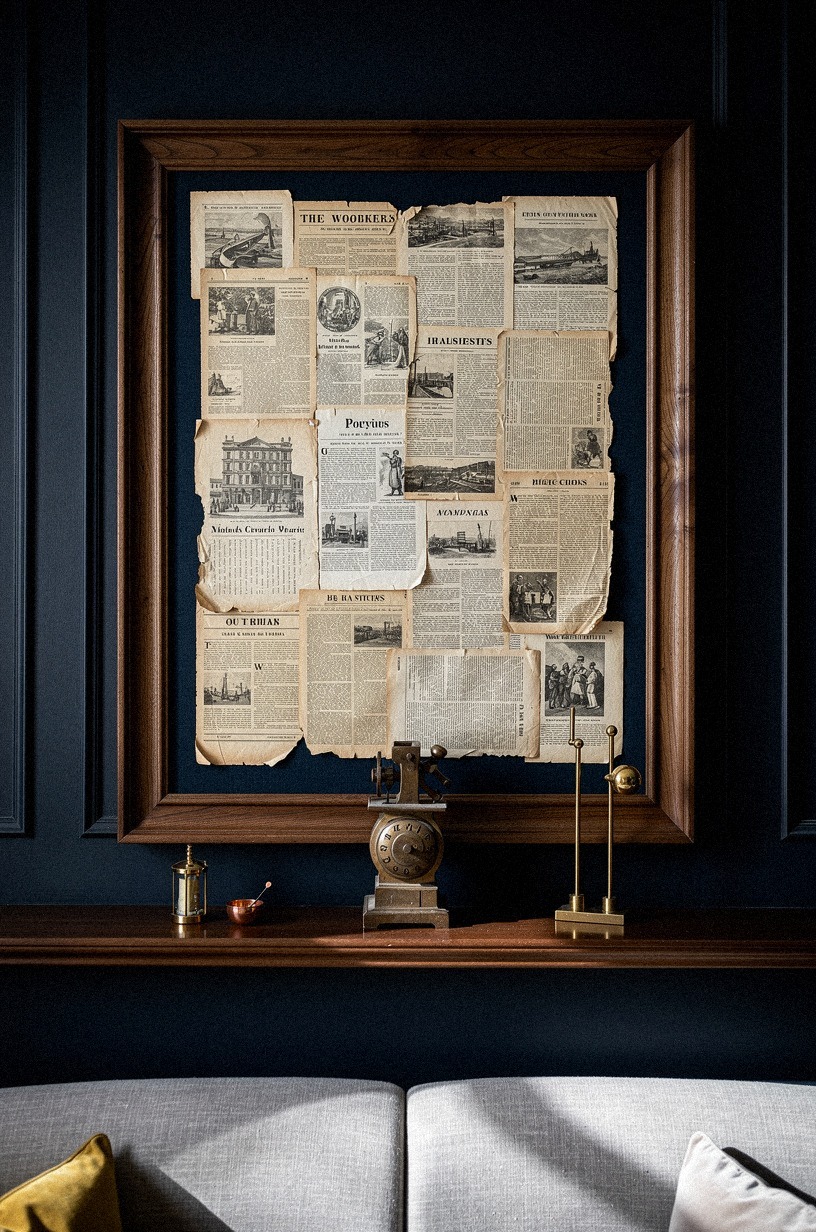
This section took the most nerve because once you start pinning a newspaper collage inside walnut molding, the wall stops being background and starts acting like architecture. I did it on a Farrow & Ball Hague Blue No.30 panel, and that contrast made the ivory paper blocks look crisp instead of tired. If your room has even one paneled area, this is the part I’d test first, ideally with a Benjamin Moore Essex Green HC-188 accent on the joinery for a deeper register.
The move that mattered was not the collage. It was the border. A warm walnut frame gives loose paper a reason to exist, and suddenly the whole setup looks custom.
I kept the paper pieces wordless, varied the sizes, and left breathing room at the edges so the walnut molding still showed. You do not want to paper the entire thing solid.
That kills the elegance. If you are into layered art moments that still feel grown-up, you’ll probably like the mood references in modern speakeasy decor ideas with updated vintage vibes, even if you are only borrowing the atmosphere.
10What do gold record sleeves do over dark wallpaper?
This one was a surprise favorite because the gold record sleeves didn’t need much size to matter.
11Add a hidden-door sign near the bookcase
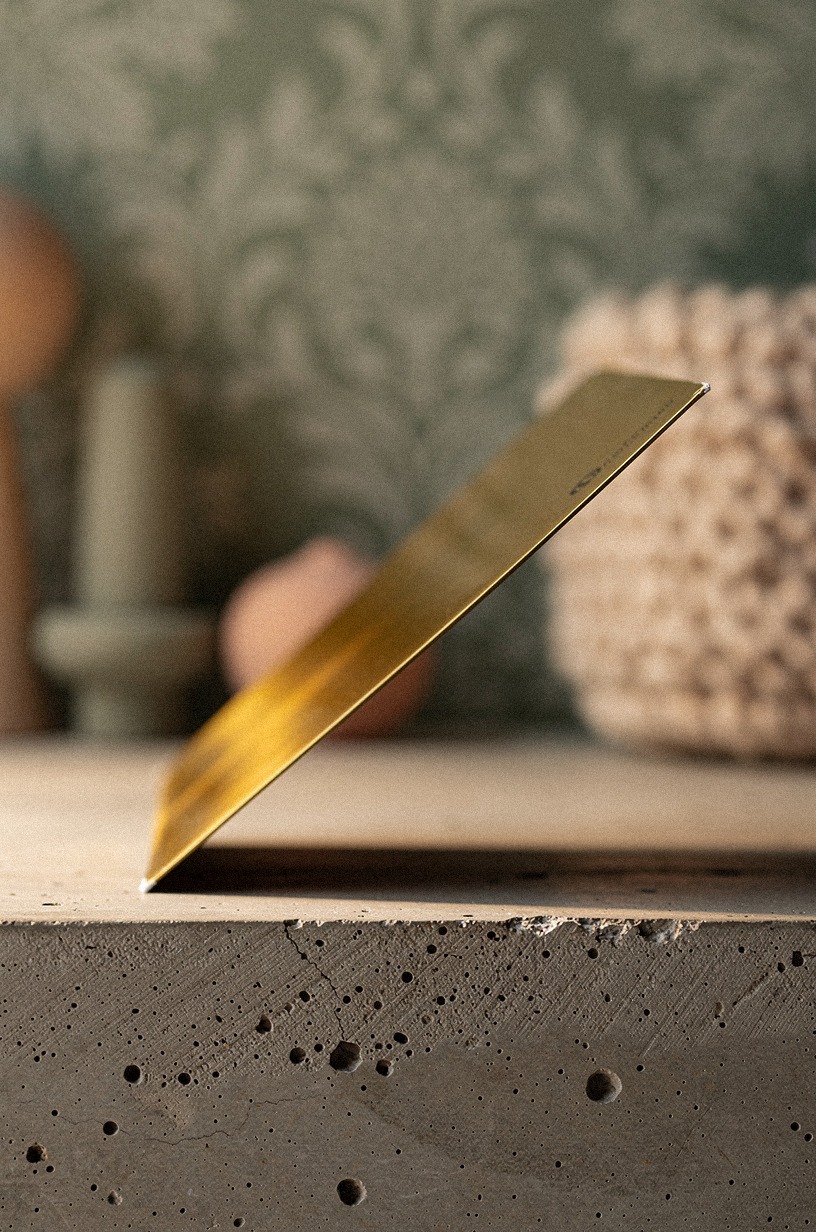
A hidden-door sign near the bookcase sounds playful, and it is, but the blank unlacquered brass plaque kept it subtle enough for a real living room. This was my The Whispered-Sign Move.
If you’re tempted to buy a novelty sign with a cheeky phrase, don’t. A small plaque beside shelves of vintage books says more because it lets the room do the talking.
I mounted mine beside a Carrara marble topped cabinet and below the eye line, almost like a private clue. That lower placement worked better than center height because you notice it on the second look, not the first, and a Pottery Barn Clifton bookend at the shelf edge quietly repeated the brass tone.
And that’s the whole point, isn’t it? The bookcase had old hardcovers, one smoked glass box, and a pair of CB2 brass bookends, nothing louder.
For more sign language ideas that stay tasteful, speakeasy wall decor signage ideas passwords maps more is the closest thing I found to a sane starting point.
12Layer telegram prints around the floor lamp
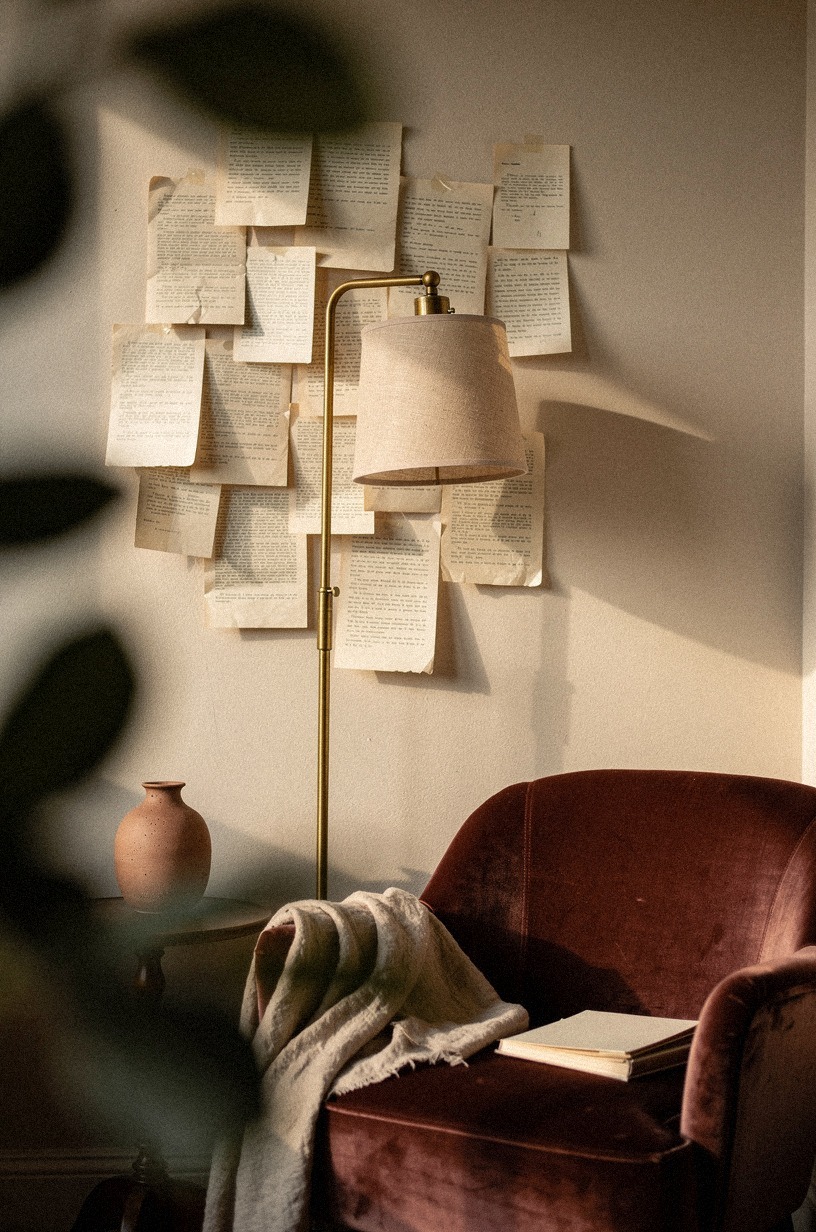
Around the RH floor lamp, I layered telegram-style cream paper slips because the lamp base alone looked stranded. You may have the same issue in your room, where one corner has good light but no visual story. A loose paper cluster solves that without asking for a giant piece of art, and you can shape it around the lamp instead of pretending the lamp isn’t there.
I kept the papers narrow, varied the heights, and let the RH-style parchment lamp shade overlap the edge of the arrangement a little. That overlap is what made the corner feel integrated. But I wouldn’t use bright white stock.
It reads office. A warmer cream with deckled edges sits better beside walnut and brass, especially a slim Farrow & Ball Bone No.15 mat under the tallest sheet. The paper tones also played nicely with Benjamin Moore Revere Pewter HC-172 on the adjacent wall, which kept the whole zone soft, and the West Elm marble base on the lamp carried the cream downward.
If you’re mixing paper art in other rooms too, speakeasy bathroom ideas for unexpected vintage glam has a few good lessons on keeping vintage references light-handed.
13Spotlight one moody club photograph at night
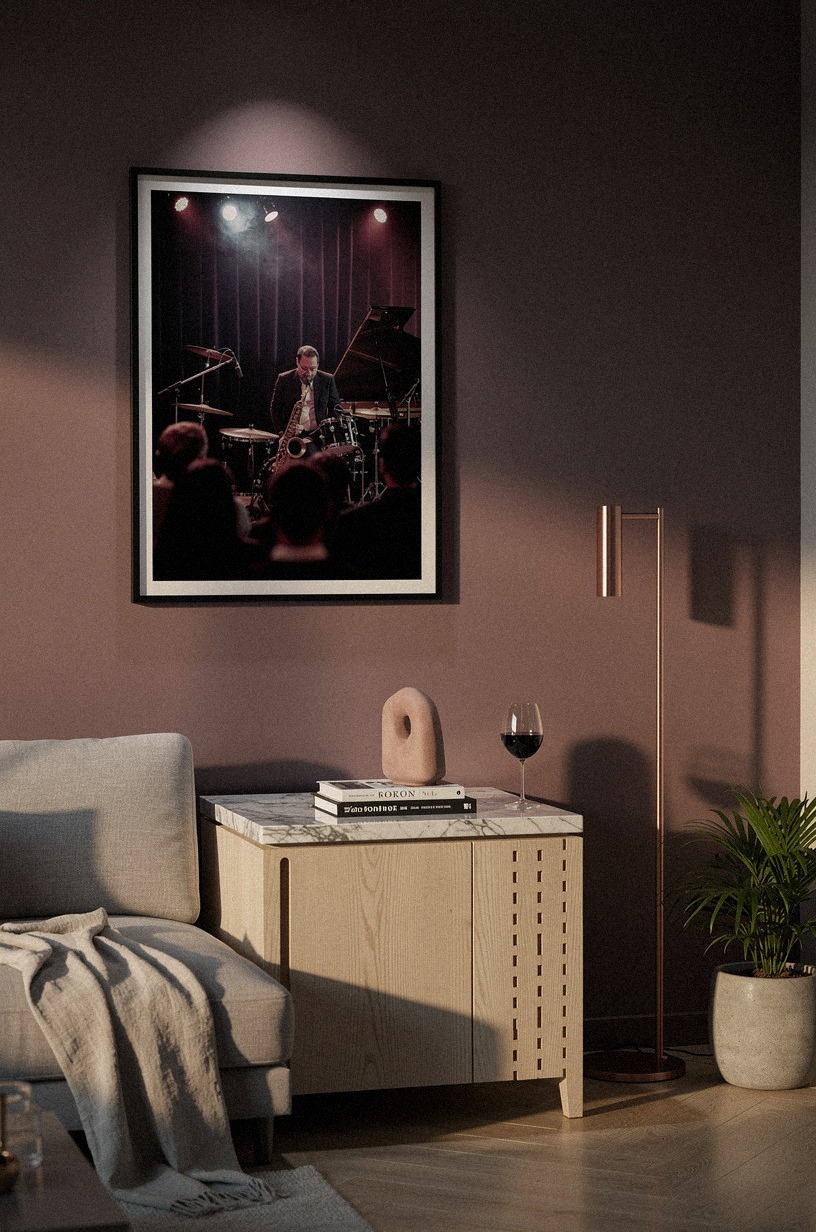
At night, one moody club photograph did more for the room than six daytime-friendly pieces. I framed a black-and-plum jazz-room image above a Carrara marble side table, the West Elm runner beneath it catching the spill, and aimed a picture light at it.
Suddenly the wall had that low-lit after-hours pull I wanted from the start. If you spend most of your time in the room after sunset, design for night first.
Nobody tells you this enough.
The photograph only worked because it stayed wordless and a little blurred, more atmosphere than documentary. You do not want literal faces staring at you across the sofa.
I used a warm 2700K bulb, not a crisp one, and kept the light beam tight so the table below still fell partly into shadow. The picture light itself was a slim RH-style brass bar, around 14 in, which I mounted about 6 in above the frame.
But if you already have strong mirrors nearby, do not add two spotlit pieces. One pool of attention wins. I found more useful night-mood cues in art deco speakeasy decor ideas for roaring 20s glamour, especially for getting the plum-and-brass balance right.
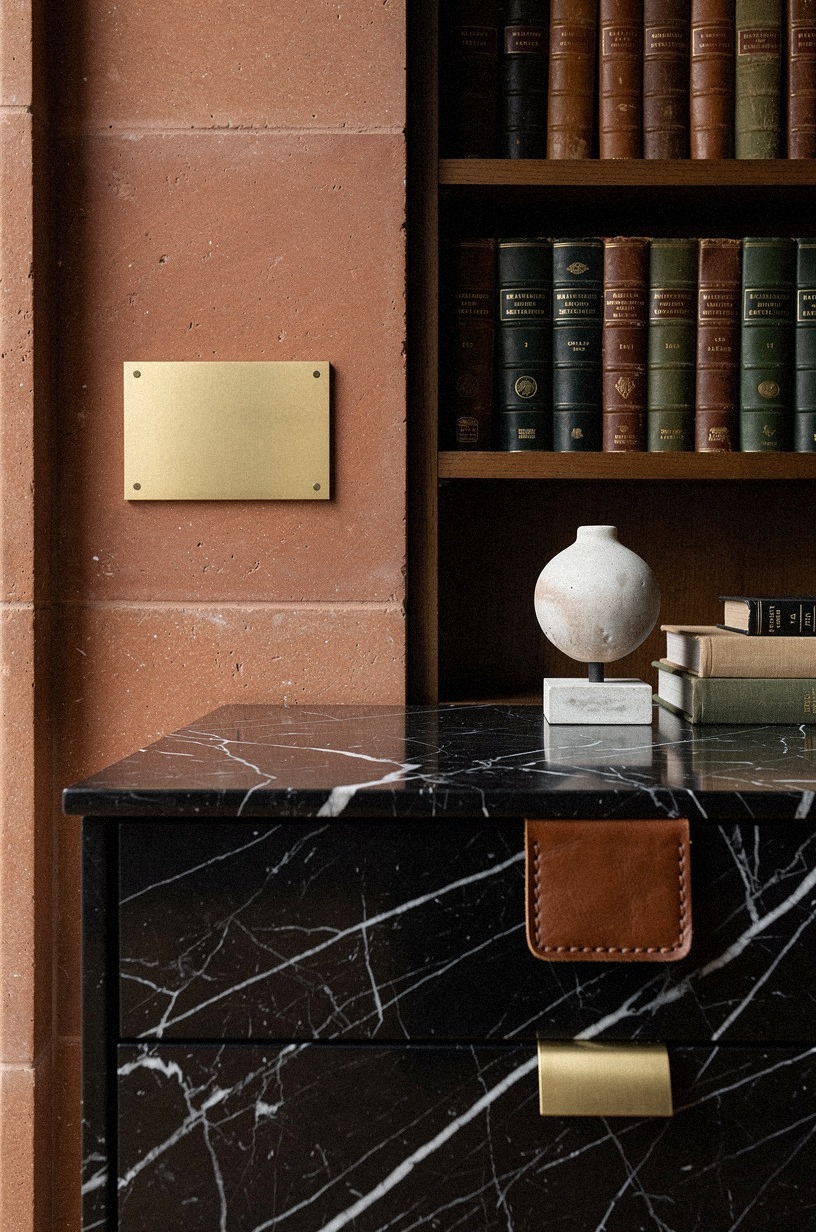
14Finish with a brass plaque by the entry
I finished with a brass plaque by the entry because the makeover needed one last note before you even sat down. This piece was small, polished, and mounted beside walnut paneling, but it changed the arrival experience more than a larger print would’ve.
If your entry spills right into the living room, think about the first three steps someone takes. That’s where the story starts.
The plaque worked because it repeated the metal from the Rejuvenation frames deeper in the room, so the whole layout felt connected. I kept the wall around it quiet, just one umbrella stand and a low IKEA HEMNES shoe cabinet nearby, with a slim Rejuvenation brass hook rail above for the coats. Nothing else fighting for attention.
But I wouldn’t put text on the plaque, ever. Blank is better here.
You let the shine and the placement do the work. For more entry-adjacent mood cues, vintage speakeasy decor ideas for old world charm helped me resist overstyling this final moment.
How much it cost
I tracked every receipt for the Farrow & Ball quart, the IKEA HEMNES console, and the Article Sven throw. The total number mattered more than I expected.
My version came in at $412, and that number mattered because I did not want a makeover that only looked good once you stopped counting. The biggest line item was a quart of Farrow & Ball at $94.
You probably do not need to replace your sofa or rug for this kind of shift. You need art, frames, a little paint, and enough restraint to stop before the room turns into a set.
Here is what I paid: $58 for the large console print, $96 for mixed frames, $42 for the brass plaques, $88 for small reproduction prints, $34 for mounting hardware, and $94 for a quart of Sherwin-Williams Evergreen Fog SW 9130 plus supplies. Total: $412.
Free moves helped too. Rearranging the lamp. Shopping the house for books.
Pulling a mirror from the guest room.
Why Vintage Prints Worked Better Than Neon for Me
I went back and forth on neon longer than I want to admit. Partly because neon is the image most people reach for when they hear speakeasy, and partly because I do like a little drama. But once I sat in the room at night and paid attention to what felt off, the answer got simple.
The room didn’t need louder light. It needed older texture, and a Farrow & Ball tinted backdrop helped me trust that instinct.
Vintage-style paper art gave me that texture without making the living room feel like a themed basement bar. That’s a difference you feel in your body before you explain it.
Neon throws attention forward. Paper, brass, walnut, and smoky glass pull you in. One says look at me.
The other says stay a while. In a room where you’re reading, talking, or stretching out on the sofa, the Article Sven tan leather seat makes the second instinct win.
I also learned that speakeasy style is less about symbols than restraint. If you stack passwords, martini signs, and novelty graphics on every wall, you get the costume version fast.
I nearly did that by the bar cart. Then I laid everything out on the coffee table and saw the problem immediately.
Too many obvious references flatten the room. A single Farrow & Ball-tinted newspaper-style print, a quiet plaque, one moody photograph, and a fan motif let the idea breathe.
And there was a money lesson in this, too. A decent CB2 neon piece can eat the whole budget in one shot, and if the color is wrong, you are stuck building around it.
Vintage prints were easier to test, easier to move, and more forgiving if I changed my mind. And you can start with one frame, live with it for a week, then build the rest.
That slower pace helped me edit better!
But the biggest thing was emotional, not decorative. The Article Sven finally felt like mine once the walls stopped performing and started hinting.
I do not want my living room to explain itself to every person who walks in. I want it to feel layered, private, a little mysterious, and warm enough that you notice the amber lamp glow on the rug before you notice the styling. That is what the vintage route gave me.
And yes, I’d choose it again, every time.
What People Always Want to Know
What is the best Speakeasy Wall Art Ideas (Vintage Prints, Newspaper & Neon) for a small living room?
A framed newspaper-style print plus one moody photograph is the best place to start. You get atmosphere without crowding the wall. Small black or brass frames, ideally IKEA HEMNES in black-brown.
A slim Farrow & Ball Studio Green No.31 accent on the back wall is the move that ties it all together. One lamp pool nearby so the art feels intentional at night.
And if you want a cleaner version, modern speakeasy decor ideas with updated vintage vibes is a good companion read.
Where can I buy Speakeasy Wall Art Ideas (Vintage Prints, Newspaper & Neon) pieces on a budget?
Target, IKEA, and Wayfair are the easiest first stops, and thrift shops still beat all three for frames if you’ve got patience. The savings are real when you mix new art with secondhand framing.
Facebook Marketplace. Estate-sale mirrors. Cheap plaques, then better paper inside.
How much does a Speakeasy Wall Art Ideas (Vintage Prints, Newspaper & Neon) makeover cost?
For most living rooms, it costs about $100 to $300 for a light version and $300 to $1,200 for a fuller wall-art update. Art changes the room faster than furniture does. Free moves count too, and a quart of Farrow & Ball sample paint runs about $15.
Rehang what you own. Restyle the console. Borrow a lamp from another room.
Can I create a Speakeasy Wall Art Ideas (Vintage Prints, Newspaper & Neon) on a budget?
Yes, and you don’t need custom millwork to pull it off. A renter-friendly version can still feel layered and rich. Print vintage-inspired art at home.
Reuse thrifted IKEA frames. Float paper inside existing mats. Paint one sample panel in Benjamin Moore White Dove OC-17 instead of the whole room.
Is a Speakeasy Wall Art Ideas (Vintage Prints, Newspaper & Neon) worth it in a small space?
Yes, it’s worth it, and a small space can make the mood feel stronger because the layers sit closer together. You get more payoff per square foot. Keep the rug at 8 x 10 if the front legs fit.
Let one wall lead. Don’t scatter the theme.
Is Speakeasy Wall Art Ideas (Vintage Prints, Newspaper & Neon) a good idea for a rental?
Yes, as long as you build the look with removable methods and leaners instead of permanent paneling. You can get the mood without losing your deposit. Command strips.
Leaned mantel art. Removable wallpaper.
Brass-tone plaques on shelves instead of walls.
Where I’d Start First
If I had to pick one, I’d start with the Farrow & Ball-tinted framed Prohibition clipping. It gives every other piece a reference point, and without that center, the room keeps feeling like separate nice objects. Pin that idea for later and let the wall story grow one layer at a time.