
My backyard is narrow, sloped, and ends in a fence the neighbor’s ivy keeps eating. I wanted a movie setup that didn’t fight that, so I tried six versions across two months: a tripod screen, an inflatable frame, a sheet-and-PVC rig, a projector-on-the-sidewall trick, a Bluetooth-only hangout, and one borderline ridiculous bean bag row.
What follows is the honest map, with the gear I actually used, the prices I paid at Home Depot, Amazon, and Walmart, and the setups I’d bother running again.
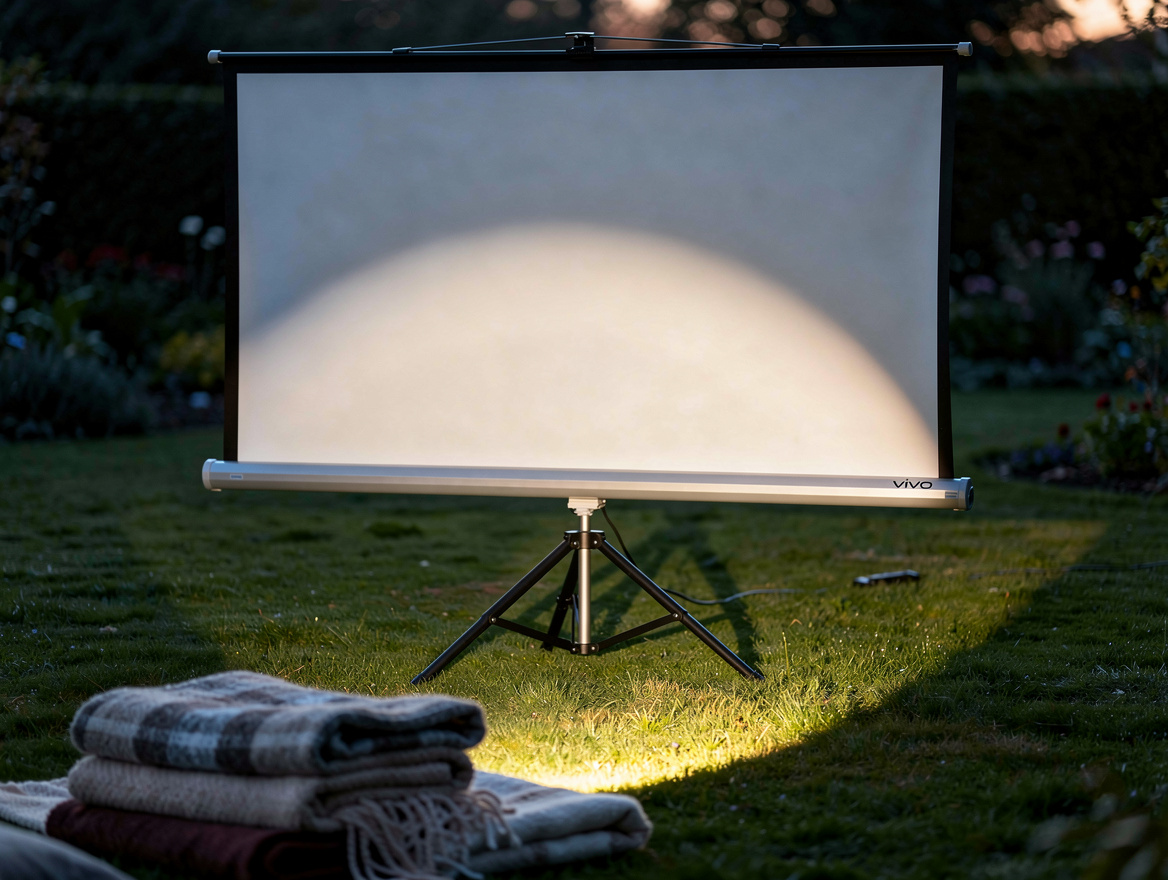
I Started With a 120 Inch Tripod Screen and a Midrange Projector
The first night I borrowed a VIVO 100 inch tripod screen from a friend and paired it with an Epson CO-FH02 at 3,000 lumens. Setup took under 20 minutes, and the image was sharp from about 3.5 m back.
Total spend was around 550 € for the projector, plus roughly 100 € for the tripod screen. The screen has a 1.1 gain white surface, which helped once the sky turned lavender.
Sound came from a JBL Charge 5 at about 160 € on a low crate under the screen. Dialogue was clean for a group of six sitting on a 2×3 m polypropylene outdoor rug from IKEA, around 80 €.
This is the baseline I’d copy. It’s reusable, it packs into a closet, and it doesn’t make the yard look like a construction site.
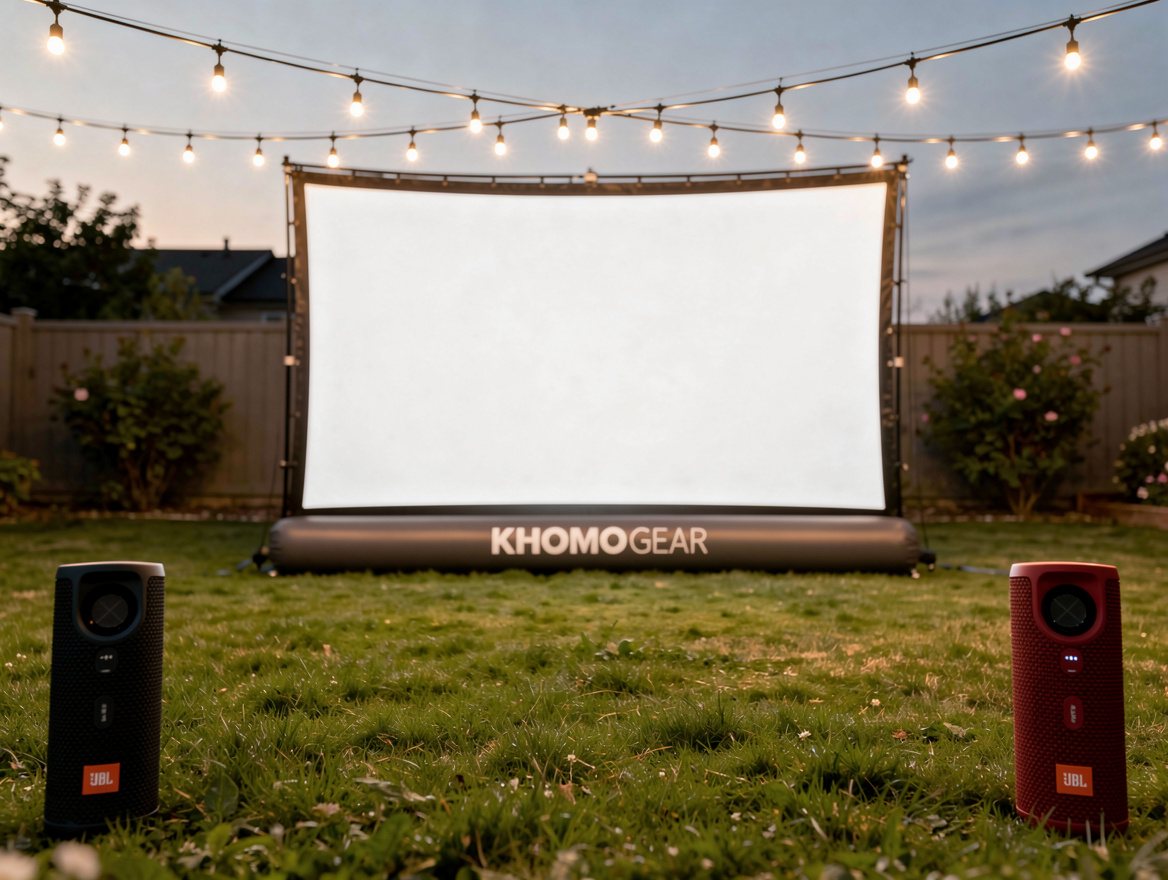
Then I Tried an Inflatable Screen for a Real Cinema Feel
I bought a KHOMO Gear 120 inch inflatable screen for about 230 € on Amazon. It’s 3 m wide, 2.2 m tall, and inflates in under two minutes with the included blower.
You need at least 1 m of clearance behind it for the guy lines, which I learned the hard way when the ivy grabbed one and tipped the frame into a lawn chair.
I pushed the projector back to 5.5 m and upgraded to a BenQ TH575 at 3,800 lumens (around 650 €). The image held up until about 30 minutes after sunset.
Two JBL Flip 6 speakers flanked the screen at 140 € each. Stereo separation was obvious, and neighbors three doors down said they could hear the movie but not the dialogue, which is the sweet spot.
This is the most dramatic-looking setup, and kids lose their minds over it. The blower hums, though, so position it downwind.
I Also Tested a 60 € Sheet and PVC Rig for Tight Budgets
For a Wednesday night with four friends, I built a frame from 1/2 inch PVC pipe (about 18 € at Home Depot) and clipped a white painters’ drop cloth (about 12 €) across it with binder clips.
The screen ended up roughly 2.5 m wide by 1.6 m tall. A wrinkle in the middle made the opening credits look like a funhouse mirror, but nobody cared once the popcorn came out.
I reused the same Epson projector. Stretching the fabric taut is the whole game, so I sewed a simple sleeve along the top and threaded a 2×2 through it.
Sound was a single Sony SRS-XE300 at 140 €, and seating was four canvas camp chairs from Walmart at 18 € each. Total bill: under 110 €, projector aside.
If you only want one movie a year, this rig is genuinely fine. If you’ll host again, spend the extra 100 € on a real screen.
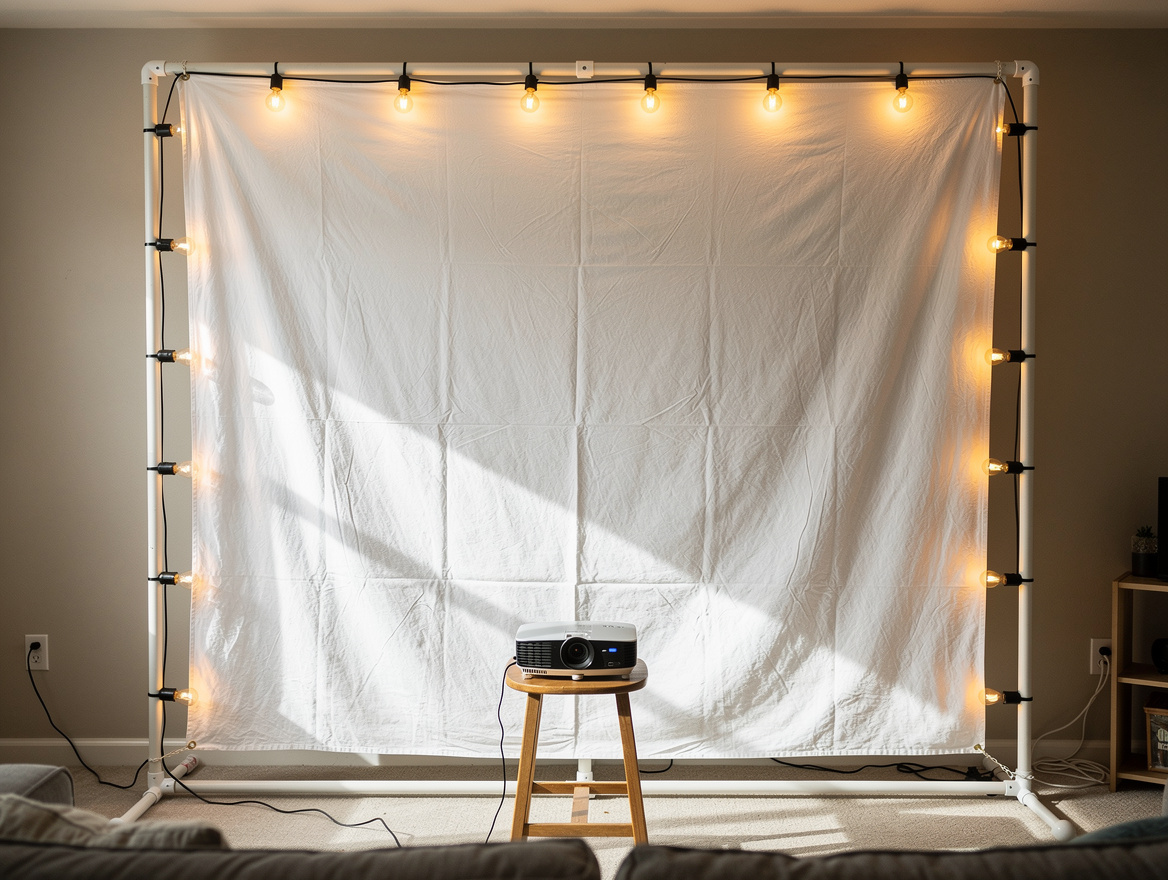
I Built a String Light Frame Around the Screen and It Changed Everything
The single biggest visual upgrade wasn’t the projector. It was warm white Edison string lights (about 40 € for 15 m on Amazon) zip-tied to a 1/2 inch PVC rectangle that framed the screen.
I set the rectangle about 60 cm in front of the screen so the bulbs didn’t wash out the image. Total added cost was under 55 €, and it made the whole yard look intentional instead of improvised.
Along the walking path, I dropped six solar stake lights from Target at 4 € each. They cast just enough glow to stop people from tripping on the extension cord.
This is the move I’d recommend first if you already own a projector. The frame is also a great anchor to hang a blanket from if the temperature drops.
I Tried Seating Six Ways and Only Two Were Worth Repeating
I tested Fatboy Lamzac bean bags (around 130 € each at Wayfair), a row of four low canvas chairs, picnic blankets on the grass, a 2×3 m indoor-outdoor rug with floor cushions, and a borrowed pair of Costco Adirondack chairs.
The bean bags were a hit with adults under 35 and a disaster with anyone over 50. The low chairs plus a rug in front for kids is the most flexible layout I found.
For larger groups of 8 to 10, I tiered the seating: blankets and floor cushions in front, chairs behind. Sightlines stayed clean and nobody blocked the screen.
Whatever you choose, test the sightline at sunset. A 1.5 m tall screen disappears behind anyone sitting on a standard camp chair.
The Cables and Power Setup I Wish I’d Done First
One 15 m outdoor extension cord (about 35 € at Home Depot) plus a six-outlet power strip with surge protection (about 25 €) ran the projector, speakers, blower, and phone chargers from a single indoor outlet.
I ran the cord along the fence line and covered the one crossing point with a rubber cable protector (around 20 €). Tripping on a live cord in the dark is the actual safety risk, not the projector brightness.
For the source, a Chromecast with Google TV at 50 € plugged into the projector’s HDMI port handled Netflix, YouTube, and a friend’s laptop over AirPlay without any drama.
Total cable spend: under 130 €, and it’s reusable for any future outdoor setup, including holiday lights.
Across all six nights, the most expensive setup landed near 1,400 € and the cheapest under 110 € beyond gear I already owned. If I had to do only one upgrade before next weekend, it would be a real tripod screen and a pair of stereo speakers, since the projector and the string lights mattered less than clean sightlines and dialogue you can hear.
Mia Carter writes about small-space living and budget home makeovers. She has restyled three rentals and tests most ideas in her own 45 sqm flat.