
detail Gaming Room Ideas for the Ultimate Hidden Setup can work in a real living room, and mine cost less than blowing up the whole space. I did this after getting tired of staring at a monitor wedged beside our sofa, with cables creeping past the rug and controllers always in view. So I stopped treating the setup like tech and started treating it like millwork.
Don’t overthink: Measure a hidden screen wall between bookcases.
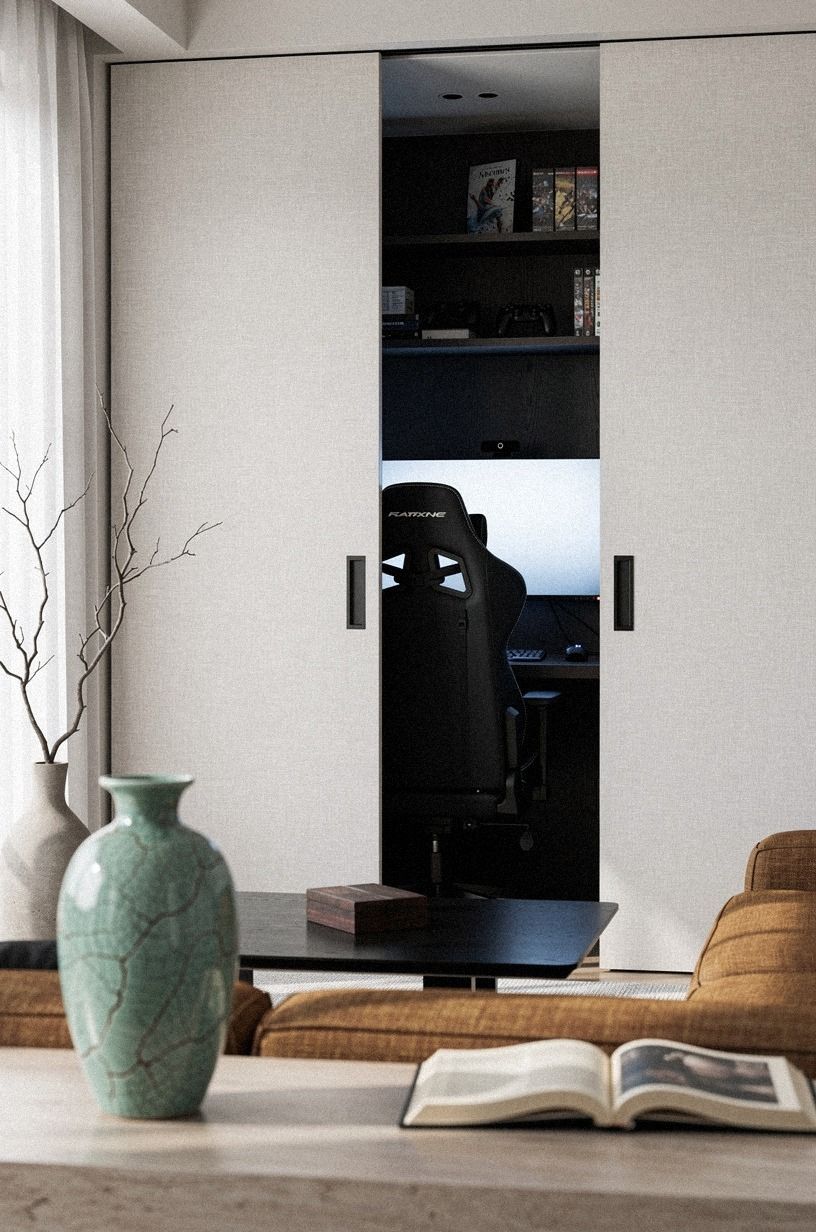
Here’s what it looked like before
Before I touched anything, the room had that awkward half-purpose feeling you probably know too well. The sectional was deep, around 35 to 40 inches, and it floated far enough off the back wall to create a dead corner that collected a lamp, a charger, and exactly zero charm. My screen sat on a cheap side table, the console was visible from the front door, and the headset looked like laundry hanging from a knob.
I kept trying to hide it with baskets and a throw. Didn’t work. The gaming gear wasn’t the problem, the lack of a plan was.
Once I started studying hidden door ideas that feel intentional and bookcase entries that disappear into a wall, I realized you don’t need a giant bonus room. You need one believable story for the wall.
- Claim the unused corner behind the sectional
- Measure a hidden screen wall between bookcases
- Build a slatted panel for the console door
- Slide the gaming desk behind pocket cabinets
- Mount the monitor on a swing-arm panel
- Hide controllers inside a lift-top coffee table
- Run cable channels under the area rug
- Add blackout curtains behind the sofa wall
- Paint the gaming nook in midnight green
- Install dimmable sconces inside the hidden bay
- Frame the entrance with matching picture molding
- Disguise the headset hooks as brass pegs
- Tuck speakers behind woven cabinet fronts
- Layer acoustic panels under framed artwork
- Store game cases in false book spines
- Place a swivel chair facing the detail wall
- Add LED strips under the floating shelves
- Close everything behind push-latch living room panels
1Claim the unused corner behind the sectional
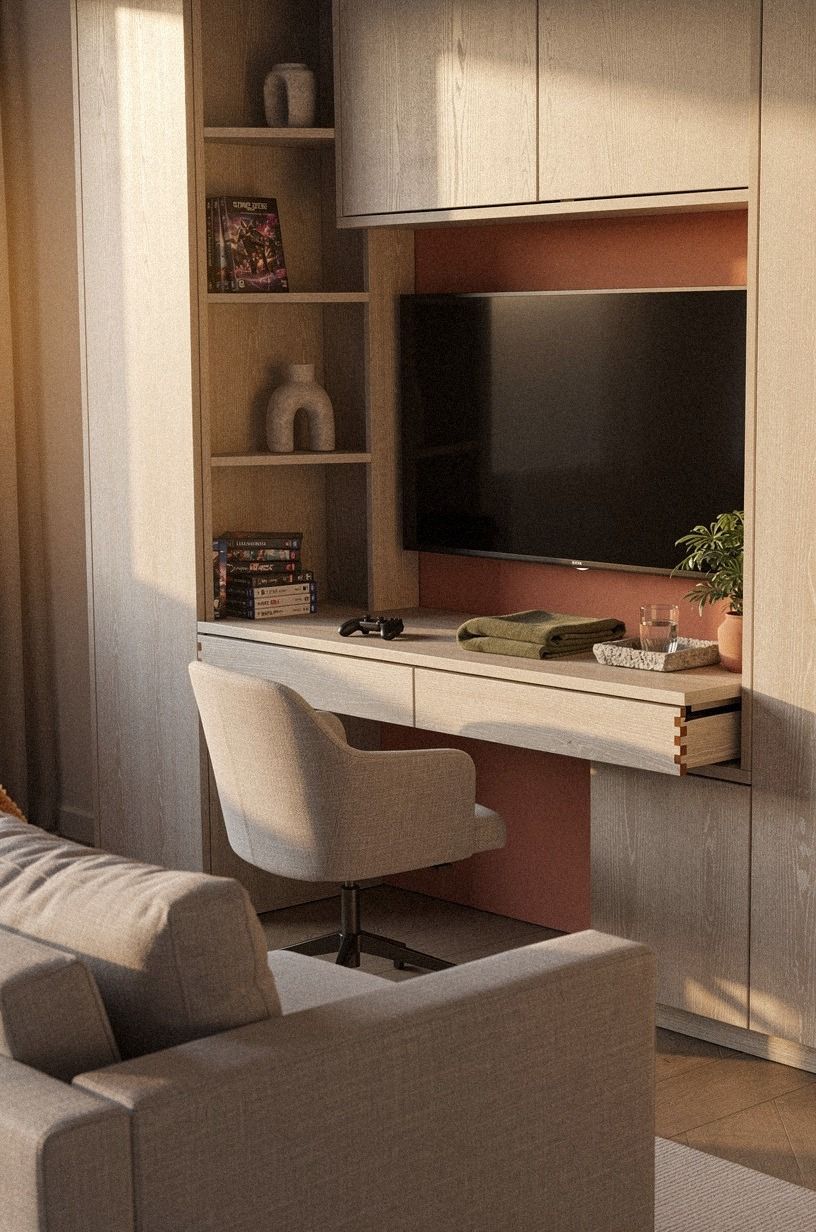
I started with the weird little pocket behind the sectional because it was already visually lost, which meant you could borrow it without making the room feel smaller. If your sofa has that same leftover wedge, don’t fill it with a plant stand and call it done.
Give it a job. I centered a compact console niche there, used a low swivel chair that stayed under the sightline, and let cerused white oak keep the whole thing closer to furniture than office gear.
The difference was proportion. I made the niche just wide enough to feel deliberate, not improvised, and kept the chair tucked so you could still walk the room without clipping your shin.
You can see a similar dead-space payoff in under-stairs hidden room planning, where the magic comes from using what the room had already given you. And honestly, this was the first moment I felt the setup could disappear.
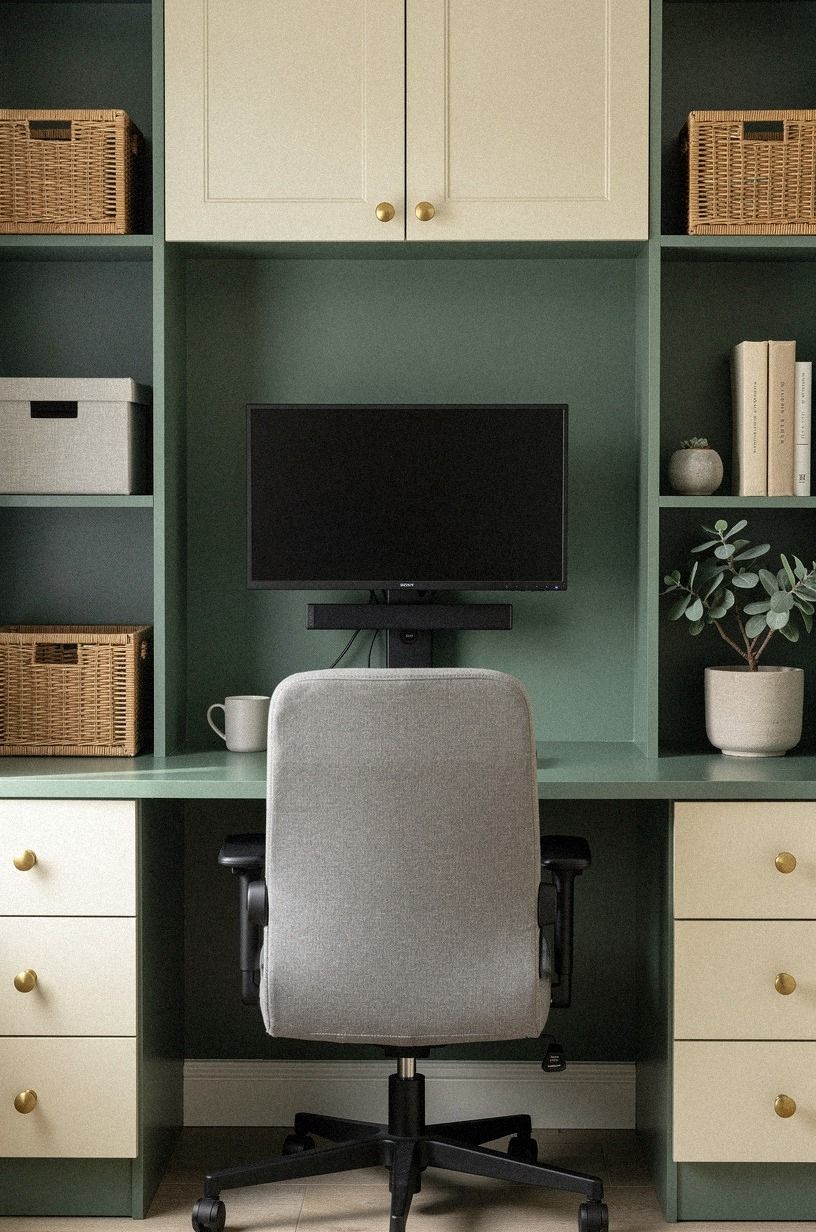
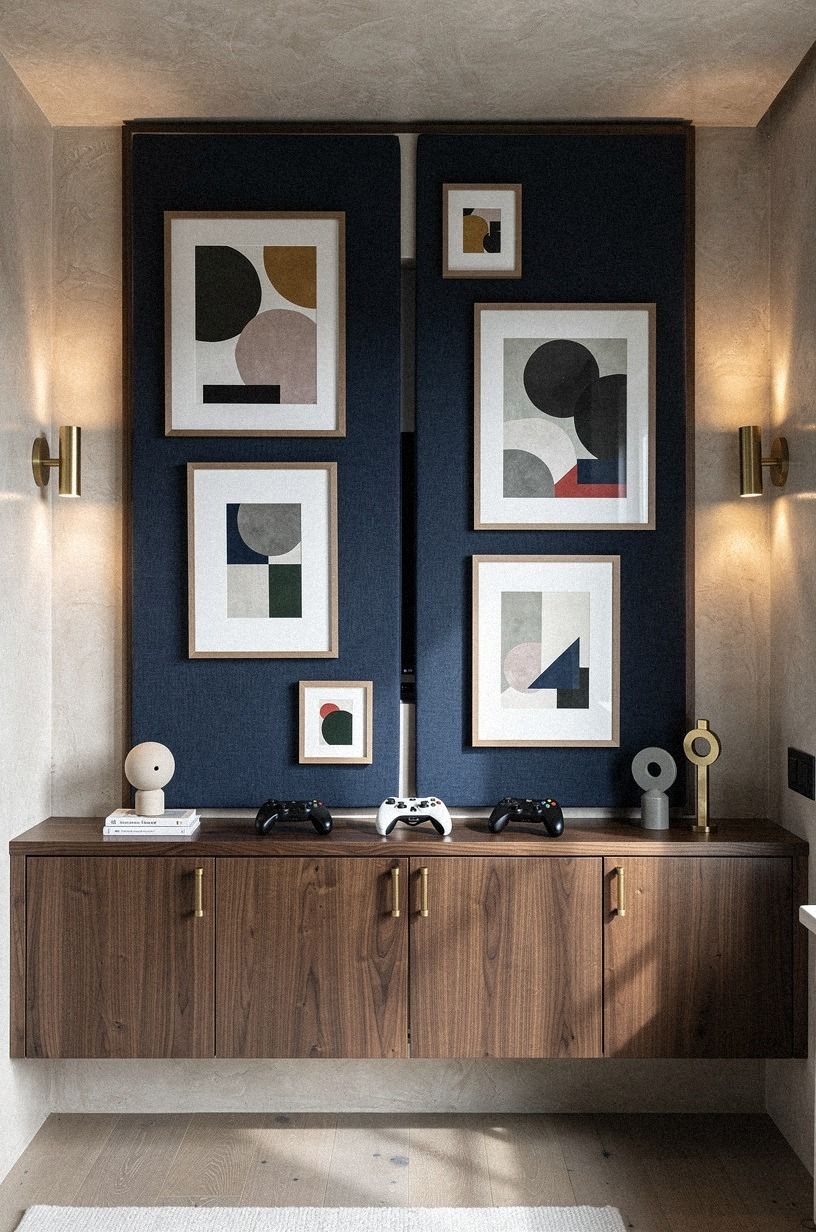
2Measure a hidden screen wall between bookcases
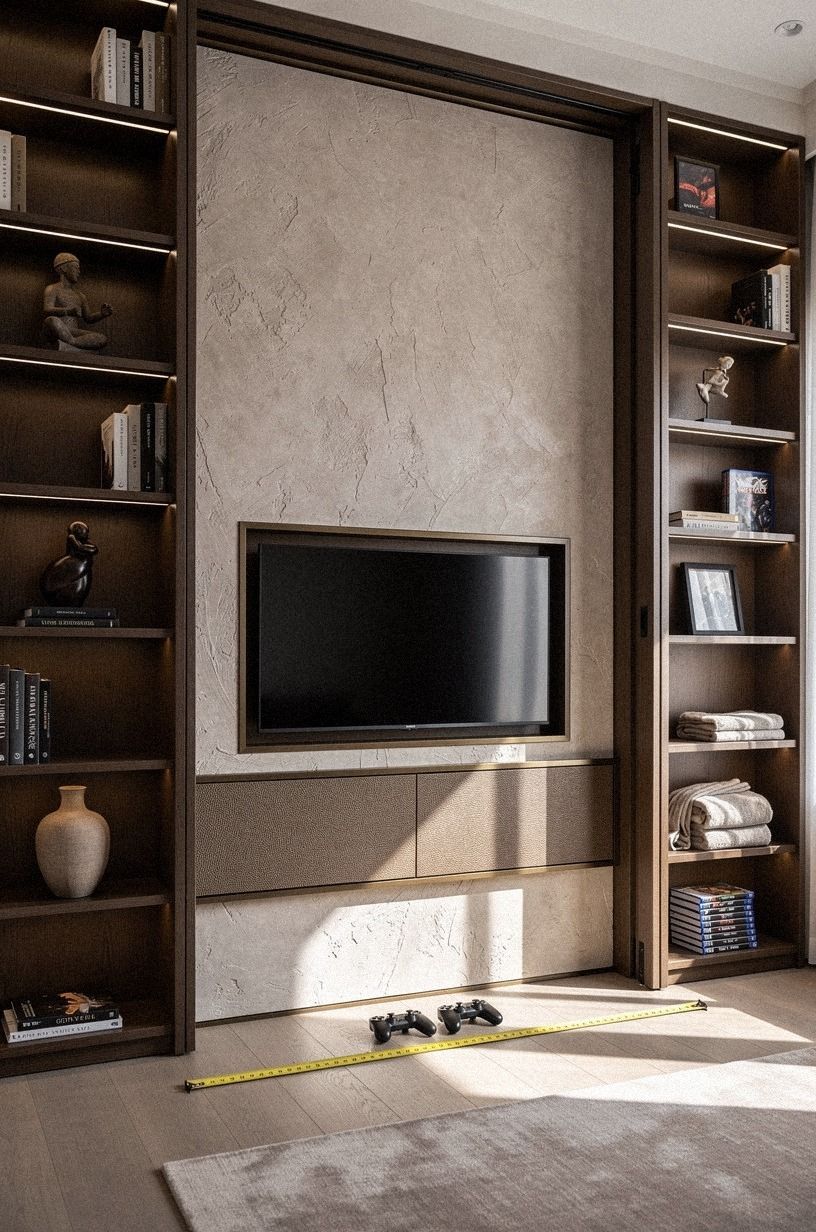
This is where I stopped guessing and pulled out the tape.
3Build a slatted panel for the console door
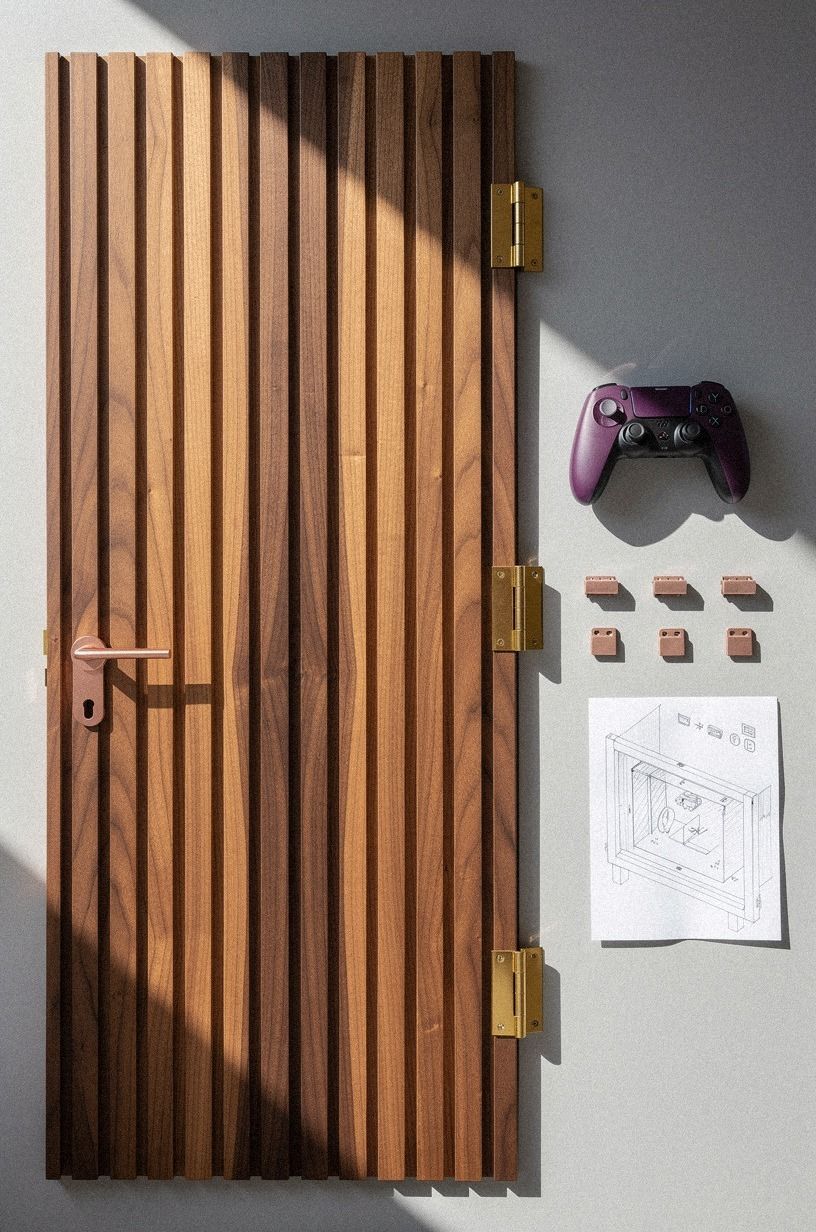
The console door was the make-or-break detail, because a flat slab would’ve looked like you were hiding a printer. I built a slatted panel instead, using book-matched walnut strips so the grain had movement even when the door was closed.
Brass hinges helped, but the real win was the depth from the slats. You get texture, airflow, and a reason for the panel to exist beyond pure camouflage.
I laid everything out overhead before drilling anything: slats, cable clips, hinge spacing, even the controller footprint. That saved me from one of my favorite dumb mistakes, finishing a panel before confirming the handles and vents.
If you want the wall to feel more like custom joinery than gadget storage, bookshelf-door inspiration is worth a look. Small build. Big payoff!
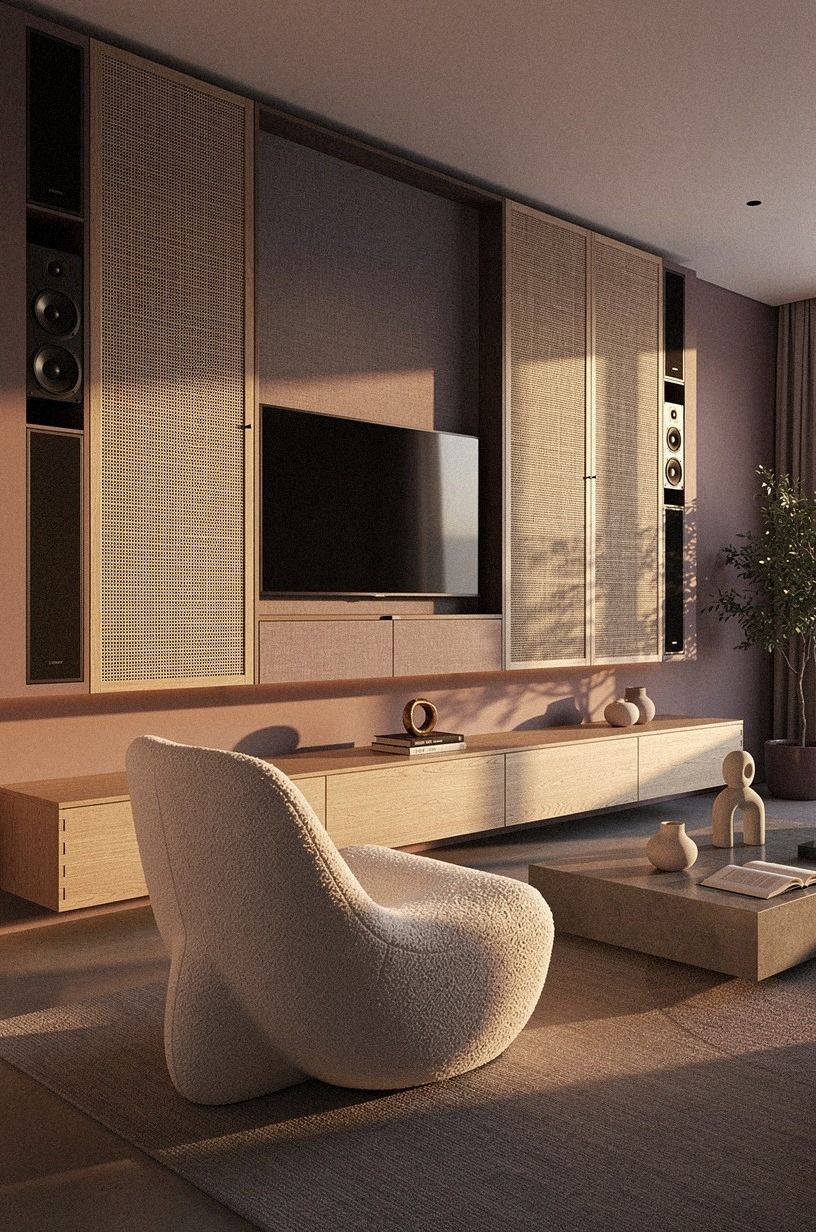
4Slide the gaming desk behind pocket cabinets
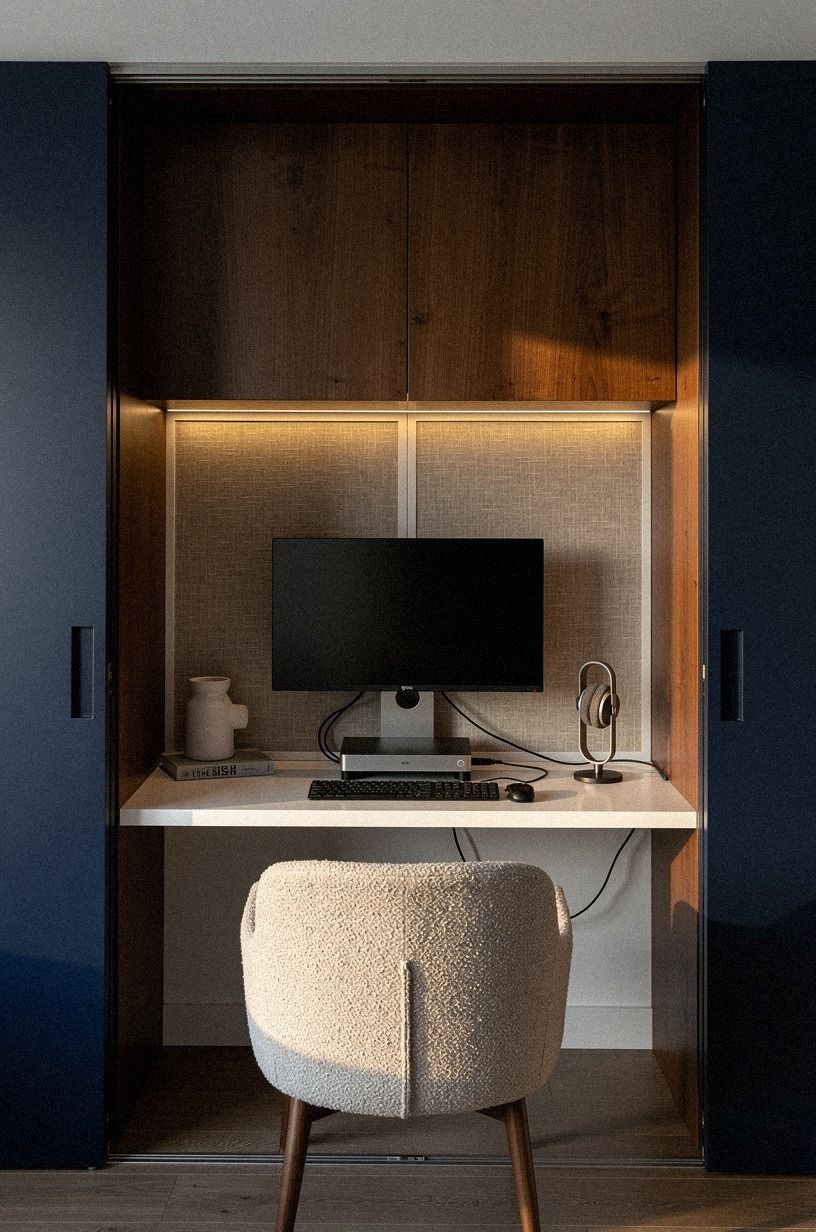
Pocket cabinets changed the whole tone of the room because they let me have a full desk without living with it visually. When the navy and walnut doors were open, the monitor, compact console, and keyboard had a clean, framed place to sit.
When they were closed, it went right back to looking like a grown-up built-in. That’s the kind of compromise you can live with every day.
You do need to think about depth here. A desk hidden behind cabinetry still needs enough room for your knees, cables, and that small panic move when you push the chair back too fast. I kept the workspace restrained and let organic bouclé soften the hard edges nearby, which stopped the bay from feeling cold.
If you like rooms that conceal purpose without turning theatrical, this hidden bar behind a bookcase has the same satisfying reveal energy.
5Mount the monitor on a swing-arm panel
A fixed screen would’ve locked the whole nook into one angle, so I put the monitor on a swing-arm panel instead.
6Hide controllers inside a lift-top coffee table

I didn’t want controllers stacked in a basket where everyone could see them, and I didn’t want to walk across the room every time we switched from movie mode to game mode. So the lift-top coffee table became the stash point. A table that’s 16 to 18 inches tall already sits in the right visual zone for the sofa, and when the top lifts, the gamepads are there without becoming decor.
This works best when the table is about two-thirds the sofa length, because the proportions feel right even with the top open. I leaned into oak veneer and a warm matte finish so it still read as living-room furniture first.
And yes, I tried the cute decorative box route. Annoying. If you like concealed storage that keeps things close at hand, under-stairs storage ideas with hidden access will feel very familiar.
7Run cable channels under the area rug
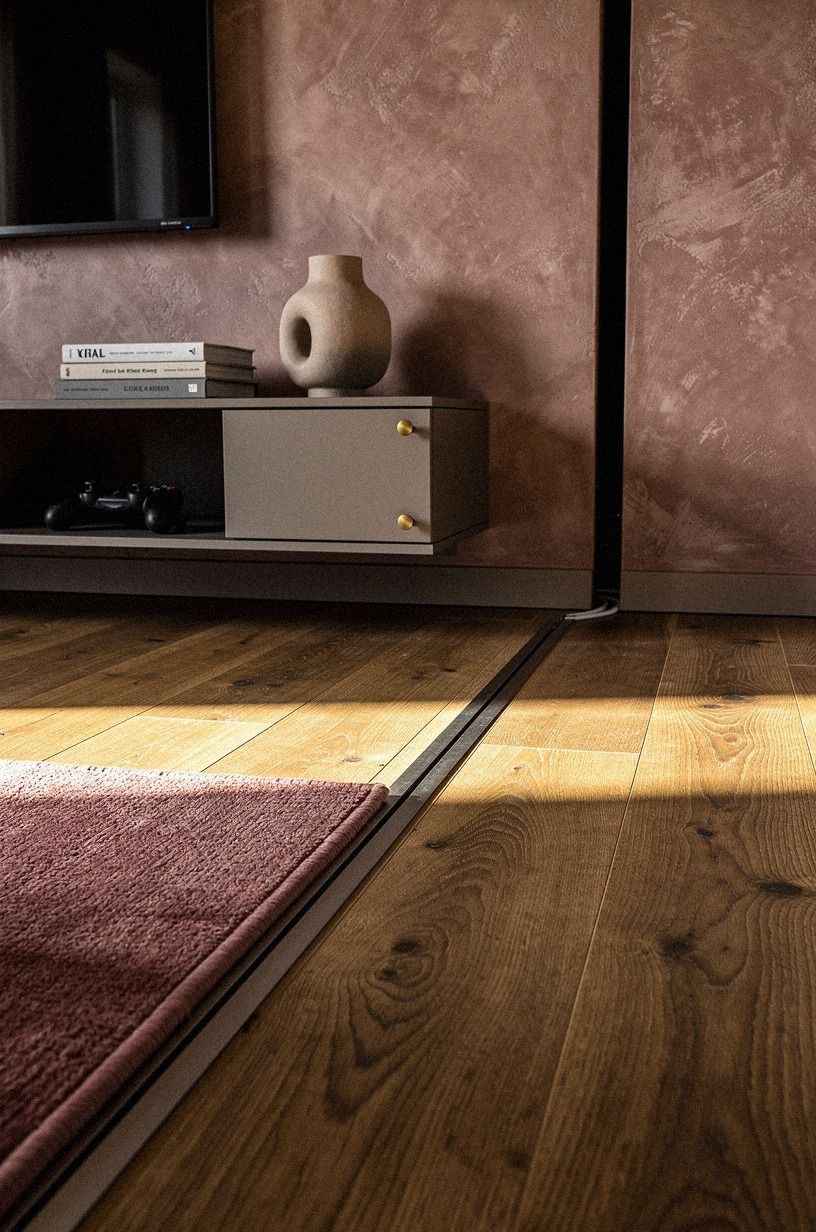
Cables were the part that made the room feel temporary, even after the cabinetry went in.
8Add blackout curtains behind the sofa wall
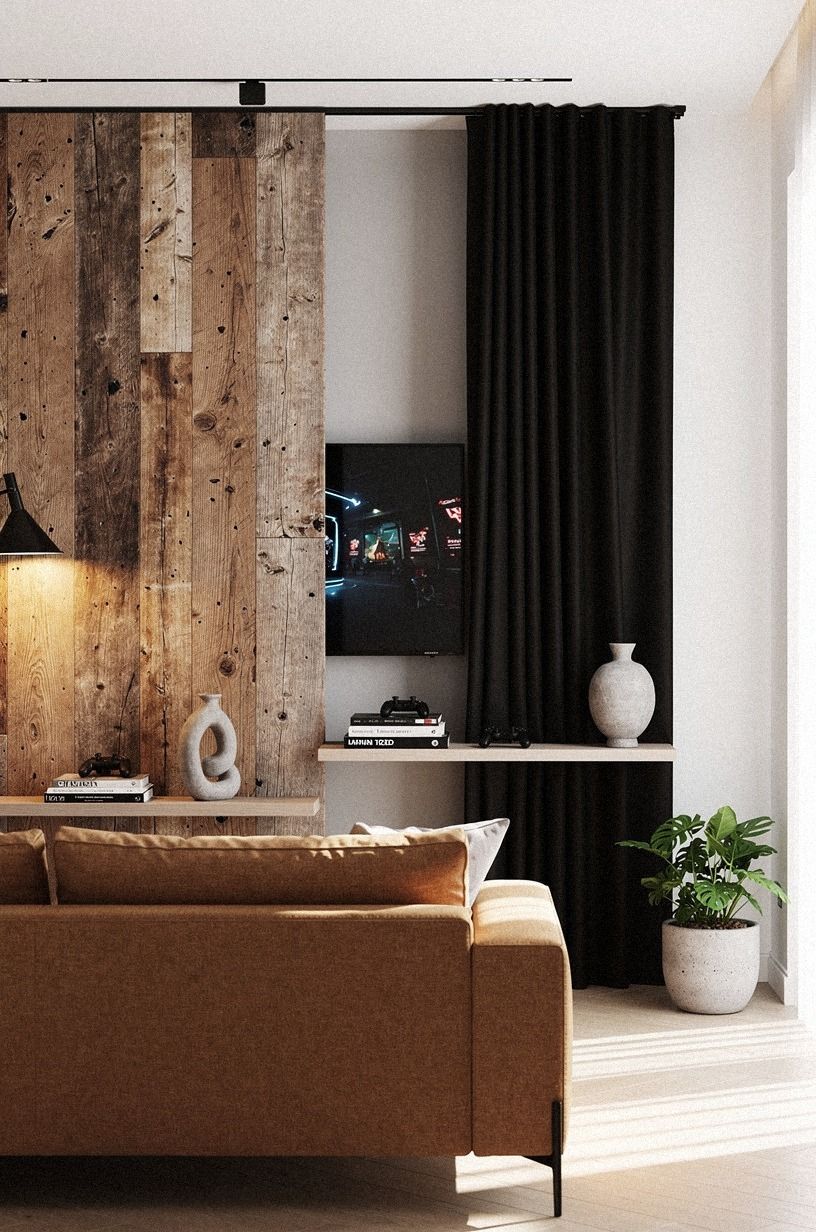
The curtain move came later, after I realized the screen looked washed out every afternoon. I pushed the camel sofa forward a touch and hung blackout curtains behind the wall line so the nook could darken without forcing the whole room into cave mode.
You don’t need theater darkness. You need control.
That’s why I chose Belgian flax linen over anything shiny, with a blackout lining hiding at the back.
This is also where I learned restraint matters more than drama. Heavy, obvious drapes would’ve made the wall look suspicious, and that’s the opposite of what you want. I kept the rod quiet and let the fabric read like a normal window treatment extension.
If you’re working with a rental, this closet hideout article is useful because the same tension-rod thinking applies. And the room looked calmer immediately!

9Paint the gaming nook in midnight green
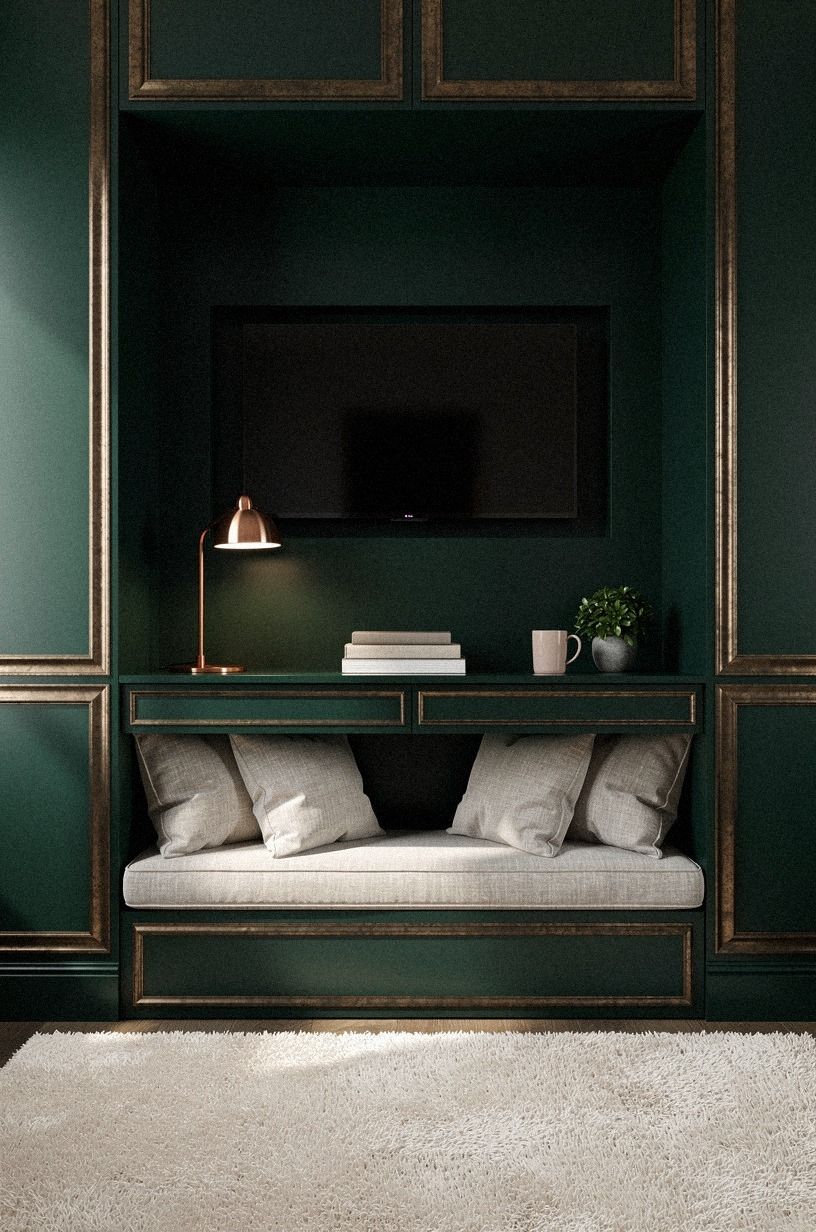
Color was what finally made the nook feel intentional instead of tucked away.
10Install dimmable sconces inside the hidden bay
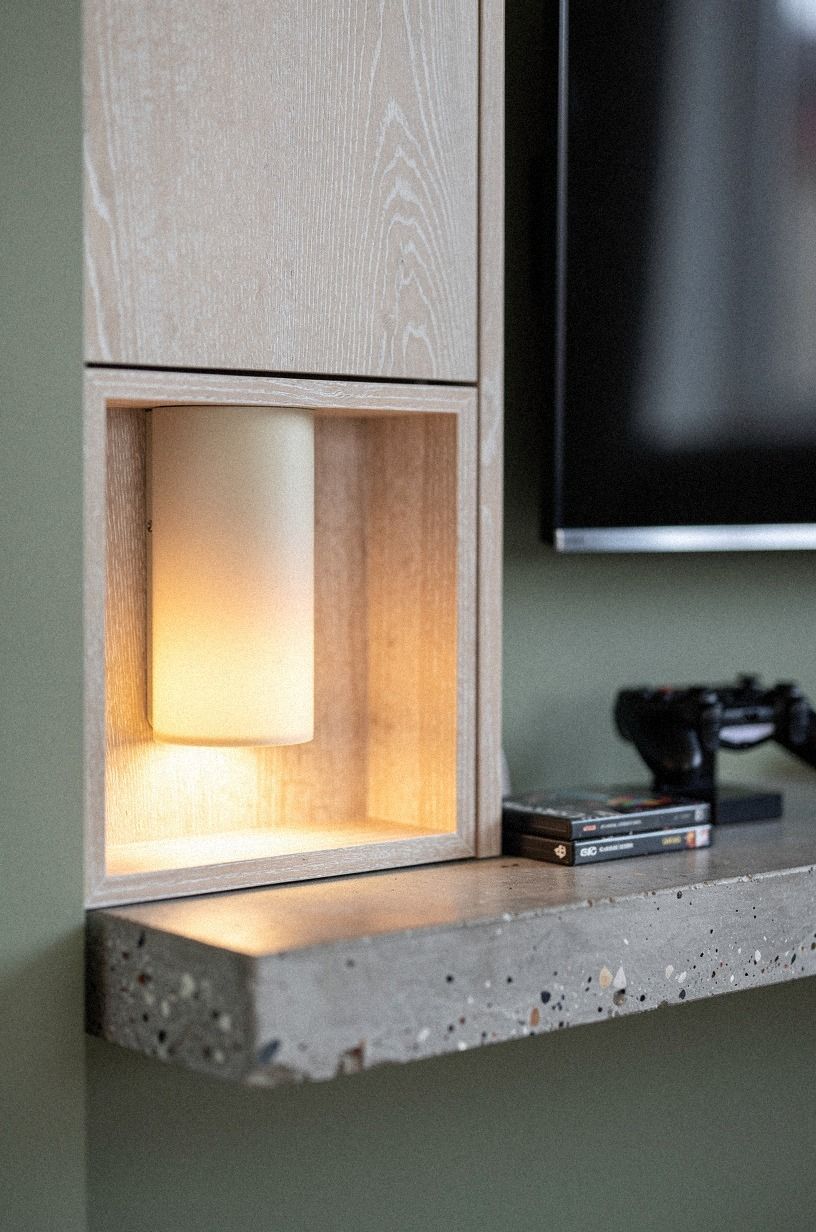
Overhead light was ruining the mood, full stop. So I skipped it and tucked dimmable sconces right inside the bay, where they could wash the cerused white oak edge and leave the screen area calm. The light sat warm and low, more amber than bright, and that made the setup feel like part of the room at night instead of a screen glowing in a closet.
I like this better than LED-only lighting because you get shape, not just shine. A small cream sconce with a dimmer gives your eye a landing spot, especially when the monitor is off and the nook needs to look finished.
And if you’re wondering whether one fixture matters that much, yes, it does. Why spend all that time hiding the setup if the light gives it away the second you switch lamps on?
This hidden entrance roundup is a good reminder that mood sells the disguise.
11Frame the entrance with matching picture molding
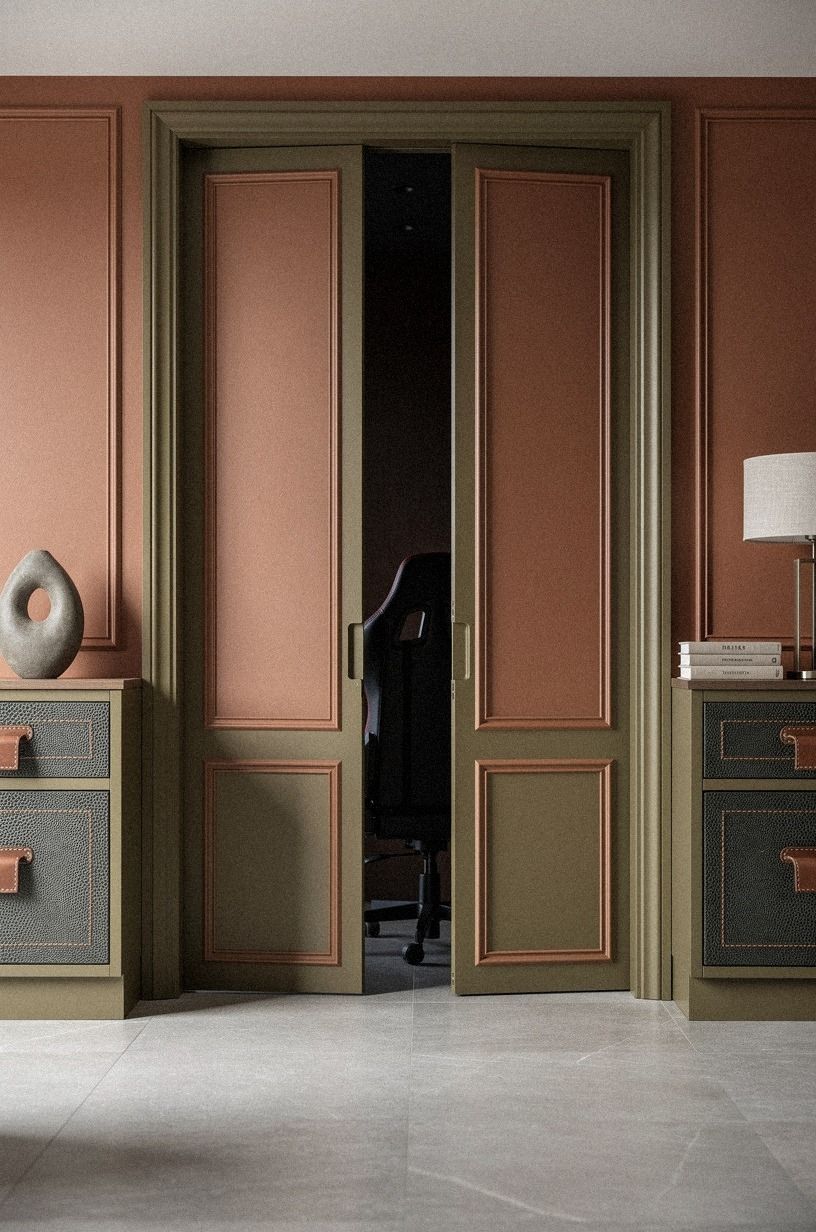
This step was pure deception, and I mean that as a compliment. Once I framed the entrance with picture molding that matched the rest of the wall, the gaming nook stopped reading like an inserted feature.
It looked original. I repeated the terracotta and olive panel rhythm from the room, kept the molding depth consistent, and let stone-toned flooring run straight through so nothing shouted, look here.
The best part is that molding makes cheap paneling look better than it is. You don’t need historic millwork money to get a convincing frame.
You need alignment. I measured every reveal twice because even a slightly off panel line will bother you every single time.
If you love the idea of a hidden threshold that still belongs in the room, this bookshelf-door article shows why matching trim is usually the smartest money.
12Disguise the headset hooks as brass pegs
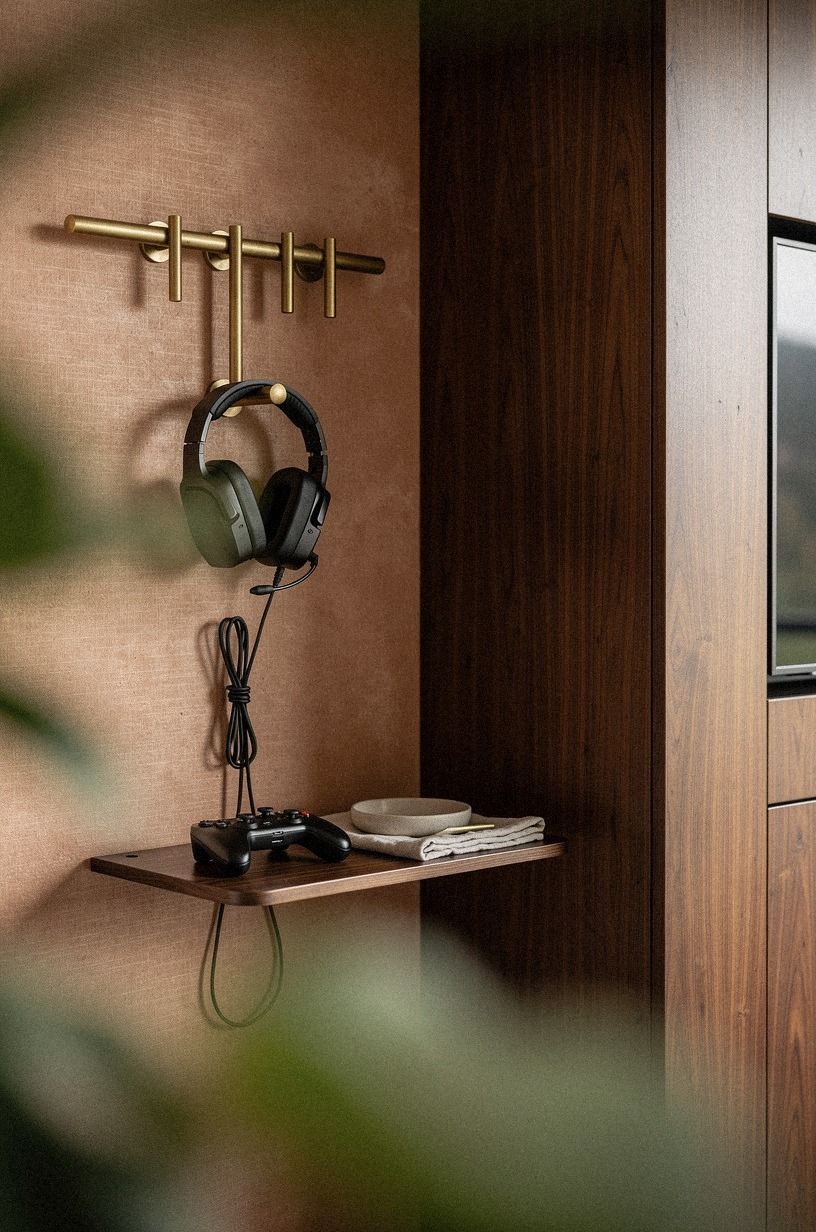
My headset was the one object that kept dragging the nook back into teenage-bedroom territory.
13Tuck speakers behind woven cabinet fronts
Speakers are hard because they want sound and you want silence, visually at least. Woven cabinet fronts were my answer.
I tucked the speakers behind the panels so the wall stayed soft and layered, not full of black boxes staring back at you. In a room already leaning plum gray, rose gold, and wood, woven cane kept the texture alive while the speakers disappeared into the cabinet rhythm.
This was one of those ideas I almost talked myself out of because I thought it might muffle too much. It didn’t, not in our room.
What did matter was keeping enough breathing space inside the cabinet so nothing sounded boxed in. If you’re weighing concealment against performance, this hidden bar bookcase story is useful because good concealment still needs air, swing, and access. You can’t fake those.
14Layer acoustic panels under framed artwork
I didn’t want the wall to look like a studio, so I hid the sound treatment under art.
15Store game cases in false book spines
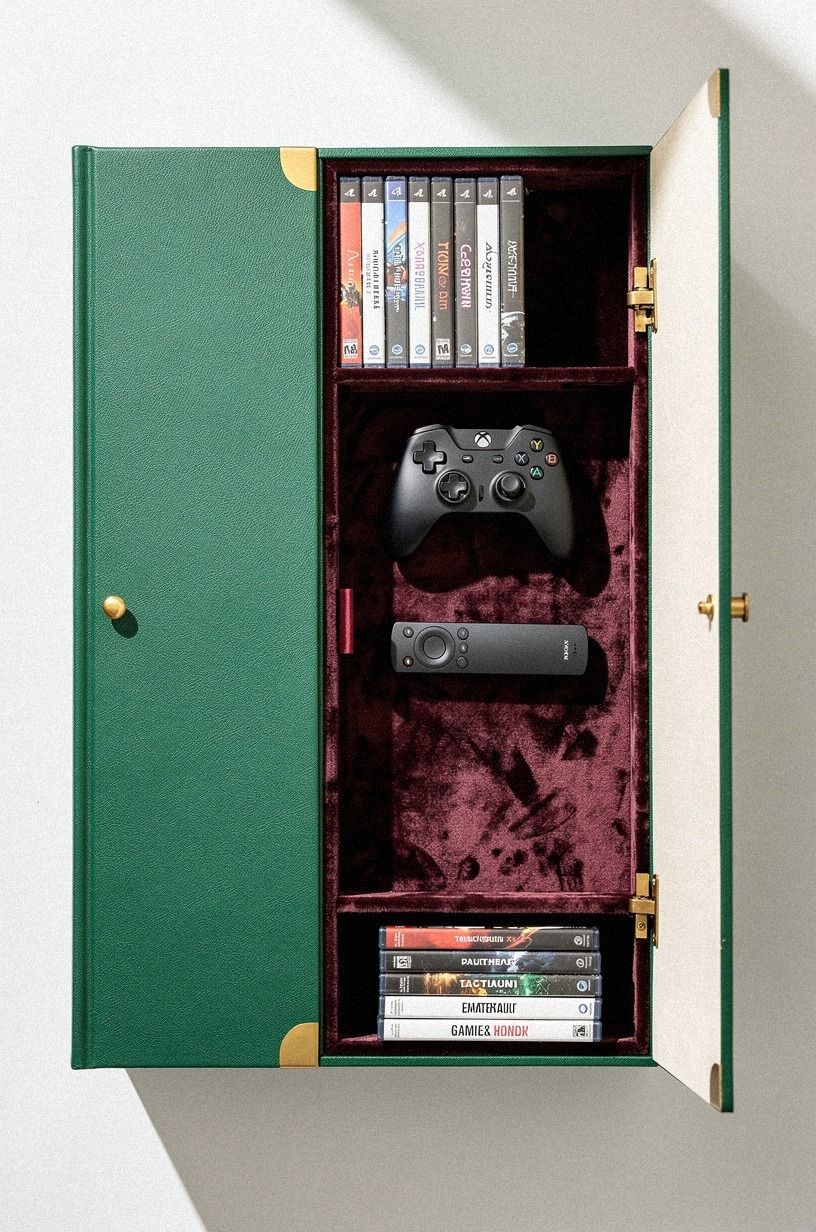
This idea sounds fussier than it is, but it solved one of the most annoying clutter problems in the room. I used false book spines in emerald and cream so a row of cases could sit right on the shelf without looking like cases.
Open one, and there’s the game storage. Closed, it just reads like styling.
That’s the Library Bluff Method, and if you already have built-ins, it’s almost unfair how well it works.
I kept the fake volumes slim, mixed them with a remote and one real controller, and stopped before it felt too clever. That’s the line. If every shelf is trying to wink at you, the wall gets campy fast.
But one small cluster near the console niche? Perfectly believable.
detail bookshelf door inspiration is the broader version of this idea, just applied to the whole wall instead of one shelf.
16Place a swivel chair facing the detail wall
The chair angle mattered more than I expected, because the room needed to function when nobody was playing.
17Add LED strips under the floating shelves
I was skeptical about LED strips because so many of them scream setup room in the worst way. But tucked under floating shelves, they became background glow instead of nightclub lighting. The key was hiding the strip itself and choosing a warm setting that played nicely with dusty rose, charcoal, and oak.
That’s the Afterglow Shelf Rule: if you can see the diode, you’ve already lost.
I kept the light line subtle, more like a soft underline than a statement, and let negative space do the rest. You want enough glow to make the shelves float at night, not enough to turn your wall into a theme park.
But this is one place where restraint looks expensive. If you like hidden lighting that feels architectural, this under-stairs hideaway article shows the same low-key approach in another small zone.
18Close everything behind push-latch living room panels
The final step was the one that made the whole project feel finished: push-latch panels that closed flush and turned the setup back into a living room. No pulls, no obvious breaks, no visual noise. One washed Belgian linen panel sat just proud enough to look layered, while the rest of the wall stayed warm white, camel, and black.
Closed, you would never guess a monitor, console, and speaker system were sitting inches behind it.
And that’s the version of hidden gaming I wanted all along. Not theatrical.
Not gimmicky. Just calm.
If you’re trying to build cool detail rooms in houses without sacrificing your main room, this hidden entrance guide is the right rabbit hole. The room still works for guests, movie nights, and regular Tuesday life, which is the whole point.
And that’s what made me keep it!
How much it cost
I kept my version in the wide space between a style refresh and a full custom wall, which is why this project felt realistic instead of fantasy. The cabinetry work, paint, lighting, and a few storage swaps did most of the heavy lifting.
My honest take: the expensive part wasn’t the screen, it was making the wall believable. Once that clicked, the gear almost became the cheap part.
My own shopping stayed in the overlap between budget and mid. Paint, panel materials, lighting parts, and storage changes landed around $2,184, plus two weekends and one very dusty Friday night.
If you’ve already got the sofa and rug, you can spend far less. If you’re adding custom millwork, you’ll climb fast.
But I’d still spend on the wall first, because every cheap object looks better once the structure is right.
Why hiding it changed the whole room for me
What surprised me most was that this project wasn’t really about gaming. It was about permission.
I wanted the room to hold two moods at once: quiet living room, then deep-focus setup, then back again without a dramatic reset. Before this, I kept thinking the answer was to buy prettier gear, or fewer things, or one more basket.
It wasn’t. The answer was to stop asking visible objects to do invisible work.
I also learned that concealment only feels good when it isn’t fussy. If you have to move six objects, lift two lids, and drag a chair from another room, you’ll quit using the setup the way you imagined.
That’s why the best decisions here were the least glamorous ones. The chair swivel.
The cable path. The panel depth.
The inch or two that let the monitor arm clear the trim. You feel those decisions every day, even if nobody compliments them.
And I think that’s why this kind of room is having a moment in 2026. Our living rooms do too much now.
They stream, work, host, nap, charge, and catch every random object we drop on the way in. A hideaway room inside the main room isn’t indulgent, it’s practical.
You get function without letting the tech dominate the mood. I went back and forth on whether that was too precious, but once the wall started closing cleanly, I was sold.
Would I do anything differently? I would’ve committed to the darker nook paint sooner, and I wouldn’t have wasted time trying to style visible controllers into the room.
They never looked intentional. They looked tolerated.
Once I accepted that, the whole project got easier. You don’t need to pretend the gear is decor.
You need to give it a home so the room can breathe.
The Questions I Get Asked Most
What is the best Detail Gaming Room Ideas for the Ultimate Hidden Setup for a small living room?
A wall bay behind the sectional is the best place to start because it uses space you already own. A compact swivel chair and a lift-top table do more than oversized gear.
Think low profile, soft finishes, and one believable wall story. An IKEA KALLAX nearby can help with overflow.
Where can I buy Detail Gaming Room Ideas for the Ultimate Hidden Setup pieces on a budget?
I start with IKEA, Target, and Wayfair because you can mix storage, lighting, and small furniture without blowing the plan up. Facebook Marketplace is still my favorite wild card. Old cabinets, side chairs, and picture frames often need paint, not replacement.
How much does a Detail Gaming Room Ideas for the Ultimate Hidden Setup makeover cost?
Most living-room versions land somewhere between about $300 and $8,000, depending on whether you’re styling, adding furniture, or building millwork. Free help counts too. Reusing your sofa, shifting your rug, and repainting the nook can change the room before you buy much.
Can I create a Detail Gaming Room Ideas for the Ultimate Hidden Setup on a budget?
Yes, and you don’t need custom cabinetry to start. Paint, paneling, and storage discipline do a lot. Low-cost moves: moving the sofa forward, hiding cables under an 8×10 rug, adding secondhand art over acoustic panels, and using a lift-top table instead of new built-ins.
Is a Detail Gaming Room Ideas for the Ultimate Hidden Setup worth it in a small space?
Yes, especially in a small room. Small spaces make concealment easier because every inch has to earn its place anyway. Keep your chair low, your table around two-thirds the sofa length, and your screen centered so the room still reads balanced when you’re not playing.
Is Detail Gaming Room Ideas for the Ultimate Hidden Setup a good idea for a rental?
Yes, if you lean on no-damage swaps. Tension rods, removable channels, and freestanding storage get you most of the effect without risking your deposit. I’d skip permanent millwork and focus on curtains, paint-safe solutions, and furniture that can move with you later.
Where I’d Start First
If I had to pick one, I’d start with the wall behind the sectional. That’s where clutter turns into architecture, and once the wall reads intentional, every controller, cable, and light choice stops fighting the room. Pin this idea for later and build the disguise before you buy more gear.