There’s something undeniably special about a well-crafted charcuterie board – the careful arrangement of cured meats, cheeses, and accompaniments that transforms simple ingredients into an edible work of art. My journey with charcuterie began in Lyon, France, where I apprenticed under a third-generation charcutier who taught me that presentation is as crucial as quality. Today, I’m sharing my take on portable charcuterie jars – a brilliant marriage of traditional French preservation methods and modern convenience that brings the same rustic elegance to picnics, parties, or intimate gatherings.
The Story Behind Charcuterie Mason Jars
Charcuterie (pronounced “shar-koo-tuh-ree”) comes from the French words “chair” (flesh) and “cuit” (cooked), dating back to 15th-century France when salting, smoking, and curing meats extended their shelf life before refrigeration existed. While the presentation in mason jars is decidedly modern, it honors the same principle that guided medieval French butchers – creating beautiful, portable provisions that showcase preserved delicacies.
My grandmother, who grew up in Provence, would pack similar layered picnics in waxed paper when we’d visit the countryside. These mason jar adaptations capture her meticulous attention to flavor balance while adding the convenience today’s home entertainers crave.
Essential Ingredients
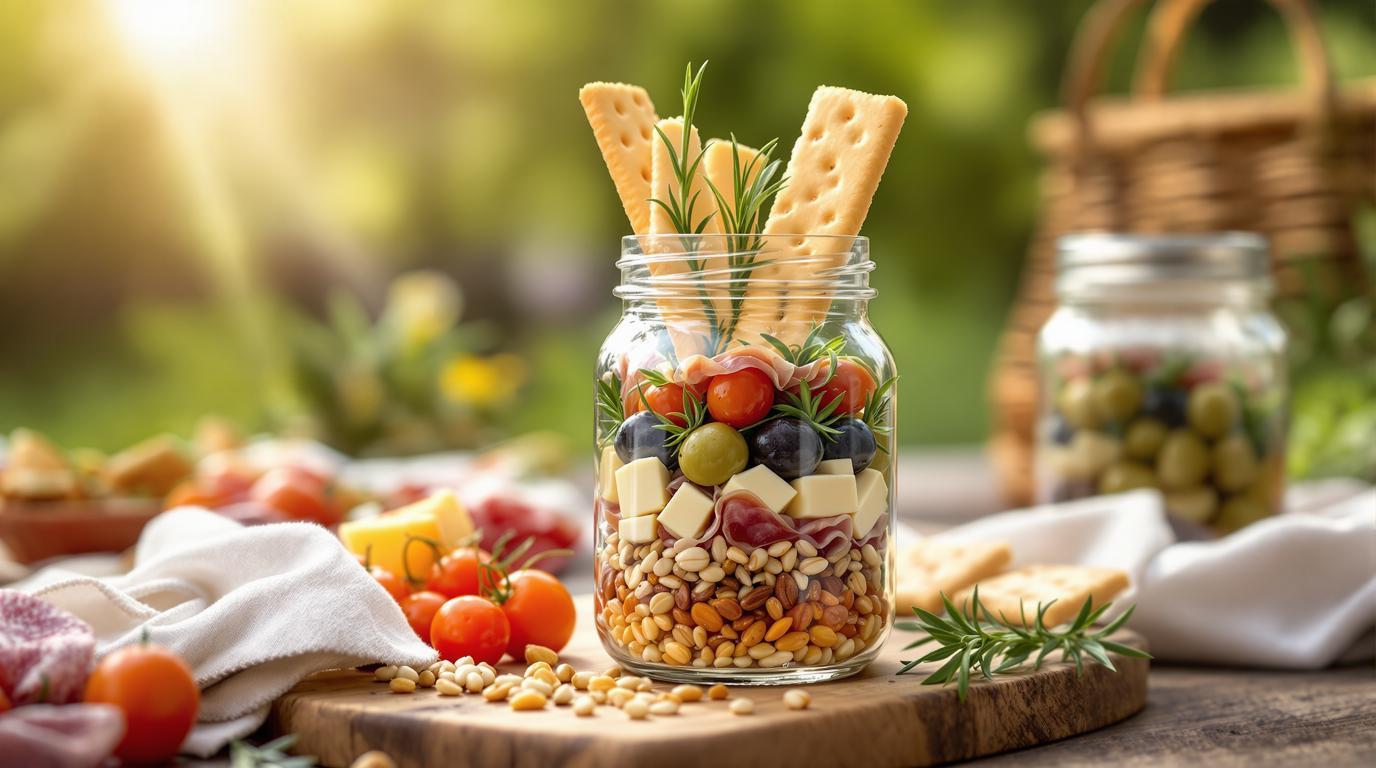
For each jar (makes 6 pint-sized jars):
- ½ cup (60g) mixed nuts (walnuts, Marcona almonds, pistachios)
- 4 slices cured meats (prosciutto, salami, coppa)
- 2½ oz (70g) mixed cheeses (aged cheddar, Manchego, Brie)
- ¼ cup (35g) olives (Kalamata, Castelvetrano)
- 2 mini pickles or cornichons, halved
- ¼ cup (40g) fresh berries or cherry tomatoes
- 8-10 crackers or 1 small baguette slice
- Fresh herb sprigs (rosemary, thyme, basil)
- 6 bamboo skewers, trimmed to jar height
Chef’s Note: Quality matters immensely with charcuterie. I recommend visiting a proper cheese shop for your selections. The complexity of a well-aged cheese or properly cured meat creates depths of flavor that supermarket varieties simply can’t match. Remember, these jars showcase ingredients in their purest form – there’s nowhere to hide mediocre quality.
Step-by-Step Instructions
1. Begin by trimming your bamboo skewers to be about 1 inch (2.5cm) shorter than your jar height. This prevents awkward protrusions when the lid is closed.
2. Create a foundation by placing nuts at the bottom of each jar, filling approximately ¼ to ⅓ of the space. This not only provides a sturdy base for your skewers but introduces essential textural contrast.
3. Fold cured meat slices into attractive shapes – I find accordion pleats or rosettes particularly beautiful. Experienced charcutiers know that meat should be rolled or folded rather than laid flat to enhance texture and mouthfeel.
4. Assemble skewers by threading alternating pieces of cheese cubes, meat rolls, olives, and cherry tomatoes. This creates visual interest while ensuring complementary flavors in each bite.
5. Carefully insert skewers into the nut layer, spacing them evenly around the jar’s circumference. The nuts should secure them in place, creating a vertical presentation.
6. Tuck crackers or baguette slices around the perimeter, standing them vertically between skewers. This provides structural support while making them easy to retrieve.
7. Fill remaining spaces with additional olives, cornichons, and berries, creating a visually abundant presentation. Remember to leave some breathing room – about ½ inch (1.25cm) from the top.
8. Finish with fresh herb sprigs tucked between components for color, aroma, and subtle flavor infusion.
Chef’s Secret Techniques
The difference between amateur and professional charcuterie lies in temperature control. Always bring cheeses to room temperature before assembly – about 30-45 minutes on the counter. Cold cheese has muted flavors and improper texture. Conversely, refrigerate the assembled jars for 15-20 minutes before serving to firm everything up for the perfect presentation.
For meat roses (a showstopping technique), overlap salami slices halfway along their length, then roll the stack tightly from one end. The resulting spiral creates a beautiful flower effect that adds professional polish to your jars.
While homemade quick pickles elevate any charcuterie, you can substitute jarred varieties when pressed for time. The tangy acidity cuts through rich meats and cheeses, cleansing the palate between bites.
Serving & Presentation Tips
These charcuterie jars pair beautifully with a sparkling raspberry mint cooler for casual gatherings or a medium-bodied red wine for more formal occasions. If you’re looking for additional nibbles, crispy pasta chips or frozen banana bites offer delightful contrasts.
For the ultimate picnic spread, complement your charcuterie jars with a Mediterranean chickpea salad – the bright, fresh flavors provide perfect balance to the rich, savory elements in your jars.
Remember that charcuterie is meant to be enjoyed at a leisurely pace, savoring each unique combination of flavors. I’ve found these jars create natural conversation starters, with guests admiring their beauty before discovering the delicious treasures inside. There’s something genuinely satisfying about watching someone’s eyes close in appreciation when they experience that perfect bite – a little cheese, meat, and something pickled, all in perfect harmony. It’s why, after all these years in professional kitchens, I still believe the simplest preparations often create the most profound dining experiences.