There’s something truly magical about transforming a humble zucchini into something that rivals traditional pasta. In my grandmother’s village outside Naples, vegetables often replaced more expensive ingredients, creating what Italians lovingly call “cucina povera” – poor kitchen cooking. These zucchini lasagna rolls embody that spirit of resourcefulness while delivering incredible flavor. I first made these for a dinner party where several guests couldn’t eat gluten – they were so popular that they’ve become a staple in my summer cooking rotation ever since.
The Art of Perfect Zucchini Ribbons 🌱
The foundation of this dish lies in properly preparing your zucchini. Select medium-large specimens with firm, unblemished skin. When I’m teaching culinary students, I always emphasize that this is one technique where precision matters tremendously.
“The thickness of your zucchini slices determines whether your rolls will be pliable enough to work with or too rigid to cooperate,” I explain. Using a mandoline set to ¼-inch thickness is ideal, but a steady hand and sharp knife will also do the job. The most critical step – one my nonna would never skip – is salting those slices to draw out moisture.
Lay your zucchini ribbons on paper towels, sprinkle with kosher salt, and let them rest for 15-20 minutes. This draws out excess moisture that would otherwise make your dish watery. Pat them completely dry before proceeding – a step many recipes neglect to emphasize but makes all the difference.
Chef’s Note: For even more pliable zucchini, pre-bake your salted, dried strips at 400°F for 10 minutes. This extra step further reduces moisture and makes rolling significantly easier.
The Perfect Filling: Balance of Textures and Flavors 🧀
My filling combines 1 cup whole-milk ricotta (never use part-skim – the texture simply isn’t the same), ⅓ cup freshly grated Parmigiano-Reggiano, 1 egg to bind, and a teaspoon of minced fresh herbs. I prefer basil and parsley, but dried Italian seasoning works in a pinch.
For those seeking more protein, brown ¾ lb Italian sausage until no longer pink, drain thoroughly, and fold into your cheese mixture once cooled. If you’re making these vegetarian, consider adding ¼ cup wilted spinach or sautéed mushrooms for depth of flavor.
The filling should be spreadable but not runny – similar to the texture of good frosting. Season judiciously with salt and pepper, remembering that the Parmesan already contributes significant saltiness.
Assembly: Where Patience Pays Dividends 🍃
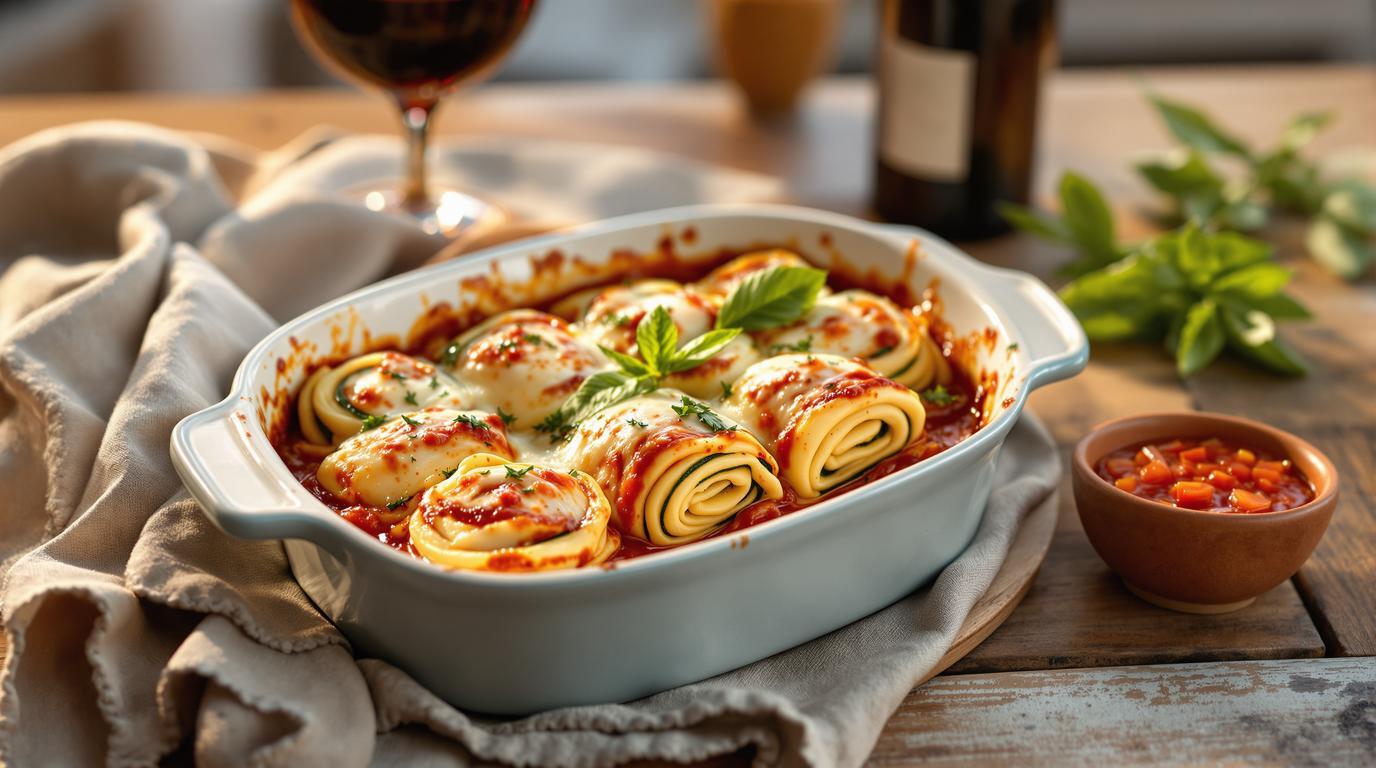
Begin by spreading ½ cup of high-quality marinara sauce in your baking dish. Working one at a time, spread about 1 tablespoon of filling across each zucchini strip, being careful not to overfill (a common mistake that leads to messy rolls).
Roll each strip from one end to the other, tucking in any filling that tries to escape, and place seam-side down in your prepared dish. Once all rolls are nestled together, top with the remaining 1 cup of marinara and 1½ cups shredded mozzarella.
Bake at 375°F for 25-30 minutes until the cheese is bubbling and lightly golden. Allow to rest for 5 minutes before serving – a crucial step that lets the rolls set up properly.
Serving Suggestions: Complete the Experience 🍷
These rolls pair beautifully with a chilled cucumber soup for a light summer meal, or alongside air fryer corn ribs for a more substantial dinner. For dessert, consider a refreshing mango sorbet or frozen yogurt bark with berries.
I recommend serving with a light-bodied Chianti or Pinot Grigio, which won’t overpower the delicate flavors. A final drizzle of high-quality extra virgin olive oil and scattered fresh basil leaves elevates the presentation to restaurant quality.
These zucchini rolls also keep beautifully for 2-3 days in the refrigerator, making them perfect for meal prep. For a quick protein boost, consider adding a tablespoon of chia seeds to your filling.
Remember, cooking is as much about technique as it is about ingredients. Take your time with each step, and you’ll create a dish that honors both tradition and modern nutritional wisdom – something my grandmother would certainly approve of.