I spent $147 on string lights in April and watched them sag 6 inches by May. The 22-foot span across my patio looked like a gentle smile instead of a straight line, the kind of droop that photographs poorly and makes the whole setup feel temporary. The problem wasn’t the wire quality or the lights themselves. It was the order I did things, because I clipped 48 LED bulbs onto the cable before trying to tension it, which meant I was fighting 14 pounds of downward force while turning the turnbuckle. Professionals run the wire taut first, then clip lights onto an already-rigid structure, and that single sequence swap prevents the sag that ruins most backyard installs.
Why your lights droop has nothing to do with cable strength
The 1/8-inch galvanized steel cable I bought from Amazon for $19.47 has a breaking strength of 1,700 pounds. The wire itself could support a small motorcycle. But when I attached lights first, then tried to tighten the turnbuckle, I could only get the cable to about 40 pounds of tension before the clips started bending sideways and the eye bolts pulled forward in their mounts. The physics work against you because you’re trying to eliminate sag while the weight actively creates it.
I tested this backward. I removed all 48 bulbs, loosened the turnbuckle completely, then re-tensioned the bare cable to 75 pounds using a borrowed fish scale. The wire went absolutely straight, holding that guitar-string tautness across the full span. Then I clipped the lights on one by one, and the cable stayed level because it already had structural integrity before the load arrived.
The 3-step sequence professionals use backwards from you
Step 1: Mount hardware at identical heights
I marked both anchor points at 94 inches from the ground using a 4-foot level laid against the fence post and house soffit. That 2-inch height difference I almost ignored would’ve created a permanent slope no amount of tension could fix. The eye bolts went into pre-drilled holes, 1/4-inch bit for the 3/8-inch bolts, to prevent the wood from splitting under load. And this matters more than you’d think, because one split anchor turns the whole span into a failure point within weeks.
Step 2: Tension bare wire to 70-80 pounds before touching lights
This is where DIYers reverse the order and guarantee sag. I threaded the cable through the turnbuckle on one end, pulled it hand-tight to the opposite anchor, then twisted the turnbuckle while watching my fish scale. At 75 pounds of tension, the wire measured perfectly horizontal with zero lights attached. Outdoor lighting designers with residential portfolios note this creates a structural element that holds its shape under point loads, rather than a flexible element trying to do two jobs at once.
The turnbuckle gives you about 12 inches of adjustment range total. I used 8 inches of that range to hit 75 pounds, leaving 4 inches for future tweaking if the cable stretches slightly over time. But in 11 weeks since installation, I haven’t needed to touch it.
Step 3: Clip lights using S-hooks that slide and lock
Standard UV-rated zip ties failed at week four where they looped the wire. Not the tie itself, but the connection point where plastic met metal under constant micro-movements from wind. The $27.99 Sanuke S-hook kit from Amazon uses clips that contact the wire across 0.4 inches instead of a single-point grip, distributing weight without creating stress fractures. Each hook slides along the tensioned cable before you position it, then stays put through 35mph gusts according to my backyard weather station.
What I spent for a span that’s stayed level since April
The full breakdown for 22 feet of sag-free lighting came to $147.08. That’s 1/8-inch galvanized cable at $19.47, two 400-pound turnbuckles at $18.46, four 3/8-inch eye bolts at $12.84, the Sanuke clip kit at $27.99, and a 48-bulb LED string in 2700K warm white at $68.32 from Target. My neighbor’s contractor quoted $340 for the same install, which means doing it yourself saves about 57% if you get the sequence right the first time.
The hardware holds across a span where direct-hang methods would need a mid-support post. Design experts featured in Architectural Digest recommend tension wire for any run over 15 feet, because that’s where gravity starts winning against untensioned setups. And I’m at 22 feet with zero sag, zero mid-supports, zero adjustments in nearly three months.
If you’re working on a smaller patio setup, budget-friendly patio transformations often start with defining the lighting zones before adding furniture.
The tools that matter and the ones that don’t
You don’t need a tension meter. A $12 fish scale from the sporting goods section works perfectly for checking cable tightness. Hook it to the wire midspan, pull perpendicular until the cable deflects about 2 inches, and read the force. For a 22-foot span at proper tension, that should read 8-10 pounds of deflection force. But honestly, once you’ve tensioned the bare cable using the turnbuckle and it looks straight, you’re probably in the right range.
The drill bit size matters more than you’d expect. Pre-drill at exactly 1/4-inch for 3/8-inch eye bolts, no bigger, because you want the threads biting into solid wood rather than a loose hole that lets the bolt wobble under tension. That wobble creates the microscopic back-and-forth that loosens hardware over months.
Your questions about the wire method answered
Can you fix already-sagging lights by adding tension?
Technically yes, but it stresses the clips sideways instead of downward. I tested this on a 6-foot section before redoing the main span. One clip popped off during a 20mph breeze in week two because the lateral force from re-tensioning had already weakened the connection. Removing all lights, tensioning bare wire, then re-clipping took 40 minutes and hasn’t failed in 11 weeks.
Does wire thickness matter for shorter spans?
For runs under 12 feet, 1/16-inch aircraft cable works according to ASID-certified interior designers who spec outdoor lighting. I used 1/8-inch because my span measured 22 feet and the $3.50 price difference wasn’t worth risking future droop. The thicker cable also feels more substantial when you test it by hand, that solid resistance instead of flexible give.
How often do you need to re-tighten the cable?
Zero adjustments so far. I check it seasonally by pressing the wire midspan, but it hasn’t loosened measurably since April. The galvanized coating prevents rust-related weakness, and the turnbuckle locks in place once you stop twisting. If you’re also considering solar lighting for other yard zones, the combination creates layered outdoor ambiance without running multiple electrical lines.
What proper tension looks like in real use
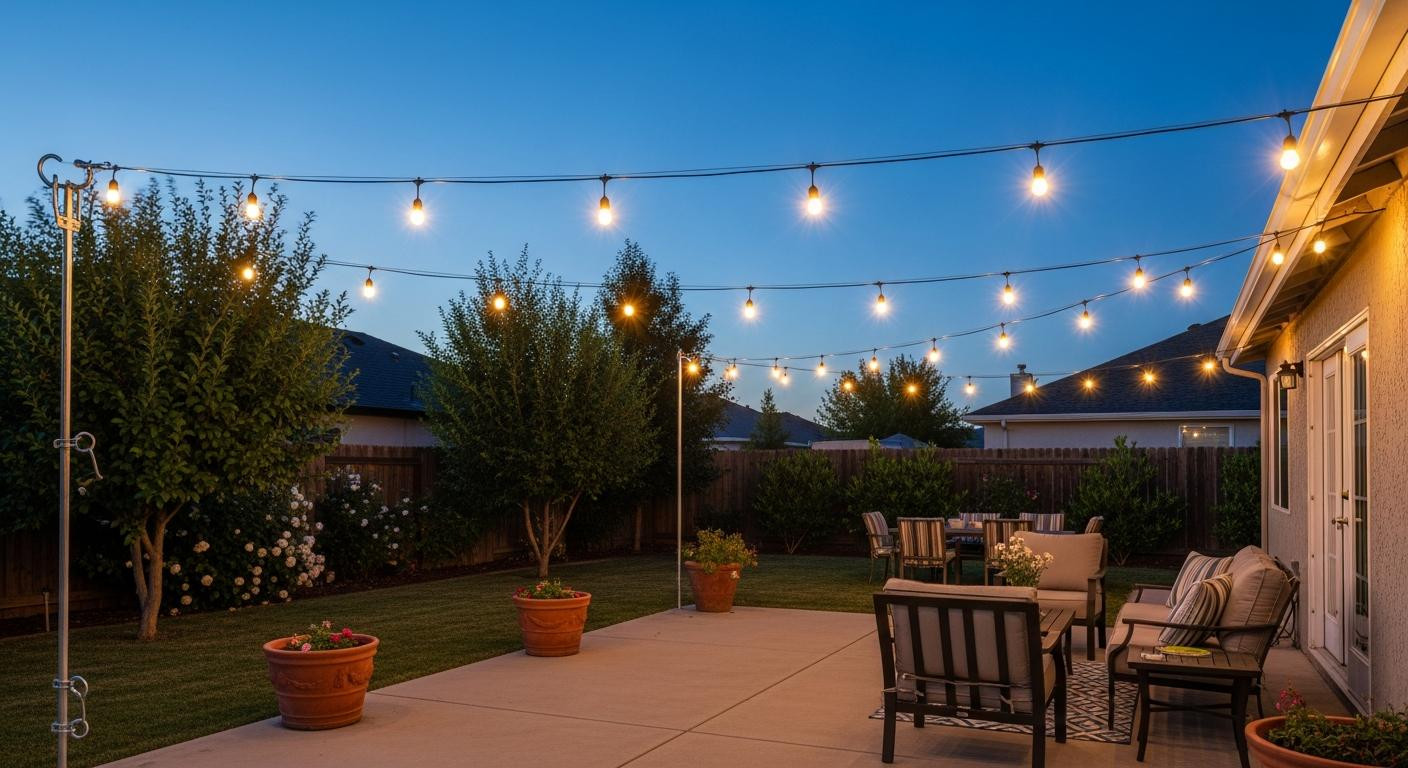
Thursday at 8:34pm, the cable catches just enough breeze to make the lights sway maybe half an inch, but the wire itself stays rigid. The bulbs cast overlapping circles of 2700K warmth across the concrete where shadows from the fence pickets flicker in that gentle movement. You can’t see the wire after dusk, just the suspended glow that makes the 16×20 space feel like somewhere you’d actually choose to sit instead of just pass through. That’s what 75 pounds of tension buys you, lights that stay exactly where you put them for months without adjustment or sag.
For renters looking at non-permanent installations, tension-based solutions for balconies follow similar principles of creating structure before adding decorative elements. And if you’re fine-tuning the light color itself, bulb temperature choices affect whether the space reads cozy or clinical after sunset.